Activity
This activity is based on the perimeter and area of rectangles. As a general introduction, have your students look at this rectangle where the side lengths are given as l and w.
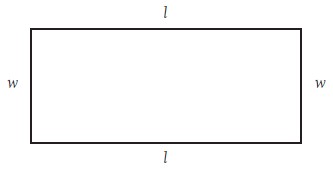
The area can be found by: area = l x w.
The perimeter can be found by: perimeter = 2 x l + 2 x w.
Problems that involve maximising or minimising one measurement while either holding the other constant or minimising it are common in the real world. Fred’s fence is typical of constrained maximisation or minimisation problems.
Students exploring question 1 are likely to try different side lengths that will result in an area of 80 square metres. The problem requires a systematic approach, so encourage your students to organise their results in a table or organised list:
| Side A | Side B | Area | Perimeter |
| 1 | 80 | 80 | 162 |
| 2 | 40 | 80 | 84 |
| 4 | 20 | 80 | 48 |
| 5 | 16 | 80 | 42 |
| 8 | 10 | 80 | 36 |
In this way, the students can find all the solutions with whole-number side measurements and calculate the perimeters at the same time. They may notice that the closer the side measurements become to each other, the smaller the perimeter becomes.
Encourage your students to explore the minimum perimeters for rectangles with the areas 16, 36, and 64 (square numbers). They will find that the perimeter is minimised when the rectangle is a square. In this situation, the length of each side is the square root of the area. They can then go back to question 1 with the knowledge that the solution is the closest whole number to √80 = 8.944 (to 4 significant figures). Students are likely to argue that the question asked for a rectangle and that a rectangle is not a square. It is worth stopping to discuss this reasonable view. In everyday use, a rectangle and a square are different shapes, but in mathematics, a square is just a special case of a rectangle.
Provide the students with a set of rectangles and squares and ask them to describe the attributes of these shapes. Encourage them to come up with minimal definitions, listing just the attributes that are absolutely necessary to define the shape. Students will typically say that a rectangle has:
• 4 sides
• 4 right-angled corners
• 2 pairs of parallel sides.
If you ask them to draw a 4-sided polygon that has right-angled corners but does not have 2 pairs of parallel sides, they will find that this is impossible. So it is not necessary to state that opposite sides must be parallel. This gives us the minimal definition for a rectangle. The minimal definition of a square is “a 4-sided polygon with right-angled corners and equal sides”. Squares are therefore a subclass of rectangles.
In the Investigation, students try to find rectangles that have the same number for the measurement of their perimeter as they do for the measurement of their area.
One solution is a square with sides of 4 metres. Its perimeter is 16 metres, and its area is 16 square metres. If they are systematic, students should be able to establish the existence of two other whole-number solutions.
They could begin by setting the length (at, say, 2 metres) and exploring what widths might work. They will discover that no whole-number solution will work for a side length of 2. But if they then try 3, they will find that a 3 x 6 rectangle has an area of 18 square metres and a perimeter of 18 metres. 6 x 3 is a third solution, but this is not a genuinely different rectangle.
Having got this far, your students may guess that there are other rectangles that meet the requirement but that they do not have whole-number sides. There are in fact an infinite number of such rectangles. In the table below, there are six rectangles that happen to have a whole-number measurement for one of their two dimensions. You could give your students the length of side b and challenge them to find the length of side a (in bold in the table), using a trial-and-improvement strategy.
| Side a | Side b | Area | Perimeter |
| 7 | 2.8 | 19.6 | 19.6 |
| 10 | 2.5 | 25 | 25 |
| 12 | 2.4 | 28.8 | 28.8 |
| 18 | 2.25 | 40.5 | 40.5 |
| 22 | 2.2 | 48.4 | 48.4 |
| 27 | 2.16 | 58.32 | 58.32 |
There is an algebraic relationship between the pairs of values of a and b that satisfy the requirement that the number of perimeter units must be equal to the number of units of area. The relationship can be expressed in this way: 
(To find the length of the second side, double the length of the first and divide by its length less 2.) Students who are developing an understanding of symbolic notation may like to try using this formula to find other pairs for a and b with the help of a calculator or spreadsheet program such as that shown.
Links
Numeracy Project materials (see https://nzmaths.co.nz/numeracy-projects)
• Book 9: Teaching Number through Measurement, Geometry, Algebra and Statistics Investigating Area, page 11
Figure It Out
• Number: Book Three, Years 7–8, Level 4 Orchard Antics, page 23
• Number Sense and Algebraic Thinking: Book One, Levels 3–4 Tile the Town, Tiny!, pages 20–21
Answers
1. a. 5 different rectangular shapes are: 1 m by 80 m, 2 m by 40 m, 4 m by 20 m, 5 m by 16 m, and 8 m by 10 m. Only the last two shapes would suit the dodgems (the other three would be too narrow).
b. The 8 m by 10 m rectangle would use 36 panels and cost $108, which is cheaper than the other options. It is one of the shapes that would suit the dodgems.
2. a. There are 12 different-sized rectangles that could be made.
| Width | 1 | 2 | 3 | 4 | 5 | 6 | 7 | 8 | 9 | 10 | 11 | 12 |
| Length | 23 | 22 | 21 | 20 | 19 | 18 | 17 | 16 | 15 | 14 | 13 | 12 |
b. The largest option is 12 m wide and 12 m long, which gives an area of 144 m2. The shape of this area is a square.
3. 50 m. The length must be 15 m because 10 x 15 = 150. 2 x (10 + 15) = 2 x 25 = 50 gives the perimeter.
Investigation
Answers may vary. There are three whole-number solutions: 4 x 4, 3 x 6, and 6 x 3 (which is the same as 3 x 6). There is an infinite number of solutions if rectangles with only one whole-number side or no whole-number sides are included.

Areas of Rectangles
In this unit students learn to use the multiplication formula to find the area of a rectangle. Using proportional reasoning students explore what happens to the area when the length and/or height of a rectangle is doubled.
Area is the amount of flat surface enclosed within a shape. Commonly used standard units for area are cm2 (square centimetres), m2 (square metres), and km2 (square kilometres). Squares are used to introduce this context, because they are an example of a two-dimensional shape that iterates. This means the shape can be repeated over and over again, without any gaps or overlaps.
Rectangles are the easiest shapes to find the area of, because the array structure of repeating units (squares) is most obvious. Consider this rectangle filled with square units:
The units are arranged in three rows of five squares. The total number of units can be found by multiplication, 3 x 5 = 15. Similarly, the rectangle contains five columns of three squares, so 5 x 3 = 15 also gives the total area. This is an example of the commutative property - you can multiply numbers (e.g. 3 and 5) in any order and get the same result (15).
The learning opportunities in this unit can be differentiated by providing or removing support to students, or by varying the task requirements. Consider using these strategies to support students:
The context for this unit can be adapted to suit the interests, cultural backgrounds, and experiences of your students. Students could be challenged to find the area of a room in their own home, a community or school garden, their classroom, a community sports ground, skate park, or marae. A diagram with measurements could be provided if the area is not readily accessible during school time.
Te reo Māori vocabulary terms such as mehua (measure), mitarau (centimetre), and tapawhā rite (square) could be introduced in this unit and used throughout other mathematical learning.
Session 1
In this session students are introduced to the idea of using multiplication to find the area of a rectangle.
How many square tiles will cover this area?
Modelling these processes on a whiteboard, interactive whiteboard, or with the use of materials could support students to develop their thinking.
Do students recognise the array structure in the arrangement of square units?
Can we count the squares even more efficiently?
Look for students to:
Recognise that much will depend on their knowledge of multiplication facts and strategies. Smaller rectangles that utilise simpler times tables could be drawn and used by pairs of learners.
Answers: A (3 x 7 = 21), B (6 x 6 = 36), C (4 x 11 = 44), D (11 x 3 = 33), E (7 x 7 = 49), F (8 x 6 = 48), G (10 x 2 = 20).
What do the answers tell us about these rectangles?
How big are the little squares? Students might measure with a ruler to check that the units are square centimetres.
Ask students to include the unit in their answers, e.g. 21cm2. Recording the notation for each rectangle is good practice.
Sessions 2 and 3
What do we mean by a formula?
Do students explain that a formula is like an algorithm, or rule, that we can follow to get the same result each time?
Record W x L = A. This is a mathematical formula written as an equation.
I wonder what the letters W, L and A might represent?
For example, Rectangle B had seven rows of five squares.
The row gives the length of the rectangle. In the case of B length equals 5. (rub off L in the formula and write 5 in its place)
The number of rows gives the width of the rectangle. In the case of B width equals 7. (rub off W in the formula and write 7 in its place).
The formula now reads 7 x 5 = A. I wonder what A equals. What value for area makes the equation true and matches the formula?
A systematic approach involves starting with 1 as a factor then increasing the smallest factor by one and testing 72 for divisibility.
1 x 72, 2 x 36 (72 ÷ 2 = 36), 3 x 24 (72 ÷ 3 = 24), 4 x 18 (72 ÷ 4 = 18), 5 x (72 is not divisible by 5), 6 x 12 (72 ÷ 6 = 12), 7 x (72 is not divisible by 7), 8 x 9 (72 ÷ 8 = 9).
If the process continues the factors will appear in reverse order, e.g. 9 x 8 = 72. 8 x 9 and 9 x 8 are essentially the same rectangle though they may appear differently if the direction of the label is considered.
Discuss criteria for eliminating labels. For example, a label with a width of less than 5cm might be considered too ‘skinny.’
Discuss the best options, cut them out at real size, then use a real jam jar (or object that is relevant to the context of the learning) to consider how well each label/array design will work.
Do they apply the W x L = A formula?
Session 4
In this session students explore using proportional reasoning to find areas of rectangles.
Session 5
In the session students demonstrate their ability to apply measurement of area independently. Consider what culturally relevant contexts can be incorporated into this task, to increase the engagement of your learners.
The following links provide pages from Figure It Out books that are suitable:
Students might also create a mat design and provide the dimensions and areas of the rectangular pieces that compose it. An example is given below:
Family and whānau,
This week at school we have been calculating the area of rectangles using the multiplication formula of length x width. We have been working out the areas of composite shapes by marking the shapes into rectangular shapes. For example,
At home this week your child is to draw 5 different composite shapes that each have a 20cm2 area. The lengths of the sides should be marked. Ask them to explain to you how they worked out the area for each one.
For extension, your child could measure the area of different rooms around the house, and then calculate the total area by treating the house as a composite shape.
Figure it out
Some links from the Figure It Out series which you may find useful are:
What Goes Around
In this unit students investigate the relationships between the area and perimeters of squares and rectangles.
Area is the amount of flat (planar) space enclosed by some boundary. Perimeter is the distance around that boundary. Area is measured in square units (e.g. m^2) because squares tessellate easily and consistently fill a 2-dimensional space in two directions. In the early stages of learning about area students fill a shape with squares leaving no gaps or overlaps. Since the squares are laid out in rows and columns it is more efficient to use multiplication (e.g knowledge of arrays) to find the number of units in a rectangular space. This leads to knowledge of the formula length x width, which is used to find the area of a rectangle. In the same way, the students might find a formula (i.e. (½) x width x height) for calculating the area of a right-angled triangle, by seeing it as half of a rectangle.
Similarly, a formula for the perimeter of a rectangle is perimeter = 2 x length + 2 x width. Since the sides of a rectangle are all equal the formula for perimeter is perimeter = 4 x side length. In both the area and perimeter formula students should recognise squares as a specific type of rectangle. Dissecting and reassembling parallelograms, trapezia, and triangles, allow students to "discover" and understand area formulae to be used with a range of shapes.
Summary of Area Formulas
The unit could be used as a series of sessions with the whole class. If appropriate, after introducing and modelling each activity, your whole class could rotate around these stations over the course of a week. Ensure that your students have had physical experiences with exploring area prior to working on these problems, and that they have developed the knowledge necessary to complete each activity independently or with a partner. During this time, you could also hold small group teaching sessions to address gaps in knowledge and misconceptions that have become apparent during your introduction (or other whole class teaching).
The learning opportunities in this unit can be differentiated by providing or removing support to students and by varying the task requirements. Ways to differentiate include:
This unit mostly uses squares on paper as the context, though Copymaster 2 is based on areas of rooms within in a house. Area and perimeter occur commonly in everyday life in situations like fencing an animal enclosure, measuring the size of a pizza, laying out squares to make tapa cloth or a quilt, working out how many free-range chickens can feed on a block, and spacing out vegetables or trees for planting. Vary contexts to suit the interests and cultural backgrounds of your ākonga, and to make connections to current events and relevant learning from other curriculum areas. You could choose one context to frame all problems in, or vary the contexts presented in each problem. Links could also be made to the traditional methods used by early Māori peoples to measure area and perimeter.
Te reo Māori kupu such as horahanga (area), paenga (perimeter, circumference), and ine (measure, measurement) could be introduced in this unit and used throughout other mathematical learning
Station 1
At this station we investigate the relationship between the area and perimeters of rectangles. The investigation is posed as two problems for the students to work on independently or with partners.
Resources:
Problem 1:
The landscape gardeners have thirty-six square paving slabs to make a rest area in the middle of a lawn. To make it easy to mow they want the rest area to be rectangular in shape and have the least perimeter (distance around the outside) as possible.
What arrangement of the tiles gives the smallest possible perimeter? (6 x 6)
Can you explain why this happens? (A square is the rectangle with the least perimeter for a given area)
Problem 2:
Use what you have learned from the first problem to work out which rectangular rest area the gardeners would make if they had forty-eight tiles.
(6 x 8 is the closest approximation of a square that can be produced with 48 tiles)
Station 2
At this station students design a house for the Affluent family. There are three problems to be investigated.
Resources:
Living Room: 48 square metres Bathroom: 8 square metres
Dining Room: 12 square metres Laundry: 6 square metres
Kitchen: 12 square metres Toilet: 2 square metres
Bedroom One: 24 square metres Bedroom Two: 16 square metres
Bedroom Three: 20 square metres Bedroom Four: 12 square metres
Conservatory/Entrance: 12 square metres
Station 3
At this station students investigate the link between the side lengths of a square and its area. There are four parts to this problem: making a square with a given area, finding the side length of the square (by finding the square root of the area), drawing squares with given area measurements, and finding the area of square diagrams.
Resources:
Problem:
√25 gives 5 which is the side length of a square with area of 25 cm2.
Use square tiles and your calculator (if you need) to complete the entries in this table:
What does the square root function on a calculator do?
Gives you the square root of that number (the number that multiplies by itself to give that number). In this context, it tells you the side length of the square with that area.
121 square units (11 x 11)
6.25 square units (2.5 x 2.5)
12.25 square units (3.5 x 3.5)
18 square units (4.24 x 4.24)
42 square units (6.48 x 6.48)
90 square units (9.49 x 9.49)
The left square has an area of 2 cm2 so the side lengths are √2.
The right square has an area of 4.5 cm2 (1/2 x 9) so the side lengths are √4.5.
Station 4
At this station we use several different problems to investigate the area of rectangles.
Resources:
Problems:
What are the area and perimeter of the square in centimetres? (area = 16 cm2 and perimeter = 16 cm.)
What is the area of the rectangle? Explain how you got your answer.
Area remains unchanged (8 x 2 = 16 cm2)
What changes happen to the area and perimeter from the starting rectangle to the square?
Try to explain why this happens.
The area remains constant (36 cm2).
The perimeter decreases from 30 cm to 24 cm.
Here is one solution. There are others.
The area remains constant (24 cm2). The perimeter changes from 22 cm to 20 cm.
The longest side of the triangle is 12 cm and the height is 6 cm.
The area of both the square and triangle is 36 cm2.
The area of the triangle is ½ x 12 x 6 = 36 cm2.
What do you notice?
Students should notice that ½ x b x h gives the area of a triangle.
Station 5
At this station we look for patterns in the perimeters and areas of squares.
Resources:
Problem:
What is the difference between their perimeters?
The 2 x 2 square has a perimeter of 4 x 2 = 8 units.
The 3 x 3 square has a perimeter of 4 x 3 = 12 units.
The 3 x 3 square has a perimeter of 4 x 3 = 12 units.
The 4 x 4 square has a perimeter of 4 x 4 = 16 units.
What do you notice? Why does this occur?
The difference is always 4 units because 1 unit is added and there are four sides.
Organising your results in a table may help:
What patterns do you notice?
Try to explain why each pattern occurs.
Just like the square, 1 unit is added to each side and there are four sides. So the differences in perimeter are four each time.
The difference in area increases by even numbers.
Family and whānau,
Did you know that the largest lasagne was made in Wieliczka, Poland? It measured an amazing 25 m x 2.5 m!
This week your child is to work on the following questions. Please encourage them to explain their thinking.
Fred's Rent-a-Fence
This is a level 3 number and measurement activity from the Figure It Out series.
A PDF of the student activity is included.
Click on the image to enlarge it. Click again to close. Download PDF (1027 KB)
use multiplication to solve perimeter and area problems.
Number Framework links
Use this activity to encourage transition from advanced additive strategies (stage 6) to advanced multiplicative strategies (stage 7).
Activity
This activity is based on the perimeter and area of rectangles. As a general introduction, have your students look at this rectangle where the side lengths are given as l and w.

The area can be found by: area = l x w.
The perimeter can be found by: perimeter = 2 x l + 2 x w.
Problems that involve maximising or minimising one measurement while either holding the other constant or minimising it are common in the real world. Fred’s fence is typical of constrained maximisation or minimisation problems.
Students exploring question 1 are likely to try different side lengths that will result in an area of 80 square metres. The problem requires a systematic approach, so encourage your students to organise their results in a table or organised list:
In this way, the students can find all the solutions with whole-number side measurements and calculate the perimeters at the same time. They may notice that the closer the side measurements become to each other, the smaller the perimeter becomes.
Encourage your students to explore the minimum perimeters for rectangles with the areas 16, 36, and 64 (square numbers). They will find that the perimeter is minimised when the rectangle is a square. In this situation, the length of each side is the square root of the area. They can then go back to question 1 with the knowledge that the solution is the closest whole number to √80 = 8.944 (to 4 significant figures). Students are likely to argue that the question asked for a rectangle and that a rectangle is not a square. It is worth stopping to discuss this reasonable view. In everyday use, a rectangle and a square are different shapes, but in mathematics, a square is just a special case of a rectangle.
Provide the students with a set of rectangles and squares and ask them to describe the attributes of these shapes. Encourage them to come up with minimal definitions, listing just the attributes that are absolutely necessary to define the shape. Students will typically say that a rectangle has:
• 4 sides
• 4 right-angled corners
• 2 pairs of parallel sides.
If you ask them to draw a 4-sided polygon that has right-angled corners but does not have 2 pairs of parallel sides, they will find that this is impossible. So it is not necessary to state that opposite sides must be parallel. This gives us the minimal definition for a rectangle. The minimal definition of a square is “a 4-sided polygon with right-angled corners and equal sides”. Squares are therefore a subclass of rectangles.
In the Investigation, students try to find rectangles that have the same number for the measurement of their perimeter as they do for the measurement of their area.
One solution is a square with sides of 4 metres. Its perimeter is 16 metres, and its area is 16 square metres. If they are systematic, students should be able to establish the existence of two other whole-number solutions.
They could begin by setting the length (at, say, 2 metres) and exploring what widths might work. They will discover that no whole-number solution will work for a side length of 2. But if they then try 3, they will find that a 3 x 6 rectangle has an area of 18 square metres and a perimeter of 18 metres. 6 x 3 is a third solution, but this is not a genuinely different rectangle.
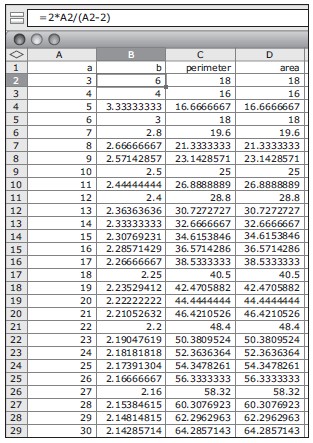
Having got this far, your students may guess that there are other rectangles that meet the requirement but that they do not have whole-number sides. There are in fact an infinite number of such rectangles. In the table below, there are six rectangles that happen to have a whole-number measurement for one of their two dimensions. You could give your students the length of side b and challenge them to find the length of side a (in bold in the table), using a trial-and-improvement strategy.
There is an algebraic relationship between the pairs of values of a and b that satisfy the requirement that the number of perimeter units must be equal to the number of units of area. The relationship can be expressed in this way:

(To find the length of the second side, double the length of the first and divide by its length less 2.) Students who are developing an understanding of symbolic notation may like to try using this formula to find other pairs for a and b with the help of a calculator or spreadsheet program such as that shown.
Links
Numeracy Project materials (see https://nzmaths.co.nz/numeracy-projects)
• Book 9: Teaching Number through Measurement, Geometry, Algebra and Statistics Investigating Area, page 11
Figure It Out
• Number: Book Three, Years 7–8, Level 4 Orchard Antics, page 23
• Number Sense and Algebraic Thinking: Book One, Levels 3–4 Tile the Town, Tiny!, pages 20–21
Answers
1. a. 5 different rectangular shapes are: 1 m by 80 m, 2 m by 40 m, 4 m by 20 m, 5 m by 16 m, and 8 m by 10 m. Only the last two shapes would suit the dodgems (the other three would be too narrow).
b. The 8 m by 10 m rectangle would use 36 panels and cost $108, which is cheaper than the other options. It is one of the shapes that would suit the dodgems.
2. a. There are 12 different-sized rectangles that could be made.
b. The largest option is 12 m wide and 12 m long, which gives an area of 144 m2. The shape of this area is a square.
3. 50 m. The length must be 15 m because 10 x 15 = 150. 2 x (10 + 15) = 2 x 25 = 50 gives the perimeter.
Investigation
Answers may vary. There are three whole-number solutions: 4 x 4, 3 x 6, and 6 x 3 (which is the same as 3 x 6). There is an infinite number of solutions if rectangles with only one whole-number side or no whole-number sides are included.
Areas of Rectangles
In this unit students learn to use the multiplication formula to find the area of a rectangle. Using proportional reasoning students explore what happens to the area when the length and/or height of a rectangle is doubled.
Area is the amount of flat surface enclosed within a shape. Commonly used standard units for area are cm2 (square centimetres), m2 (square metres), and km2 (square kilometres). Squares are used to introduce this context, because they are an example of a two-dimensional shape that iterates. This means the shape can be repeated over and over again, without any gaps or overlaps.
Rectangles are the easiest shapes to find the area of, because the array structure of repeating units (squares) is most obvious. Consider this rectangle filled with square units:
The units are arranged in three rows of five squares. The total number of units can be found by multiplication, 3 x 5 = 15. Similarly, the rectangle contains five columns of three squares, so 5 x 3 = 15 also gives the total area. This is an example of the commutative property - you can multiply numbers (e.g. 3 and 5) in any order and get the same result (15).
The learning opportunities in this unit can be differentiated by providing or removing support to students, or by varying the task requirements. Consider using these strategies to support students:
The context for this unit can be adapted to suit the interests, cultural backgrounds, and experiences of your students. Students could be challenged to find the area of a room in their own home, a community or school garden, their classroom, a community sports ground, skate park, or marae. A diagram with measurements could be provided if the area is not readily accessible during school time.
Te reo Māori vocabulary terms such as mehua (measure), mitarau (centimetre), and tapawhā rite (square) could be introduced in this unit and used throughout other mathematical learning.
Session 1
In this session students are introduced to the idea of using multiplication to find the area of a rectangle.
How many square tiles will cover this area?
Modelling these processes on a whiteboard, interactive whiteboard, or with the use of materials could support students to develop their thinking.
Do students recognise the array structure in the arrangement of square units?
Can we count the squares even more efficiently?
Look for students to:
Recognise that much will depend on their knowledge of multiplication facts and strategies. Smaller rectangles that utilise simpler times tables could be drawn and used by pairs of learners.
Answers: A (3 x 7 = 21), B (6 x 6 = 36), C (4 x 11 = 44), D (11 x 3 = 33), E (7 x 7 = 49), F (8 x 6 = 48), G (10 x 2 = 20).
What do the answers tell us about these rectangles?
How big are the little squares? Students might measure with a ruler to check that the units are square centimetres.
Ask students to include the unit in their answers, e.g. 21cm2. Recording the notation for each rectangle is good practice.
Sessions 2 and 3
What do we mean by a formula?
Do students explain that a formula is like an algorithm, or rule, that we can follow to get the same result each time?
Record W x L = A. This is a mathematical formula written as an equation.
I wonder what the letters W, L and A might represent?
For example, Rectangle B had seven rows of five squares.
The row gives the length of the rectangle. In the case of B length equals 5. (rub off L in the formula and write 5 in its place)
The number of rows gives the width of the rectangle. In the case of B width equals 7. (rub off W in the formula and write 7 in its place).
The formula now reads 7 x 5 = A. I wonder what A equals. What value for area makes the equation true and matches the formula?
A systematic approach involves starting with 1 as a factor then increasing the smallest factor by one and testing 72 for divisibility.
1 x 72, 2 x 36 (72 ÷ 2 = 36), 3 x 24 (72 ÷ 3 = 24), 4 x 18 (72 ÷ 4 = 18), 5 x (72 is not divisible by 5), 6 x 12 (72 ÷ 6 = 12), 7 x (72 is not divisible by 7), 8 x 9 (72 ÷ 8 = 9).
If the process continues the factors will appear in reverse order, e.g. 9 x 8 = 72. 8 x 9 and 9 x 8 are essentially the same rectangle though they may appear differently if the direction of the label is considered.
Discuss criteria for eliminating labels. For example, a label with a width of less than 5cm might be considered too ‘skinny.’
Discuss the best options, cut them out at real size, then use a real jam jar (or object that is relevant to the context of the learning) to consider how well each label/array design will work.
Do they apply the W x L = A formula?
Session 4
In this session students explore using proportional reasoning to find areas of rectangles.
Session 5
In the session students demonstrate their ability to apply measurement of area independently. Consider what culturally relevant contexts can be incorporated into this task, to increase the engagement of your learners.
The following links provide pages from Figure It Out books that are suitable:
Students might also create a mat design and provide the dimensions and areas of the rectangular pieces that compose it. An example is given below:
Family and whānau,
This week at school we have been calculating the area of rectangles using the multiplication formula of length x width. We have been working out the areas of composite shapes by marking the shapes into rectangular shapes. For example,
At home this week your child is to draw 5 different composite shapes that each have a 20cm2 area. The lengths of the sides should be marked. Ask them to explain to you how they worked out the area for each one.
For extension, your child could measure the area of different rooms around the house, and then calculate the total area by treating the house as a composite shape.
Figure it out
Some links from the Figure It Out series which you may find useful are:
Is there Room?
This is a level 3 measurement activity from the Figure It Out theme series.
A PDF of the student activity is included.
Click on the image to enlarge it. Click again to close. Download PDF (284 KB)
use multiplication to find areas of rectangles
A calculator (optional)
In this activity, the students will need to apply their knowledge of area and how to calculate the area of rectangular shapes. This may be the first time they have found area from a diagram drawn to scale. You should discuss why it is not possible to do a drawing of the actual park in the book and why it has to be represented by a diagram drawn to scale. In this case, the scale is 1 : 1 000 or 1 centimetre : 10 metres.
The students will have had previous experiences finding area by counting non-standard units and concrete units, such as 1 centimetre cubes and squared diagrams (or pieces of fudge, as on page 4). From this, you will need to check that they understand and can express in their own words that the area is found by “multiplying the measurement along the length by the measurement across the width” as they may have done with a multiplication array. Some visual models of 1 metre square
would also be helpful for imagining dimensions involved in the task. The students will have worked with 1 metre square in page 4 of Measurement, Figure It Out, Levels 2–3. The students will probably find it easier to begin by calculating the area of this year’s gala.
Encourage the students to use a problem solving approach to investigate different
ways of finding the area of last year’s gala.
This may include:
• taking the smaller rectangle away from the larger
During the activity, encourage the students to stop to discuss and share the strategies that the groups are using before they continue to work out other strategies. Students having difficulty with formal measurement could compare the two shapes using concrete materials and non-standard units.
Don’t forget to compare the measurements of the two diagrams to answer the original problem. As an extension, the students could attempt to draw an irregular shape with the same area as this year’s gala field.
Answers to Activity
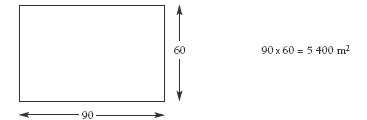
Yes. The total area of the park used for last year’s gala is (75 x 60) + (30 x 25) = 5 250 m2. The area available for this year’s gala is 90 x 60 = 5 400 m2.
Fred's Rent-a-Fence
This is a level 3 number and measurement activity from the Figure It Out series.
A PDF of the student activity is included.
Click on the image to enlarge it. Click again to close. Download PDF (1027 KB)
use multiplication to solve perimeter and area problems.
Number Framework links
Use this activity to encourage transition from advanced additive strategies (stage 6) to advanced multiplicative strategies (stage 7).
Activity
This activity is based on the perimeter and area of rectangles. As a general introduction, have your students look at this rectangle where the side lengths are given as l and w.

The area can be found by: area = l x w.
The perimeter can be found by: perimeter = 2 x l + 2 x w.
Problems that involve maximising or minimising one measurement while either holding the other constant or minimising it are common in the real world. Fred’s fence is typical of constrained maximisation or minimisation problems.
Students exploring question 1 are likely to try different side lengths that will result in an area of 80 square metres. The problem requires a systematic approach, so encourage your students to organise their results in a table or organised list:
In this way, the students can find all the solutions with whole-number side measurements and calculate the perimeters at the same time. They may notice that the closer the side measurements become to each other, the smaller the perimeter becomes.
Encourage your students to explore the minimum perimeters for rectangles with the areas 16, 36, and 64 (square numbers). They will find that the perimeter is minimised when the rectangle is a square. In this situation, the length of each side is the square root of the area. They can then go back to question 1 with the knowledge that the solution is the closest whole number to √80 = 8.944 (to 4 significant figures). Students are likely to argue that the question asked for a rectangle and that a rectangle is not a square. It is worth stopping to discuss this reasonable view. In everyday use, a rectangle and a square are different shapes, but in mathematics, a square is just a special case of a rectangle.
Provide the students with a set of rectangles and squares and ask them to describe the attributes of these shapes. Encourage them to come up with minimal definitions, listing just the attributes that are absolutely necessary to define the shape. Students will typically say that a rectangle has:
• 4 sides
• 4 right-angled corners
• 2 pairs of parallel sides.
If you ask them to draw a 4-sided polygon that has right-angled corners but does not have 2 pairs of parallel sides, they will find that this is impossible. So it is not necessary to state that opposite sides must be parallel. This gives us the minimal definition for a rectangle. The minimal definition of a square is “a 4-sided polygon with right-angled corners and equal sides”. Squares are therefore a subclass of rectangles.
In the Investigation, students try to find rectangles that have the same number for the measurement of their perimeter as they do for the measurement of their area.
One solution is a square with sides of 4 metres. Its perimeter is 16 metres, and its area is 16 square metres. If they are systematic, students should be able to establish the existence of two other whole-number solutions.
They could begin by setting the length (at, say, 2 metres) and exploring what widths might work. They will discover that no whole-number solution will work for a side length of 2. But if they then try 3, they will find that a 3 x 6 rectangle has an area of 18 square metres and a perimeter of 18 metres. 6 x 3 is a third solution, but this is not a genuinely different rectangle.
Having got this far, your students may guess that there are other rectangles that meet the requirement but that they do not have whole-number sides. There are in fact an infinite number of such rectangles. In the table below, there are six rectangles that happen to have a whole-number measurement for one of their two dimensions. You could give your students the length of side b and challenge them to find the length of side a (in bold in the table), using a trial-and-improvement strategy.
There is an algebraic relationship between the pairs of values of a and b that satisfy the requirement that the number of perimeter units must be equal to the number of units of area. The relationship can be expressed in this way:

(To find the length of the second side, double the length of the first and divide by its length less 2.) Students who are developing an understanding of symbolic notation may like to try using this formula to find other pairs for a and b with the help of a calculator or spreadsheet program such as that shown.
Links
Numeracy Project materials (see https://nzmaths.co.nz/numeracy-projects)
• Book 9: Teaching Number through Measurement, Geometry, Algebra and Statistics Investigating Area, page 11
Figure It Out
• Number: Book Three, Years 7–8, Level 4 Orchard Antics, page 23
• Number Sense and Algebraic Thinking: Book One, Levels 3–4 Tile the Town, Tiny!, pages 20–21
Answers
1. a. 5 different rectangular shapes are: 1 m by 80 m, 2 m by 40 m, 4 m by 20 m, 5 m by 16 m, and 8 m by 10 m. Only the last two shapes would suit the dodgems (the other three would be too narrow).
b. The 8 m by 10 m rectangle would use 36 panels and cost $108, which is cheaper than the other options. It is one of the shapes that would suit the dodgems.
2. a. There are 12 different-sized rectangles that could be made.
b. The largest option is 12 m wide and 12 m long, which gives an area of 144 m2. The shape of this area is a square.
3. 50 m. The length must be 15 m because 10 x 15 = 150. 2 x (10 + 15) = 2 x 25 = 50 gives the perimeter.
Investigation
Answers may vary. There are three whole-number solutions: 4 x 4, 3 x 6, and 6 x 3 (which is the same as 3 x 6). There is an infinite number of solutions if rectangles with only one whole-number side or no whole-number sides are included.
Perplexing Perimeters
In this unit students develop a sense of the size of a centimetre and metre as they construct their own “rulers”. Students come to recognise the exactness of the measurement needed as they calculate the perimeter of objects.
Perimeter is the distance (length) around the boundary of a shape. This is measured in units such as centimetres, metres and kilometres. Perimeters are very important in the construction of enclosures, including fencing, edging and the walls of buildings.
Standard metric units of length are based on the unit of one metre. Prefixes such as centi (one hundredth), milli (one thousandth), and kilo (one thousand), are used to equally partition, or combine, units of one metre to form new units that are fit for purpose. Length is measured using tools, most frequently rulers or tape measures. Rulers have a scale that shows iterations (copies end on end) of a unit of measure. The marks on the scale indicate the endpoint of units and begin with a baseline of zero. Intervals on a scale can be further subdivided into smaller equal sized units to get greater precision.
The learning opportunities in this unit can be differentiated by providing or removing support to students, and by varying the task requirements. Ways to support students include:
Tasks can be varied in many ways including:
The contexts for this unit can be adapted to suit the interests and cultural backgrounds of your students. Capitalise on the interests of your students. Perimeters are important in many parts of everyday life. For example, students might be interested in the construction of a fence around a marae, church, swimming pool, or area of your school. They may be interested in the cost of painting or wallpapering their bedroom. Sport also provides excellent contexts, especially if students are put in the position of marking out playing surfaces. Perimeters are also important for designing borders and for framing art work. These contexts might also enable you to make connections with local community members, who could come share their knowledge around, and experience of, applying 'perimeter' in their daily lives.
Te reo Māori kupu such as ine (measure), rūri (ruler), paenga (perimeter), roa (length), mitarau (centimetre), mitamano (millimetre), and mite (metre) could be introduced in this unit and used throughout other mathematical learning
Session 1
In this session we make our own centimetre rulers and metre tapes so that we can measure the perimeter of objects in the classroom and playground.
Is the race fair?
Is it longer around the perimeter of this book or this book?
Can anyone tell me what perimeter means? (The perimeter of an object or shape is the measure around its edges.)
How could we find out which perimeter is longer?
What is a centimetre?
What things can you think of that are 1 centimetre in size?
Can you show me with your fingers how big a centimetre is?
Can you find me something in the classroom that is one centimetre long? (Centimetre cube, width of a pencil, thickness of a book, width of a fingernail, point to markings on a ruler)
Why are they called centimetres?
Students may know that centi- is the prefix for ‘one hundredth’ so one metre is divided up into 100 centimetres, just like one dollar is divided into 100 cents.
Can you think of anything in our classroom that is similar to this strip in length?
How long do you think this strip is?
How could we check? (Use a ruler, line centimetre cubes along the strip.)
What will the strip look like then?
Why is having a zero mark important? (Zero is the conventional baseline to start measuring from)
Why are numbers put on the ruler at all?
How can you keep track of the measurement? (Record and then add the length of the sides later.)
Do you need to measure all of the sides?
What’s the smallest number of sides you need to measure?
How did you combine the numbers?
Is there a way to estimate whether or not two books have the same perimeter before you measure?
Session 2
We begin this session by posing a perimeter problem that is “too large” for our 10 cm rulers. We discuss the need for a larger measuring instrument and then construct and use a 5 metre tape.
How could we find out which is larger?
Are our centimetre rulers appropriate for this? Why not?
What could we use? (metres) How many of our centimetre rulers make a metre? How do you know?
How many centimetres in a metre?
How do you write centimetre?
What does this line mean on your tape? Is it at the end of the metre or in the middle?
How many centimetres are there in 2 metres?
What objects would you choose to measure with the tape rather than the ruler?
How accurate is your tape? Why?
How can you keep track of the measurement? (Record and then add the length of the sides later)
Do you need to measure all of the sides?
How accurate do you need to be? (As the question posed was one of comparison the level of accuracy will depend on how close the perimeters of the two objects are.)
1 m 20 cm 120 cm
How did you combine the numbers?
Session 3
In this session the students are involved in a Perimeter Hunt. This involves them finding objects whose perimeter is of a certain length (in either metres or centimetres). You could adapt this to better suit the context of your class by picking items for students to find that relate to another area of learning. Consider how you might integrate the perimeter hunt with a 'fact finding hunt' related to your chosen objects.
Ask them to select 10 perimeter ranges to find. Head up each page with a different perimeter range.
Session 4
In this session the students investigate open ended problems involving perimeter. Students may work in pairs to answer the following problems.
Session 5
In this session we compare the objects we found during the Perimeter Hunt and discuss the findings in our investigations.
What length do you think this side would be?
What do you use to make your estimate?
What about the length of this side? (pointing to another side)
How did you combine the measurements to estimate the perimeter?
The conversation might lead to recording a rule for finding the perimeter of any rectangle.
Why do you think that [perimeter] was the easiest?
Dear families and whānau,
In maths this week we have constructed our own measuring instruments so that we develop a good understanding of the size of metres and centimetres. We have used our measuring tools to find objects for our Perimeter Hunt. Our home task this week is to find at least 5 objects to add to our book. We need to draw the object, state the length of each side (in metres or centimetres) and then calculate the perimeter.
Please ask your child to explain perimeter and to tell you how they worked it out for each of the 5 chosen objects. Encourage them to combine the numbers in different ways.