Purpose
This is a level 3 shape activity from the Figure It Out theme series.
A PDF of the student activity is included.
Student Activity
Click on the image to enlarge it. Click again to close. Download PDF (301 KB)
Specific Learning Outcomes
interpret simple co-ordinate maps
Required Resource Materials
FIO, Level 2-3, Theme: Gala, Clara's Cowpats, page 14
Square Grid paper
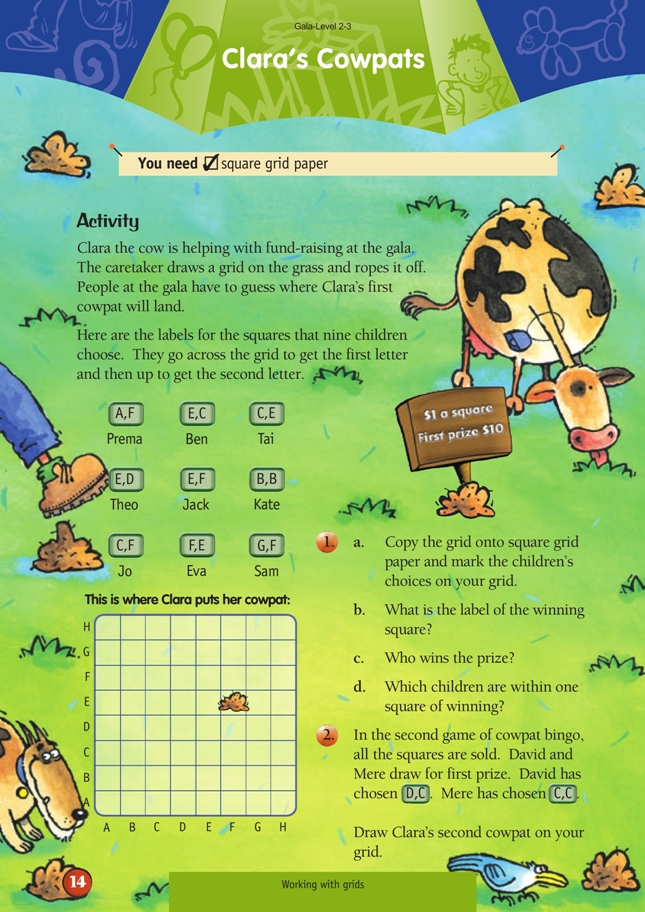
Activity
In this activity, the students will gain experience in reading and plotting positions on a grid. The activity explores the idea of using letters to explain the position of something. The students need to realise that the order of the letters is important. For example, in A,F , Prema’s guess, the across letter (the distance along the horizontal axis) is written first. Note, though, that the labels refer to the square spaces rather than the intersecting lines of the ordered pair and co-ordinate system.
Explain to the students how we need such a location system when we find places on maps or find a seat at the movies. A possible introduction could be to prepare two sets of alphabet cards labelled A to H and model the grid on the classroom floor. Students could be randomly assigned to a square on the grid or could be placed on a spot and asked to state the label of their square.
Question 2 will be useful for sharing and discussion. The students need to realise that Clara’s second cowpat lands on two squares.
Some extension ideas include:
• Two students play a game similar to Battleships. Each player has a grid and marks on it a trail of cowpats in adjacent squares that starts on one side of the grid and goes to the other. The other player tries to find the trail by calling out labels of squares where cowpats might be. The first player to complete a trail as marked on their partner’s grid wins.
• Two players each have a grid on which they place six items typically sold at a school gala, for example, fudge, a pot plant, a drink, clothing, comics, and books. The players take turns trying to collect all six items into their basket by calling the correct labels for squares. Their partner is required to indicate a near miss if a player’s call is only one square away.
• Two players have a 6 x 6 grid between them. They throw two dice marked A to F or spin a spinner. One throw or spin gives the horizontal reference, and the second gives the vertical reference. The player puts a counter in the square. The first player to have three of their counters in consecutive squares (vertical, horizontal, or diagonal) is the winner.
Treasure Trove on pages 6–7 of Under the Sea, Figure It Out, Levels 2–3, also deals with grids and co-ordinates. Note, though, that this activity uses co-ordinates that refer to intersecting lines rather than the square spaces.
Answers to Activity
1a.

b. F,E
c. Eva
d. Theo, Jack, and Sam
2. 
Maps
In this unit ākonga are introduced to using maps. They use maps to locate landmarks, identify views from different locations, and give directions using left and right turns, and distances.
Maps provide a two dimensional representation of the real world. By looking at a map ākonga can anticipate the landmarks they will see from a given location and in which direction (N, S, E, W) those landmarks will be seen. By using maps of their kura or local area, ākonga will be able to check their thinking by matching the map with the real world.
Ākonga will begin to use maps to help them follow and give directions. They will start to use directions involving left and right turns and use landmarks to clarify pathways. Ākonga will begin to use distances in whole numbers of metres.
This unit can be differentiated by varying the scaffolding of the tasks or altering expectations to make the learning opportunities accessible to a range of learners. For example:
Some activities in this unit can be adapted to use contexts and materials that are familiar and engaging for ākonga. In particular, the choice of maps to use will depend on the interests of your class. Some ākonga may respond best to maps of familiar areas, (for example, marae, beach access or playground) while others may be more engaged by an imaginative context. You could work as a class (mahi tahi model) to create maps of a favourite story, or the location of a movie.
Te reo Māori vocabulary terms such as map (mahere), North (raki), South (tonga), East (rāwhiti), West (uru), left (mauī) and right (matau) could be introduced in this unit and used throughout other mathematical learning.
Session 1
In this session ākonga are introduced to using a map to locate landmarks and identify views from different locations.
Which classroom has the best view of the marae?
What building can you see from the field?
What building can you see out the library windows?
Session 2
In this session ākonga use the kura map to describe pathways from locations.
Session 3
In this session ākonga use a local or imaginative map to describe different views they can see from different locations. They use compass directions to give the direction of landmarks from given locations. The map below is available as Copymaster 1.
How many whare have a direct view of the marae?
What can the children see from the playcentre?
What can the doctor see out the window?
If you sat in the doctor’s carpark what could you see?
Colour in a whare that has a view of the playcentre, the dairy, and the hall?
What building is east of the café?
What building is north of the hall?
What building is south of the chemist?
What direction is the playcentre from the church?
What direction is the marae from the doctors?
How many whare are south of the hall?
From which building can you look west to see the church?
Session 4
In this session ākonga give a set of directions between two locations using distances and quarter turns to the left and right.
Session 5
In this session ākonga learn about pathways and apply this to creating a fire escape plan for their whare.
Dear family and whānau,
This week your child has been using maps to describe views and pathways from locations. Your child has started to draw a plan of your whare and is finishing it by marking the escape routes out of each room in case of a fire. Please help them to complete the activity. You may wish to complete the Fire Escape Plan on the NZ Fire Service website - https://www.escapemyhouse.co.nz
Figure it out
Some links from the Figure It Out series which you may find useful are:
Rescue!
In this unit students explore movement and position concepts. They draw maps and write directions focusing on the use of right, left, up and down. They will be introduced to the concept of North, South, East, and West and the use of these positions on maps.
Maps and plans are an important part of every day life. They enable us to find given towns and cities in a country and to find given roads in a town or city. They enable architects to conceive buildings and builders to build what the architect has created. Reading maps is a valuable skill that everyone should have.
This unit introduces the basic skills needed in map reading by getting the students to create a map for themselves and letting them interpret someone else’s map. These skills are the notions of direction, distance and legends and the conventions that are involved with them. All of these skills will be built on in future as the students are introduced to more complicated maps.
But this work also develops in another area that may not be obviously related to maps. We are thinking here of co-ordinate grids that are the basis of co-ordinate geometry. The cartesian co-ordinate system is invaluable in ‘mapping’ and interpreting relations and their properties. This system allows algebraic expressions to be ‘visualised’ and therefore understood more deeply. It also allowed the development of calculus, a tool that is used to describe movement of all kinds. Students in secondary school will be introduced to these topics and their applications.
Session 1
In this session students are introduced to the concept of drawing a map. A path will be drawn onto squares on grid paper. This path will represent a journey. The concept of a legend on a map could also be introduced.
Where did Hansel and Gretel’s journey begin?
Where did they go to next?
How far do you think they travelled? Why do you think that?
What direction do you think they travelled? Why do you think that?
Session 2
In this session students make a map by drawing the path that Hansel and Gretel may have followed to go to the witch’s house. This is done by colouring squares on the grid sheet. (The journey may have to be embellished depending on the version of the story read! Looking at a board game like snakes and ladders may also help to reinforce the concept.)
How do we know which way to move on your map?
Are our maps similar? In what ways?
How are they different?
Where do you start in your map?
In which direction do I travel next?
How far will I travel in that direction?
If I couldn’t see your map what directions would you give me next?
Session 3
In this session students will write directions for their path maps using the language of North South, East, and West or left, right, up and down - depending on their abilities.
Session 4
In this session students will be asked to follow each other’s direction cards to draw the paths from the original maps. The maps will then be compared to see if the directions have been recorded accurately.
Session 5
In this session the students prepare and then use treasure maps. The treasure hunt is to be carried out in their environment at school using clearly identified boundaries. A map of the area is drawn with key features. The concept of a legend is to be introduced by asking students to identify and label key features marked on the map in the designated area.
Family and Whānau,
At school this week we have explored movement and position concepts in our maths programme. We have drawn maps and then followed directions to find "treasure". At home this week your child is asked to bury some "treasure" in your house and then make a direction list for you to follow. The directions should make use of right and left turns and should give the number of steps that you need to take between turns.
Figure it Out Links
Some links from the Figure It Out series which you may find useful are:
Street Maps
In this unit students use street maps as the context to learn about coordinates and grid references, and for giving and following instructions involving directions and distances.
In this unit students are introduced to two ways in which location is represented in real life situations, grid references and coordinates. In both cases the representation is an ordered pair, e.g. F4 as a grid reference, and (6,4) as a pair of coordinates. The convention is to state the horizontal reference (located on the x-axis) first, and the vertical reference (located on the y-axis) second.
In the grid system (left image), a grid reference (F, 4) is used to locate the person in an area. Grid references are frequently used on maps. In the coordinate system (right image) the location of the person is a specific point at the intersection of the lines. The coordinate (6,4) can also be interpreted as a vector from the origin (0, 0). The vector is the combined effect of a shift of 6 units in the horizontal direction, and 4 units in the vertical direction.
The learning opportunities in this unit can be differentiated by providing or removing support to students, by varying the task requirements. Ways to support students include:
Tasks can be varied in many ways including:
The contexts for this unit can be adapted to suit the interests and cultural backgrounds of your students. Using locations that are familiar and of high interest to students will support motivation. The advantage of familiar locations is that students can use their personal knowledge to validate their work. Students often view non-familiar locations through the media. For example, Great Race events are a hobby for some people, and are readily available on television. Students will enjoy a virtual Great Race through an unfamiliar part of Aotearoa. Choose locations that students show interest in, and/or hold particular cultural significance, e.g. world heritage sites that UNESCO has recognised because of the natural or cultural value. This unit offers opportunities for authentic links to be made to procedural writing.
Te reo Māori vocabulary terms such as mahere (map), ahu (direction), and huri (turn) could be introduced in this unit and used throughout other mathematical learning.
Session 1
Where is the school on the map?
Where is the local park/sports ground?
Where is a local shop (dairy, petrol station, bakery, church etc)?
Where is your house?
How would you tell someone else where The Mole and Chicken Restaurant is located? (B3)
Where is the Taupo Hospital? (E2)
What landmark is in the grid G5 (Parts and Service)?
Mobile phone technology has made maps redundant and almost removed the need for navigational tools as well. When have you needed to use a map?
Can you imagine a place where a map might still be useful?
Session 2
What instructions might we give them?
Instructions must include turns (right and left), distances and important things to look for (Street names, buildings, parks, etc.)
Students may know about the scale.
This distance on the strip equals 200 metres in real space. Let’s tell our friend how far they need to walk along (Street name). Align the strip with the street beginning at the place where the friend starts walking. For example, “They will need to walk about 300 metres up Taharepa Road.”
Session 3
What differences can you see between our grid map and this map?
Do students notice that the numbers are located on the lines rather than between those lines?
What is at (6, 2)? (school)
What are the coordinates for the Fountain?...the Fire Station?...Ferris Wheel?
Put ten new landmarks on the map. Label each landmark, e.g. Hospital, MacDonald’s Restaurant, Skate World, Church, Marae. Students should be encouraged to choose landmarks important to them.
Write down a set of ten coordinates for the landmarks in the order you want another team to visit them. Try to make the trip an interesting shape.
Session 4
Students might think of situations where giving a precise location is important, e.g. Flights to a Pacific Island, searching for lost trampers, tracking ships, etc.
Ask: Do you know where these towns are in Aotearoa?
Students might suggest that they are coordinates.
Locate the towns using the coordinates
Use the decimals to get improved precision.
Session 5
In this session students create a map that will be of future use to them. They screen grab the map from Google Maps and impose their own coordinate or grid system on it.
Using their own map students might write instructions using cardinal compass directions (N, NE, E, SE, S, SW, W, NW) and orientation instructions. In pairs the students follow each other’s instructions. The activity can be made more challenging by asking students to include an appropriate scale on the map.
Dear family and whānau,
This week we have been learning about using maps with grid references. The game Battleship is a great way to practice these mapping skills. It would be appreciated if you could take some time to play it with your child:
Discuss with your child places of significance in your family and locate these on a map.
Figure it Out
Treasure Trove
This is a level 3 geometry activity from the Figure It Out theme series.
A PDF of the student activity is included.
Click on the image to enlarge it. Click again to close. Download PDF (838 KB)
use co-ordinates to describe and locate positions
A classmate
Cardboard, Scissors, Multilink cubes
2 photocopies of the grid (one for each player) in the Student book
Game
This game is a version of the traditional game Battleships, which uses ordered pairs on a co-ordinate grid to specify position. Since the “treasure chests” are represented by multilink cubes, which have an area of 2 cm x 2 cm, students can think strategically about which co-ordinates (ordered pairs) to choose.
For example, finding out that B 2 is not a co-ordinate for a treasure chest effectively eliminates the co-ordinates A 1, A 2, and B 1. If E 2 also is not a co-ordinate for a chest, that effectively eliminates C 1, C 2, D 1, D 2, and E 1. Note that this strategy is good for locating the approximate position of treasure chests, but to finish the game, students must give all four corner co-ordinates of each chest.
An interesting variation of the game is for students to use 16 unit place-value cubes to make four “gold nuggets”. These nuggets can take any shape the player wants them to within the squares.
For example:
Answers to Activity
Game
A game using co-ordinates
Clara's Cowpats
This is a level 3 shape activity from the Figure It Out theme series.
A PDF of the student activity is included.
Click on the image to enlarge it. Click again to close. Download PDF (301 KB)
interpret simple co-ordinate maps
Square Grid paper
In this activity, the students will gain experience in reading and plotting positions on a grid. The activity explores the idea of using letters to explain the position of something. The students need to realise that the order of the letters is important. For example, in A,F , Prema’s guess, the across letter (the distance along the horizontal axis) is written first. Note, though, that the labels refer to the square spaces rather than the intersecting lines of the ordered pair and co-ordinate system.
Explain to the students how we need such a location system when we find places on maps or find a seat at the movies. A possible introduction could be to prepare two sets of alphabet cards labelled A to H and model the grid on the classroom floor. Students could be randomly assigned to a square on the grid or could be placed on a spot and asked to state the label of their square.
Question 2 will be useful for sharing and discussion. The students need to realise that Clara’s second cowpat lands on two squares.
Some extension ideas include:
• Two students play a game similar to Battleships. Each player has a grid and marks on it a trail of cowpats in adjacent squares that starts on one side of the grid and goes to the other. The other player tries to find the trail by calling out labels of squares where cowpats might be. The first player to complete a trail as marked on their partner’s grid wins.
• Two players each have a grid on which they place six items typically sold at a school gala, for example, fudge, a pot plant, a drink, clothing, comics, and books. The players take turns trying to collect all six items into their basket by calling the correct labels for squares. Their partner is required to indicate a near miss if a player’s call is only one square away.
• Two players have a 6 x 6 grid between them. They throw two dice marked A to F or spin a spinner. One throw or spin gives the horizontal reference, and the second gives the vertical reference. The player puts a counter in the square. The first player to have three of their counters in consecutive squares (vertical, horizontal, or diagonal) is the winner.
Treasure Trove on pages 6–7 of Under the Sea, Figure It Out, Levels 2–3, also deals with grids and co-ordinates. Note, though, that this activity uses co-ordinates that refer to intersecting lines rather than the square spaces.
Answers to Activity
1a.
b. F,E
c. Eva
d. Theo, Jack, and Sam
2.