This unit uses the context of morning tea with whānau. Begin by discussing students' experiences of of morning tea and compare differences between families. Explain that this week they will be working at different stations to help prepare for a of morning tea. This may be an event that you’d like to plan and invite students’ whānau to.
Note: It’s important not to use food for purposes other than food.
Points that may need to be discussed as work progresses include:
- The importance of estimation and the value of accurate estimation.
- The relationship between millilitres and litres.
- Reading volumes and scales to an appropriate accuracy. Sometimes it will be possible to estimate half-way between marked volumes.
Station One
In this station students accurately measure the volume of a variety of different drinking glasses. You may wish to begin by modelling the measurement of the volume of a liquid. This could start with measuring the volume of water in millilitres and litres. Discuss where students have read or heard of the terms “millilitres” and “litres”. You may wish to make a list of objects in the classroom that show these measurements (e.g. drink bottles). Ensure that your students can read the scale of the provided measuring vessels accurately, and understand the relevant abbreviations (l or L for litres and ml or mL for millilitres). This could be modelled by the teacher, or pairs of students could work together to develop a set of rules for measuring volumes.
Student instructions (Copymaster 1)
In this station you need to estimate and measure the volume of different glasses for drinks at the morning tea.
Estimate the volume of each of the glasses in mL. Record your estimates.
Which glass do you think will hold the most?
Which will hold the least?
Which glasses will hold a similar amount?
Use the measuring equipment to measure the volume of each of the glasses. Record your results in a table as you work.
Compare your results with your estimates. How close were your estimates?
Which glass held the most?
Which held the least?
Which glasses held a similar amount?
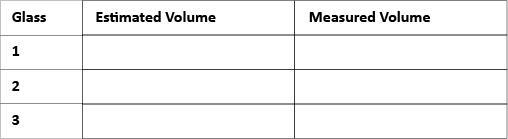
Encourage discussion around why some learners estimated the volume of liquids differently.
Station Two
In this station students accurately measure the volume of a variety of bowls that could be used to make jelly.
Student instructions (Copymaster 2)
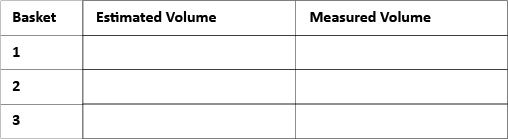
In this station you need to estimate and measure the volume of different bowls used to make jelly for the morning tea.
Estimate the volume of each of the bowls. Record your estimates.
Which bowl do you think will hold the most?
Which will hold the least?
Which bowls will hold a similar amount?
- Use the measuring equipment to measure the volume of each of the bowls. Record your results in a table as you work.
Compare your results with your estimates. How close were your estimates?
Which bowl held the most?
Which held the least?
Which bowls held a similar amount?

If each packet of jelly makes 1 litre how many packets would be needed for each bowl?
How many packets would be needed for all the bowls?
Share and discuss your estimations and measurements with another pair or group. What is the same? What is different? Why might this be?
Station Three
In this station students make baskets to hold chips and measure the volume of the baskets they have made.
Student Instructions (Copymaster 3)
In this station you will make baskets to hold chips for the morning tea and measure the volume of the baskets you have made. Can you make three baskets that hold different amounts?
- Make a basket: Take a rectangular shape and cut squares of the same size out of each corner of the rectangle. Cut out the shape and tape up the sides. Cut a strip for a handle and tape it on.

- Estimate the volume of your basket. Record your estimates on a table.
Which basket will have the greatest volume?
Which will have the least? - Measure the volume of your baskets using the sand and the measuring equipment.
How do you work out the volume of a box, like that?
If you know the volume of the box in cubic centimetres, how do you figure out how much water in millimetres and litres, it will hold?
Record your results in a table as you work. Compare your results with your estimates. How close were your estimates?
Which basket held the most?
Which held the least?
Station Four
In this station students measure the volume of a variety of cake tins and predict which recipe would be best to use for each tin.
Student Instructions (Copymaster 4)
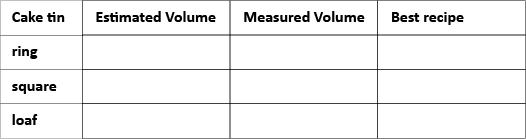
In this station you need to measure the volume of the different cake tins, then decide which recipe mix would be best for each tin. Remember that the cakes will rise when they are cooked!
- Estimate the volume of each of the cake tins. Record your estimates on a table.
- Measure the volume of each of the cake tins using water and the measuring equipment. Record your measurements.
Compare your results with your estimates. How close were your estimates?
Which tin held the most?
Which held the least?
- Which of the recipes below would be best for each tin? You will need to add up the volume of ingredients and allow for the cake to rise when baked to be able to make a good decision.
Recipes
Absurdly Easy Chocolate Cake
Ingredients
3 cups flour (750 mL)
2 cups sugar (500 mL)
6 tablespoons cocoa (90 mL)
2 teaspoons baking soda (10 mL)
1 teaspoon salt (5 mL)
3/4 cup vegetable oil (190 mL)
2 tablespoon vinegar (30 mL)
2 teaspoon vanilla (10 mL)
2 cup cold water (500 mL)
Directions
Mix the dry ingredients. Add the wet ingredients. Stir until smooth. Bake at 180ºC for at least 30 minutes.
One Mix Chocolate Cake
Ingredients
1 cup self raising flour (250 mL)
1 cup sugar (250 mL)
50 grams melted butter (50 mL)
1/2 cup milk (125 mL)
2 eggs
2 Tbsp. cocoa (30 mL)
1 tsp. vanilla (5 mL)
Method
Mix all ingredients together in a large bowl with a wooden spoon. Bake at 180ºC for about 30 minutes.
Daisy’s Easy Chocolate Cake
Ingredients
1 1/2 cups sugar (375 mL)
1 cup cold water (250 mL)
125g butter (125 mL)
2 Tablespoons cocoa (30 mL)
1/2 teaspoon baking soda (2.5 mL)
2 eggs, well beaten
1 1/2 cups self-raising flour (375mL)
Method
Put sugar, water, butter, cocoa and soda into a large pot.
Stir over low heat until butter has melted, then bring to the boil.
Simmer for 5 minutes and remove from heat.
When mixture has cooled, stir in beaten eggs. Sift in the flour and beat well.
Bake at 180°c for 50-60 minutes.
Station Five
In this station students calculate and measure the volume of sauce needed for cheerios at the morning tea.
Student Instructions (Copymaster 5)
- In this station you need to estimate and measure the amount of sauce needed for cheerios at the morning tea.
- Estimate the volume of sauce in each of the bottles. Record your estimates on a table.
- Measure the volume of sauce in each bottle using water and the measuring equipment. Record your results on a table.
- If each person uses 10mL of sauce, how many people will be able to use each of the sauce bottles? Estimate then measure for each bottle, recording your results on a table.
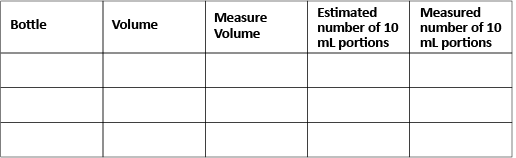
- If each person uses 15mL of sauce, how many people will be able to use each of the sauce bottles?
- How much sauce is contained in all of the bottles put together? Estimate then measure.
Making benchmarks: Volume
In this unit we will explore the idea of having benchmarks of 1 litre and ½ litre or 500 millilitres, to aid in estimating the volume of given objects.
Volume is the measure of space taken up by a three-dimensional object. The space within a container is known as its capacity but as the thickness of many containers is negligible, it has become acceptable to refer to the space inside a container as volume too. In the measurement strand of the New Zealand Curriculum, volume and capacity are used as interchangeable terms (although the glossary describes capacity as the interior volume of an object).
Students need to develop personal measurement benchmarks. A benchmark is an understanding or a “feel” for the size of a measurement unit, which is useful when working with measures in daily life. Often these benchmarks are linked to familiar items such as a one litre milk bottle or a Pyrex jug.
This unit supports students to develop personal benchmarks for 1, 100 or 1000 cubic centimetres, 1 litre and ½ litre, and also strengthens students’ understandings of the relationship between litres and millilitres. Milli is the prefix for 1/1000 so 1 millilitre (1 mL) is 1/1000th of 1 litre and has a volume of 1 cm3.
The learning opportunities in this unit can be differentiated by altering the difficulty of the tasks to make the learning opportunities accessible to a range of learners. For example:
This unit is focussed on measuring the volume of containers. Use a range of objects and containers that are familiar to your students to encourage engagement. Suitable examples are tissue boxes, cereal packets, Milo or biscuit tins, milk or fruit juice bottles, and toy buckets.
Te reo Māori vocabulary terms such as mehua (measure), rita (litre), kītanga (capacity), rōrahi (volume), whakatau tata (estimate), mita pūtoru (cubic metre), mitarau pūtoru (cubic centimetre) and ritamano (millilitre) could be introduced in this unit and used throughout other mathematical learning.
Session 1
For this session you will need plenty of bottles and containers of a range of sizes, including several that hold 1 litre. Fruit juice bottles, shampoo bottles, and yoghurt containers are particularly good containers for this task. You could either ask students to bring bottles and containers to school with them or collect them yourself. To ignite interest in this session, begin with a discussion around why it is important to know the amount that can be held in a container/ Possible contexts for framing this discussion could include looking at the ways in which people travelled to New Zealand (e.g. by ship, waka, plane etc.) or looking at planning the amount of food and drink needed for a school camp.
What is the most efficient way to find the place of this (new) container amongst the others?
Students might suggest estimating first to get a ‘ballpark’ idea of where the new container might go. Next, compare the capacity of the new container to the others by pouring. How many pourings are needed?
Session 2
The following activities are to provide students with experiences to compare volumes/capacities of different objects and to create a benchmark for a container that holds one litre.
Compare it to a large Place Value Block cube.
Which object takes up the most space, that is, has the greatest volume?
The visual appearance of the large cube makes it look smaller than most other objects with the same volume of 1 litre (1000 cm3). It is fun to fill a bucket of water to the brim and ‘dunk’ the containers one at a time. The water that overflows is equivalent to the volume of the container or cube.
Gather the class and discuss the strategies students used to make their estimates. Consider the following points:
Do taller objects have more volume than shorter objects?
How does the cross-section affect the volume of the object?
If you have an object that you know is 1 litre, how do you compare its volume to that of an object that has different height and cross-section?
Provide students with this open challenge. They need scrap cardboard, scissors, rulers and strong tape.
Create a cuboid (rectangular prism), cone, or cylinder shaped container that can hold exactly 1 litre of water.
You may need to support students with creating nets, rolling pieces of card to form cones or cylinders, and applying their understanding of the fact that 1 litre equals 1000 cubic centimetres.
Session 3
In this session students compare their benchmarks for one litre and try to estimate one litre.
We know that all the bags hold 1 litre but they look different. Why is that?
Compare the bags to reliable benchmark objects.
You might use a small place value block to give students a sense of the size of 1 millilitre.
How many millilitres will fill a teaspoon? (5mL)
....a dessert spoon (10 mL)?
....a tablespoon (20 mL)?
Show the students a Place Value Block flat.
How many millilitres is this? (10 x 10 = 100)
How many lots of 100 millilitres make 1 litre? (10 since 10 x 100 = 1000)
Stack ten flats to form a large 1 litre cube to prove the result.
Provide the students with some conversion examples between millilitre and litre measures, such as:
Session 4
In this session students work with volume as the amount of space that an object takes up.
Make a blob that has a volume of 48 cm3 which is the same volume as 48 mL.
Change the volume to provide more challenge, e.g. 0.124 L.
Session 5
What is the volume of a can of soft drink?
Why might that volume be a good ‘size’?
What is the volume of your lunchbox?
Why might that volume be a good ‘size’?
What would be a good volume for a chilly bin?
Why is the capacity of a backpack important?
How many litres is your backpack in capacity?
Use the large Place Value Block cube as the benchmark of 1 litre to estimate the students' backpacks.
Dear family and whānau,
At the start of this week we would like each child to bring a plastic container or empty bottle to school. We are collecting containers of as many different sizes and shapes as we can. During the week, draw your child's attention to the labels of containers around your home and ask them to tell you the capacity of the containers in litres or millilitres.
If possible, do some baking with your child. Recipes usually include standard measures of weight and volume, such as grams (g) and millilitres (mL).
Figure It Out Links
Some links from the Figure It Out series which you may find useful are:
Morning tea volumes
In this unit students build on previous experiences with litres and millilitres. Work is carried out in the context of planning a morning tea with students measuring volumes accurately as part of the planning process.
When students can measure areas effectively using non-standard units, they are ready to move to the use of standard units. The motivation for moving to this stage, often follows from experiences where the students have used different non-standard units for the same volume. This allows them to appreciate that consistency in the units used allows for easier and more accurate communication.
For example, when building a sandcastle, students may have used a variety of cups and vessels to investigate what volume of sand can be held in the different containers. This allows them to appreciate that consistency in the units used allows for easier and more accurate communication.
It is important to note a mathematical difference between capacity and volume. Volume describes the amount of space occupied by a three-dimensional liquid, solid, or gas object (how much juice can fit into this container?). In comparison, capacity describes the space within a container (how much juice can this container hold?). In the measurement strand of the New Zealand Curriculum, the terms volume and capacity are used interchangeably. In the glossary of this document, “capacity” is defined as the interior volume of an object.
When learning about volume, students should have opportunities to explore the question “how much space does a three-dimensional object occupy?”. Students should also have opportunities to measure volume by measuring fluids. The volume of a cuboid can be calculated by multiplying together its width, length, and height (l x w x h = volume). Volume is measured cubic centimetres and cubic metres. However, the usual sequence used in primary school is to introduce the litre as a measurement of volume, before introducing cubic units.
Students’ measurement experiences must enable them to:
Students also need to be able to read a range of scales to accurately measure volume .
The standard units can be made meaningful by looking at the volumes of everyday objects. For example, the litre milk carton, the 2-litre ice-cream container and the 100-millilitre yoghurt pottle.
The learning opportunities in this unit can be differentiated by varying the scaffolding provided to make the learning opportunities accessible to a range of learners. Ways to support students include:
The context for this unit can be adapted to suit the interests and experiences of your students. The unit begins with a discussion of students’ experiences of morning tea with their whānau. Following this discussion you could work with the students to adapt the activities and contexts at the stations to reflect their experiences. Alternatively, you may like to choose a social gathering other than morning tea with whānau as the context for the measuring tasks. For example, the school disco, or a birthday party, a fiefia night, preparing a hāngī or another important cause for celebration and gathering.
Te reo Māori vocabulary such as mehua (measure), kai (food), rita (litre), and ritamano (millilitre) could be introduced in this unit and used throughout other mathematical learning.
Station One:
Station Two:
Station Three:
Station Four:
Station Five:
This unit uses the context of morning tea with whānau. Begin by discussing students' experiences of of morning tea and compare differences between families. Explain that this week they will be working at different stations to help prepare for a of morning tea. This may be an event that you’d like to plan and invite students’ whānau to.
Note: It’s important not to use food for purposes other than food.
Points that may need to be discussed as work progresses include:
Station One
In this station students accurately measure the volume of a variety of different drinking glasses. You may wish to begin by modelling the measurement of the volume of a liquid. This could start with measuring the volume of water in millilitres and litres. Discuss where students have read or heard of the terms “millilitres” and “litres”. You may wish to make a list of objects in the classroom that show these measurements (e.g. drink bottles). Ensure that your students can read the scale of the provided measuring vessels accurately, and understand the relevant abbreviations (l or L for litres and ml or mL for millilitres). This could be modelled by the teacher, or pairs of students could work together to develop a set of rules for measuring volumes.
Student instructions (Copymaster 1)
In this station you need to estimate and measure the volume of different glasses for drinks at the morning tea.
Estimate the volume of each of the glasses in mL. Record your estimates.
Which glass do you think will hold the most?
Which will hold the least?
Which glasses will hold a similar amount?
Use the measuring equipment to measure the volume of each of the glasses. Record your results in a table as you work.
Compare your results with your estimates. How close were your estimates?
Which glass held the most?

Which held the least?
Which glasses held a similar amount?
Encourage discussion around why some learners estimated the volume of liquids differently.
Station Two
In this station students accurately measure the volume of a variety of bowls that could be used to make jelly.
Student instructions (Copymaster 2)
In this station you need to estimate and measure the volume of different bowls used to make jelly for the morning tea.
Estimate the volume of each of the bowls. Record your estimates.
Which bowl do you think will hold the most?
Which will hold the least?
Which bowls will hold a similar amount?
Compare your results with your estimates. How close were your estimates?
Which bowl held the most?

Which held the least?
Which bowls held a similar amount?
If each packet of jelly makes 1 litre how many packets would be needed for each bowl?
How many packets would be needed for all the bowls?
Share and discuss your estimations and measurements with another pair or group. What is the same? What is different? Why might this be?
Station Three
In this station students make baskets to hold chips and measure the volume of the baskets they have made.
Student Instructions (Copymaster 3)
In this station you will make baskets to hold chips for the morning tea and measure the volume of the baskets you have made. Can you make three baskets that hold different amounts?
Which basket will have the greatest volume?
Which will have the least?
How do you work out the volume of a box, like that?
If you know the volume of the box in cubic centimetres, how do you figure out how much water in millimetres and litres, it will hold?
Record your results in a table as you work.
Compare your results with your estimates. How close were your estimates?
Which basket held the most?

Which held the least?
Station Four
In this station students measure the volume of a variety of cake tins and predict which recipe would be best to use for each tin.
Student Instructions (Copymaster 4)
In this station you need to measure the volume of the different cake tins, then decide which recipe mix would be best for each tin. Remember that the cakes will rise when they are cooked!
Compare your results with your estimates. How close were your estimates?
Which tin held the most?
Which held the least?
Recipes
Absurdly Easy Chocolate Cake
Ingredients
3 cups flour (750 mL)
2 cups sugar (500 mL)
6 tablespoons cocoa (90 mL)
2 teaspoons baking soda (10 mL)
1 teaspoon salt (5 mL)
3/4 cup vegetable oil (190 mL)
2 tablespoon vinegar (30 mL)
2 teaspoon vanilla (10 mL)
2 cup cold water (500 mL)
Directions
Mix the dry ingredients. Add the wet ingredients. Stir until smooth. Bake at 180ºC for at least 30 minutes.
One Mix Chocolate Cake
Ingredients
1 cup self raising flour (250 mL)
1 cup sugar (250 mL)
50 grams melted butter (50 mL)
1/2 cup milk (125 mL)
2 eggs
2 Tbsp. cocoa (30 mL)
1 tsp. vanilla (5 mL)
Method
Mix all ingredients together in a large bowl with a wooden spoon. Bake at 180ºC for about 30 minutes.
Daisy’s Easy Chocolate Cake
Ingredients
1 1/2 cups sugar (375 mL)
1 cup cold water (250 mL)
125g butter (125 mL)
2 Tablespoons cocoa (30 mL)
1/2 teaspoon baking soda (2.5 mL)
2 eggs, well beaten
1 1/2 cups self-raising flour (375mL)
Method
Put sugar, water, butter, cocoa and soda into a large pot.
Stir over low heat until butter has melted, then bring to the boil.
Simmer for 5 minutes and remove from heat.
When mixture has cooled, stir in beaten eggs. Sift in the flour and beat well.
Bake at 180°c for 50-60 minutes.
Station Five
In this station students calculate and measure the volume of sauce needed for cheerios at the morning tea.
Student Instructions (Copymaster 5)
Family and whānau,
This week at school we are estimating and measuring volumes using litres and millilitres. Please help find a container in your home with an estimated volume of 600 ml. Please send it to school so we can measure its volume accurately.