Tessellation, Transformation and Art
In this unit students learn about transformations (translations, rotations, reflections) and tessellations, then apply this knowledge to create a piece of art that creatively demonstrates one or more tessellated transformations.
- Recognise invariant properties of tessellations.
- Apply invariant properties to continue and complete given tessellating patterns.
- Use translations, rotations and reflections to create Escher-type tessellations.
- Apply knowledge of tessellations to the creation of a piece of art.
The unit of work is based on the work of the Dutch artist Escher who utilised mathematical concepts, including tessellation, to create mathematically pieces of artwork.
Tessellations are found all over the place but especially in the kitchen and bathroom on tiles and lino. Occasionally you can see them in the living room as the basis of the pattern on carpets and in parquetry wooden floors. Tessellations are a neat and symmetric form of decoration. They also provide a nice application of some of the basic properties of polygons.
They also have other, practical uses. Brick walls are made of the same shaped brick repeatedly laid in rows. Bees use a basic hexagonal shape to manufacture their honeycombs. The brick wall provides a tessellation with rectangles and the honeycomb is a tessellation of regular hexagons. These tessellations provide a strong structure for their two different purposes.
The key features of tessellations are that there are no gaps or overlaps. The same figure (or group of figures) come together to completely cover a wall or floor or some other plane. This requires the vertices to fit together. This can be done in two ways. Either the corners of the basic shape all fit together to make 360° , or the corners of some basic shapes fit together along the side of another to again make 360°. Note that this unit does not include explicit teaching around angles, although this could be included as an additional point of learning. You might use the ideas from Measuring Angles, Level 3 for this purpose.
The idea of this unit is for students to develop their understanding of the mathematical concepts that underlie the creation of Escher type tessellations and apply this to the creation of an art piece.
Main resource: Creating Escher-Type Drawings. E.R Ranucci and J.L. Teeters, Creative Publishers Inc 1977.
Associated achievement objectives:
The Arts:
Understanding the arts in context
- Investigate the purpose of objects and images from past and present cultures and identify the contexts in which they were or are made, viewed, and valued.
Developing practical knowledge
- Explore and use art-making conventions, applying knowledge of elements and selected principles through the use of materials and processes.
The learning opportunities in this unit can be differentiated by providing or removing support to students and by varying the task requirements. Ways to differentiate include:
- providing physical manipulatives, regular polygons, or online tools (many are available), so that students can experiments with the tessellation and transformation of different shapes
- asking students to justify why they believe tessellating patterns occur
- directly modelling examples of tessellations and transformations
- providing teacher support with the drawing of tessellations
- providing opportunities for students to work collaboratively in partnerships, and to share and justify their ideas in small groups, and with the whole class.
The difficulty of tasks can be varied in many ways including:
- altering the complexity of shapes students are asked to use in their tessellations
- displaying the work of students as models for others. Motivate students to add a new, undiscovered tessellation to the class display.
The contexts for this unit can be adapted to suit the interests and cultural backgrounds of your students. For example, tessellations are prominent in Islamic art traditions, and in tapa cloth designs from Pacific nations. Tessellation might fit well with efforts to beautify the school environment. Mosaic tiles can be created from fired clay, or cobblestones created from concrete. Look for examples of tessellations in students’ environment such as lino, or tile patterns, facades of buildings, or honeycombs in beehives. Look online for examples of tessellation in the natural and human-made world.
Te reo Māori kupu such as rōpinepine (tesselate, tessellation, tiling, mosaic), neke (translate), huri (rotate), and whakaata (reflect) could be introduced in this unit and used throughout other mathematical learning.
- Tessellating shape model: Plastic or cardboard shape tiles, or a digital representation (search online for interactive tessellation tool)
- Scissors
- Glue
- A3 paper
- Packet of note paper
- Tracing paper
- Colour pencils
- System/resources for storing student work
- Copymaster 1
- Copymaster 2
- Copymaster 3
- Copymaster 4
- Copymaster 5
This unit of work is presented as a series of six sessions, however, more sessions than this may be required. It is also expected that any session may extend beyond one teaching period.
This unit of work has most of the mathematics front-loaded to best support students in developing ideas for their piece of art. The teacher supports this work with examples of art that are based on the ideas of the mathematics being explored.
Session 1
Introduction: This session introduces the artwork of Escher and the concept of tessellation. You will make connections between mathematical concepts and their application to art, introduce tessellations, and support students to develop their understanding of area and length in relation to tessellations.
Activity 1
- Use the PowerPoint to introduce students to Escher’s work and the idea of tessellations. You could edit this PowerPoint to include images that are of increased relevance to your students (e.g. images of local buildings, art by culturally relevant artists, tiles in your school environment).
- Ask students to share their prior knowledge of tessellations.
Where have you seen tessellations before? Responses might include paving patterns, bridges, landmark buildings, ceramic tiles, beehives, wallpaper.
Are there certain types of shapes that often see being used to tessellate?
What sort of transformations are applied to the shapes that are being tessellated? Bring students’ attention to the invariant properties of tessellations – meaning properties of the tessellating shapes which do not change, such as area, length, and angle.
What can you say about the shapes that have been tessellated? Look for students to identify that there are no gaps or overlaps between shapes, to identify the transformations that have been applied, and to identify the names of the shapes used in the tessellations. The shapes that are specifically referenced in this unit are equilateral triangle, square, rectangle, rhombus, parallelogram, kite and hexagon. - Model the tessellating of the different shapes mentioned in discussion, using your chosen tessellating shape model.
- Discuss the shapes used and their attributes (e.g. angles, straight edges). Look for students to identify the type of angles used in tessellating shapes, and therefore the shapes that can and cannot create a tessellating pattern. The corners of the basic shapes used in a tessellation will either all fit together to make 360°, or the corners of some basic shapes will fit together along the side of one another to make 360°. See the Level 3 Geometry Unit Keeping in Shape for further detail around which kinds of shapes tessellate.
- Introduce Copymaster 1 to students. Model completing a few tessellating tiles for each of the given designs.
- Remind students of the invariant properties. Provide students with time to complete the activities Stingrays, Hexastars, and Butterflies. Roam and support students - looking for them to accurately complete the tessellations. Some students may find it difficult to maintain the scale and proportion of the shapes, or to complete the whole page of each tessellating pattern. You could reduce the amount of tessellating patterns students are required to complete (e.g. ⅓ of each pattern), or ask each student to only complete one of the tessellating patterns.
- As a class, share the tessellations created and reflected on the process. Look for students to identify that there are no gaps or overlaps in their tessellations, and that the area, length, and angle of the tessellating shapes do not change.
Session 2
This session explores learning to create a base pattern for a tessellation that has translation only.
Activity 1
In this activity students learn more about translations as a method for creating tessellations.
Introducing Translations
Translations involve a linear shift or slide of a figure in a plane.
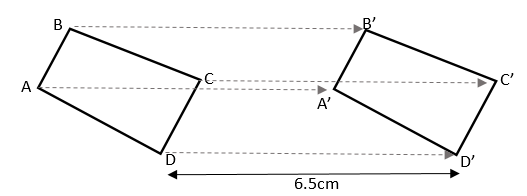
In the figure above, quadrilateral ABCD has been translated to a new position in the plane (A’B’C’D’). Note that lines AA’, BB’, CC’ and DD’ are all parallel.
We would say quadrilateral ABCD maps to quadrilateral A’B’C’D’ under translation to the right of 6.5cm.
The properties of size, shape and orientation remain invariant (unchanged) under the operation of translation.
Translation allows us to repeat patterns.
For further information about translations, see the Transforming Shapes unit of work.
Activity 2
- Once your students have demonstrated understanding of using translation to create a tessellating pattern, support them to make a base template using translation. Model the processes involved and provide plenty of support to ensure students complete this task successfully.
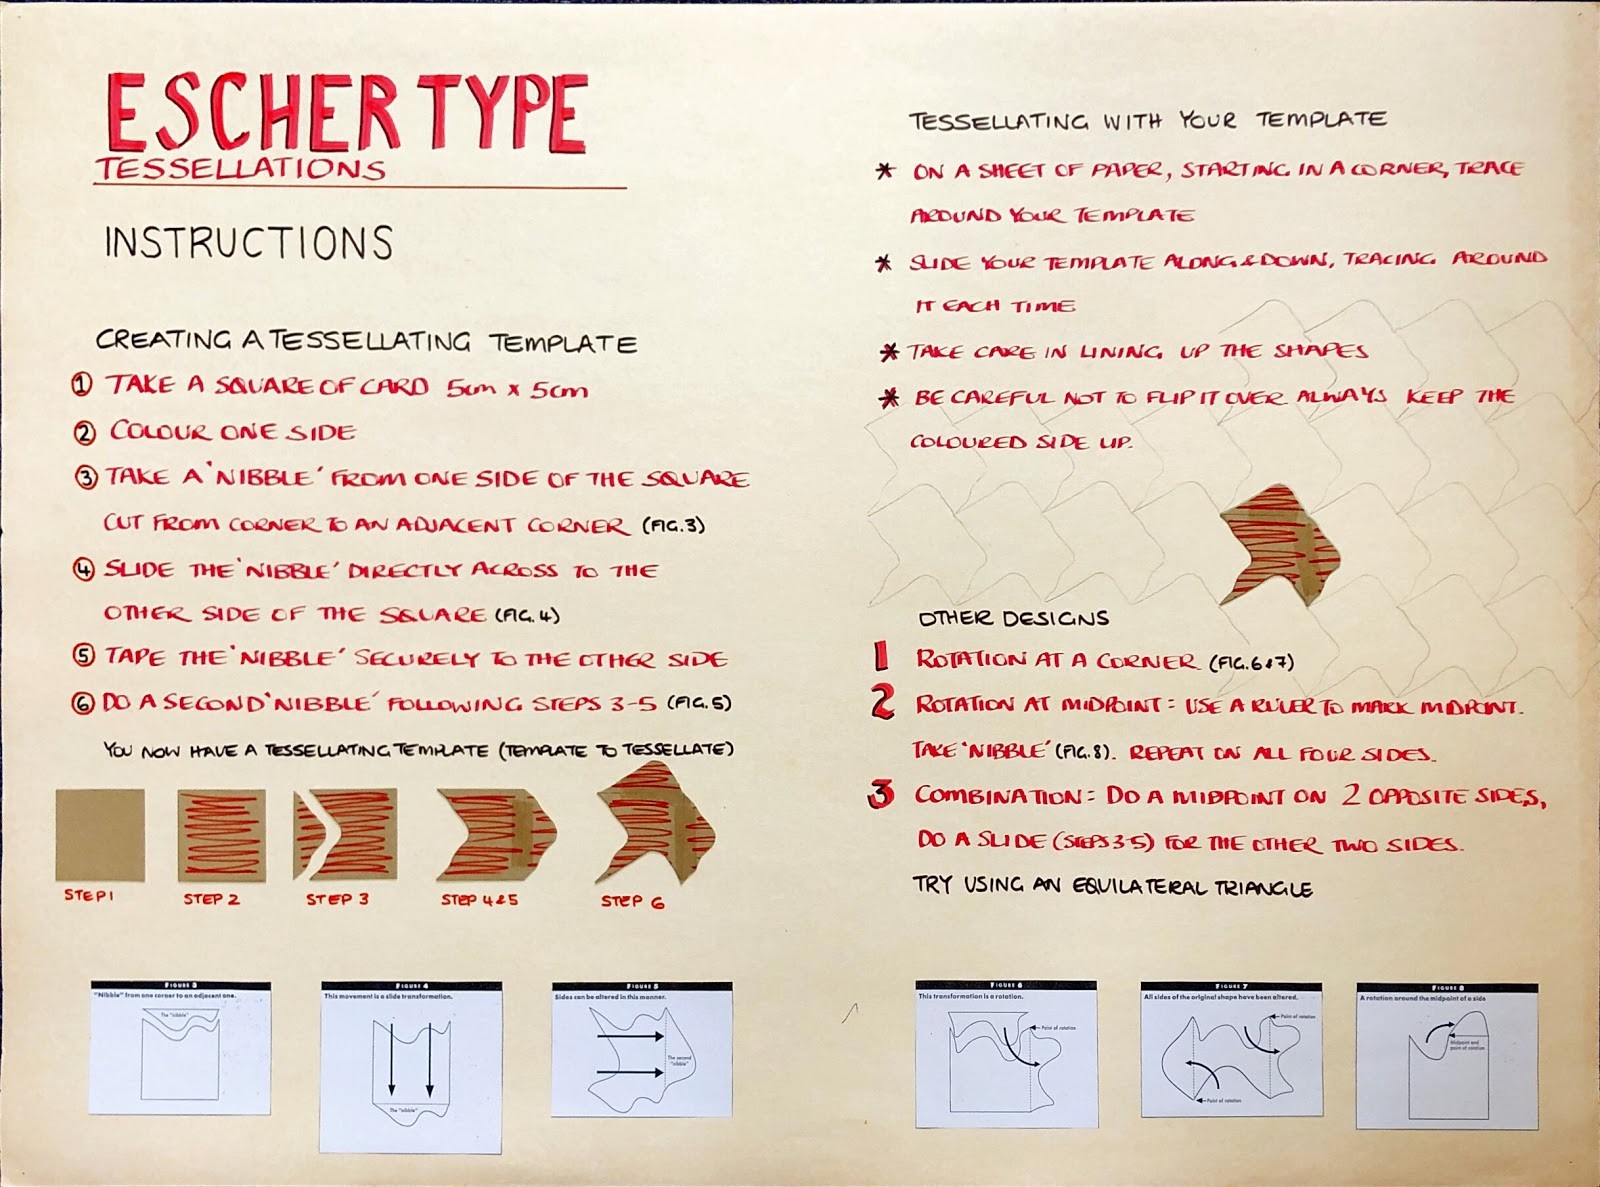
The Escher type tessellations instructions card above shows how a tessellating tile can be made using translation. These instructions use the idea of taking a nibble and translating that across the square. Other ideas include altering a side and translating the alteration across the square, both ideas are explored in the student activities given later.
Demonstrate this using an example or two, for example:
Encourage your students to think creatively when creating their tessellation tile. They could look online for inspiration, to artwork created by significant artists (e.g. Glenn Jones), or create work that reflects their interests, cultural backgrounds, or learning from other curriculum areas. Display a selection of pictures of Escher’s work to support your students in generating and developing their ideas.
- Give students time to practice and have a go at making their own tessellation using Copymaster 2. These are best printed A3 size.
The key ideas to reinforce during this time are the conservation of area, perimeter and orientation.
What area does your pattern cover? If students work with a 5cm square piece of card, creating a pattern to repeat on a sheet of A4 paper (and therefore creating a tessellation, as in the instruction card), the new shape should have the same area as the square.
As students work on using translation to tessellate they should record and show, perhaps on photocopy on their completed tessellation, the direction(s) and distances of the translations used in their tessellation. For example:
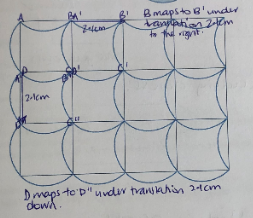
Alternatively, they might write ABCD maps to A’B’C’D’ under translation 2.1cm to the right; ABCD maps to A’’B’’C’’D’’ under translation 2.1cm down.
Session 3
This session explores learning to create a base pattern for a tessellation that has rotation (and translation).
Activity 1
In this activity students learn about using rotation to create a tessellating pattern.
Introducing Rotations
A rotation involves turning a figure in a plane about a given point in the plane, called the centre of rotation. The properties of size, shape and orientation remain invariant (unchanged) under the operation of rotation. In the picture below, the figure is rotated 90° clockwise about the point P. S has been rotated to a new position in the plane (object S’). Point P is the centre of rotation.
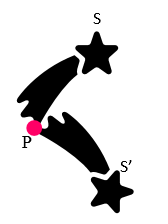
The centre of rotation may or may not be a point on the figure itself.
Half turn rotations
Half turn rotations occur when the amount of the rotation is 180o. Half turn rotations are common in Escher type tessellations.
For a more in-depth exploration of half turn rotations see the Transforming Shapes unit of work. These ideas could be adapted to explore other turns, e.g. quarter turns.
Activity 2
- Draw on your students' experiences of using translating to create a base template for a tessellation, and have them use rotation to create a new base template. Model the processes involved and provide plenty of support to ensure students complete this task successfully.
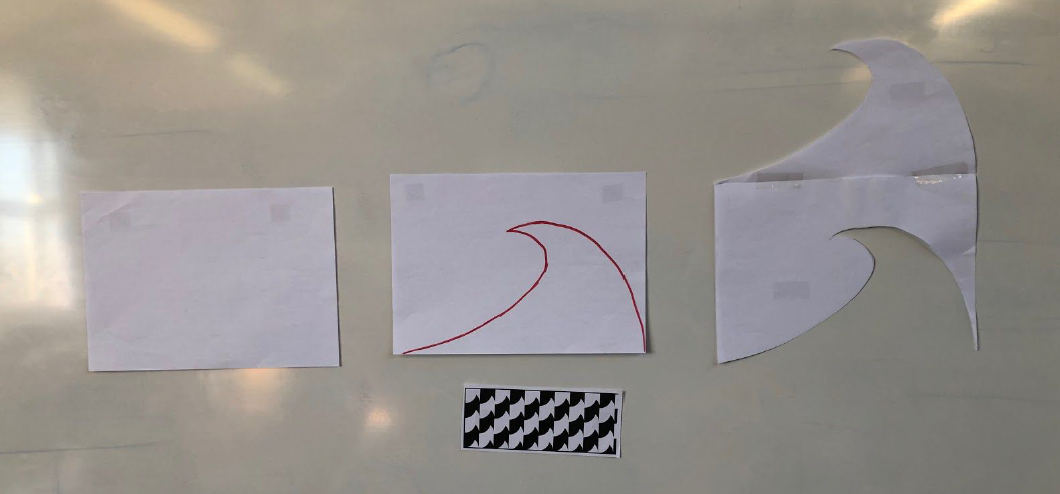
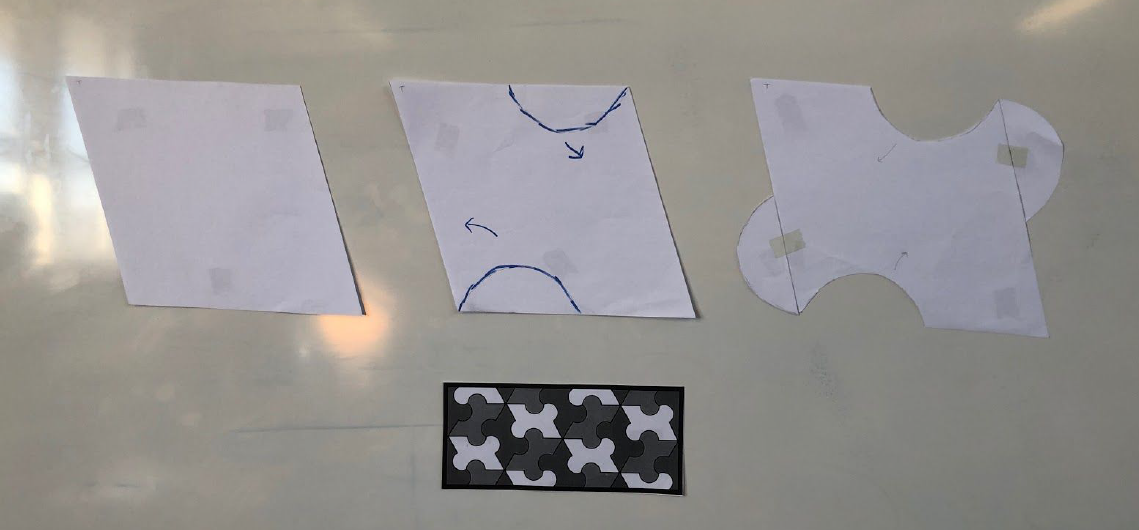
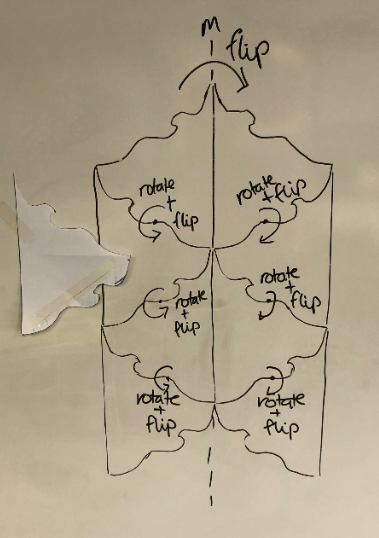
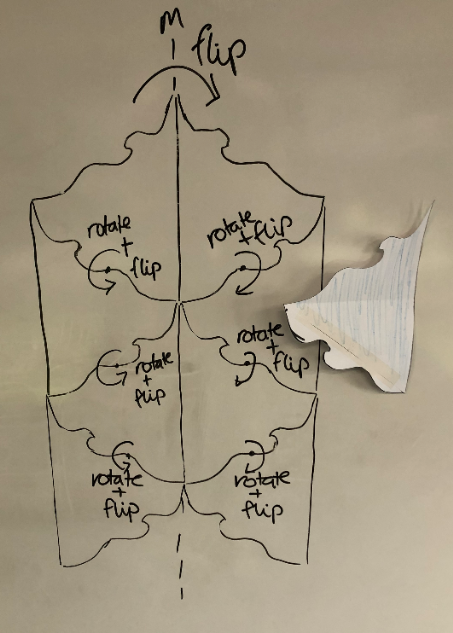
In this activity we are going to explore the other designs part of the Escher type tessellations instructions card. As with translation, a "nibble" can be taken and then rotated about a vertex, or rotation can happen at the midpoint on a side. Altering a side and then rotating about a vertex or midpoint on a side is also a viable way or creating a base pattern to use in the tessellation.
- Use cut outs on board to demonstrate how to alter a shape and then use rotation to create a tessellation.
- Give students time to practice and have a go at making their own tessellation using Copymaster 3. These are best printed A3 size.
Designs using rotations can become quite complicated. Shapes can be left-handed and right-handed. This is a good thinking exercise for students who need some extension. They could also try shading triangular tiled tessellations so that there are not equal numbers of each colour of tile. Students should describe the rotation(s) in the tessellation including angle of rotation and centre of rotation. They should also include the translation description as these two transformations combine to make the tessellation.
Session 3
This session explores learning to create a base pattern for a tessellation using reflection. Rotations and translations are also used. Using reflections is more challenging than using rotations and translations.
Activity 1
In this activity students are learning about reflections.
Introducing Reflections
A reflection is the flipping of points of the plane about a line, called a mirror line. The properties of size and shape remain invariant (unchanged) under the operation of reflection. In the figure below, the figure is reflected about line m. D’ is the reflected image of D, and D is the reflected image of D’.
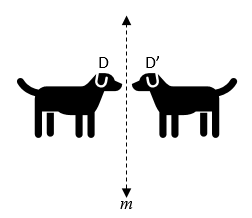
Mirror lines are usually labelled with small italic letters.
The properties of size and shape remain invariant (unchanged) under the operation of reflection.
For a more in-depth exploration of reflection see the Transforming Shapes unit of work.
Activity 2
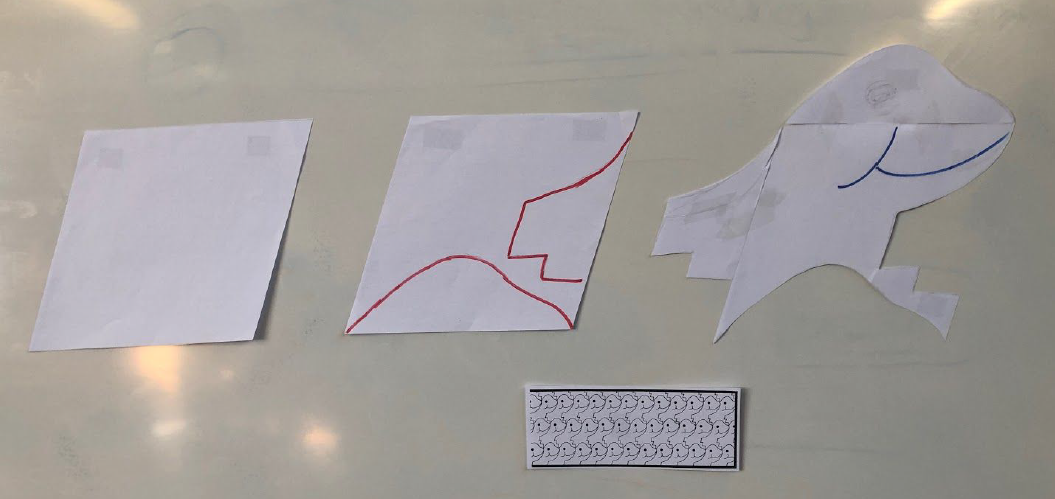
- Use paper with 'nibbles' to demonstrate how to alter a shape, and use reflection and rotation to create a tessellation.

Original triangle Showing the nibble Cut and reflect the nibble Rotate the nibble
Note that the “nibble” in the final two is flipped, so the side showing is the blank side. To demonstrate this, it is useful to colour one side.
- Use your shape to model how flipping and rotating can be used to create a tessellating design.
- Provide students with time to work on Copymaster 4, practicing and creating their own base templates. Roam and provide support and modelling.
Whilst students work, reinforce key ideas around the conservation of area and length. Students should demonstrate understanding that the reflections in the tessellation are not as straight forward, and should describe the rotations and translations they have used to create a tessellation.
Session 5
In this session students draw on their previous learning experiences and apply their developing knowledge of tessellations to more complex tiles.
Activity 1
- Have students choose a tile from the set in Copymaster 5.
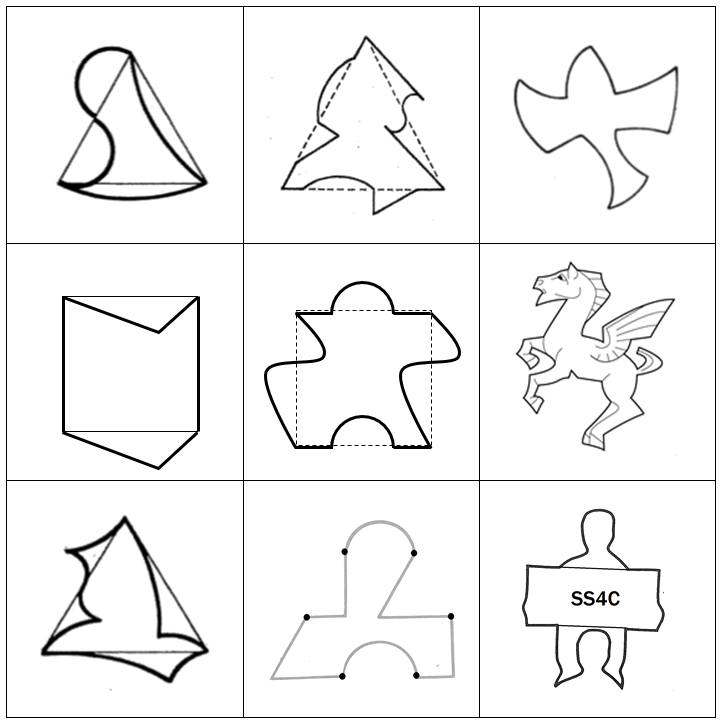
- Have students trace or make several copies of the tile to see if the shape tessellates. If the shape tessellates students should describe the transformations involved in the tessellation and describe how the shape was created (e.g. using slides (translations), flips (reflections) and/or turns (rotations)). They could write down these descriptions of verbally discuss and model them with a partner.
- As a class, discuss and investigate which shapes tessellate.
Activity 2
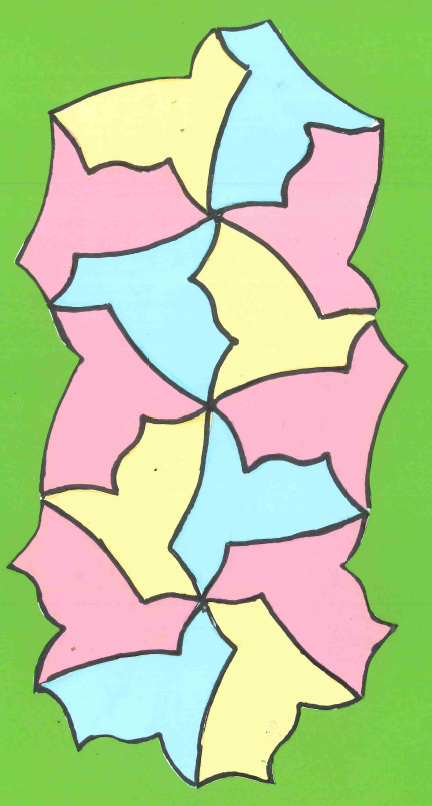
- Have students choose either one of the new shapes, one of the previous shapes they had created, or design a new shape, and produce a tessellation onto an A3 size poster.
To add colour, students could trace their shapes onto square (coloured) note pad paper, cut out the shapes, and glue them together to make the tessellation. Alternatively, they could transfer their shape onto paper and colour using different art materials.
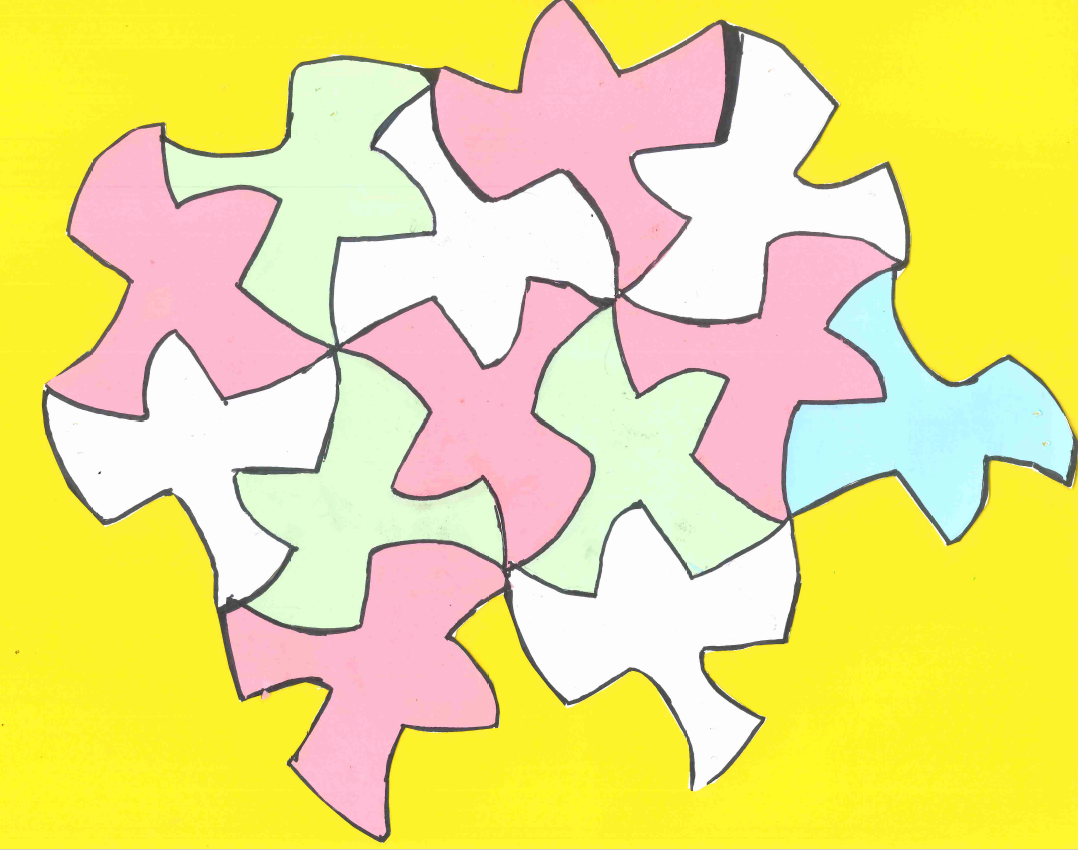
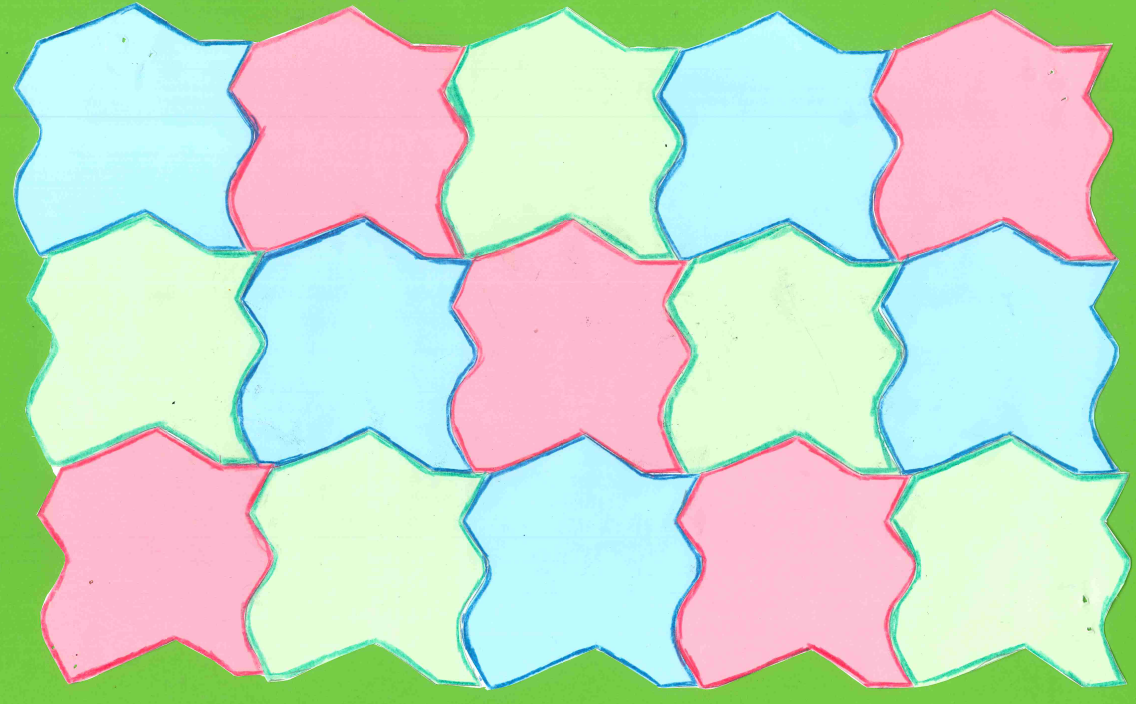
Examples showing the use of coloured paper:
Session 6
In this final session students improve design with colour, texture and imagination.
Activity 1
- Refer back to the Escher PowerPoint, or have students research and find examples of artworks created with tessellating shapes.
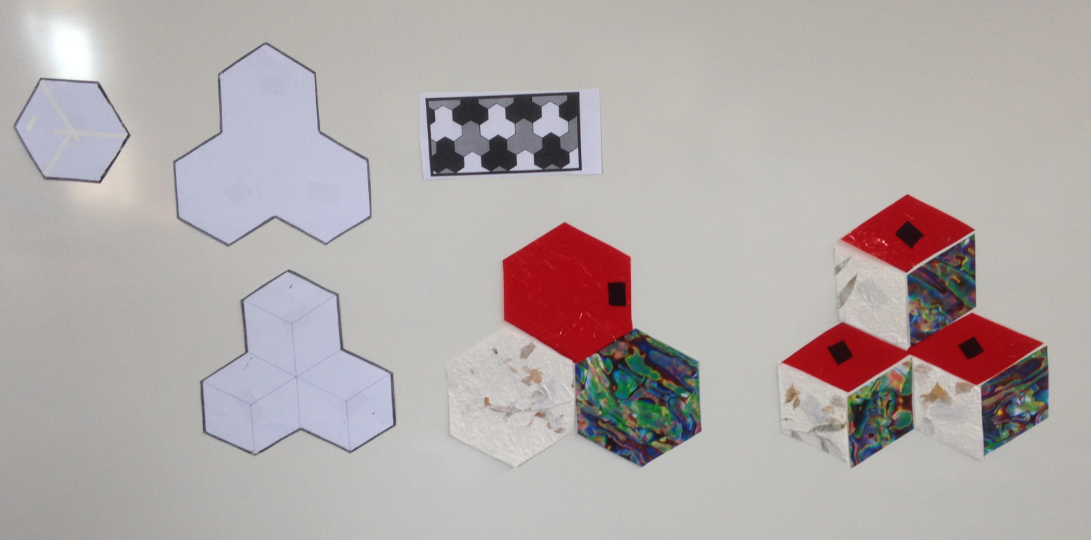
- Use hexagon tiles (on paper) to demonstrate how a rhombus can be seen as part of a hexagon. Arrange several of the hexagon tiles to create a larger, stacked shape (as shown below).
- Use hexagon and rhombus tiles (cut from patterned paper) to demonstrate how a tessellating, 3D-appearing design can be create using these shapes (see below).
- Have students draw something creative onto the base pattern that they have used in their tessellation. This could relate to their interests, cultural backgrounds, or current learning from another curriculum area.
- Gather the class together and have them share their designs.
Activity 2
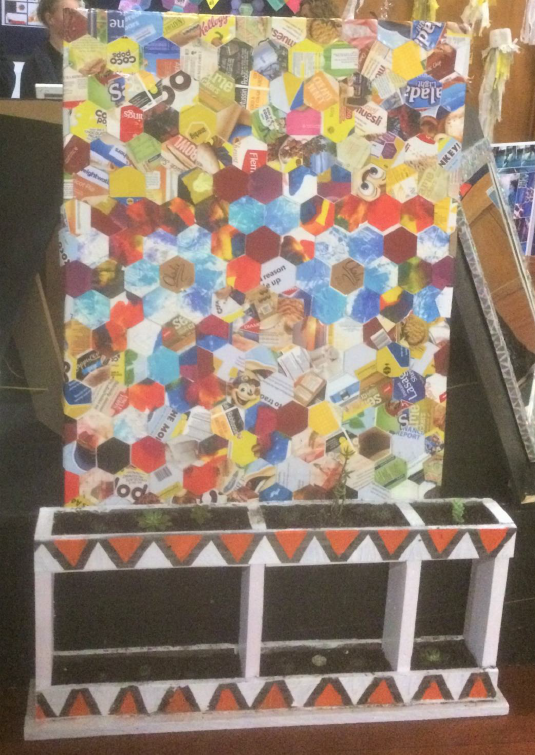
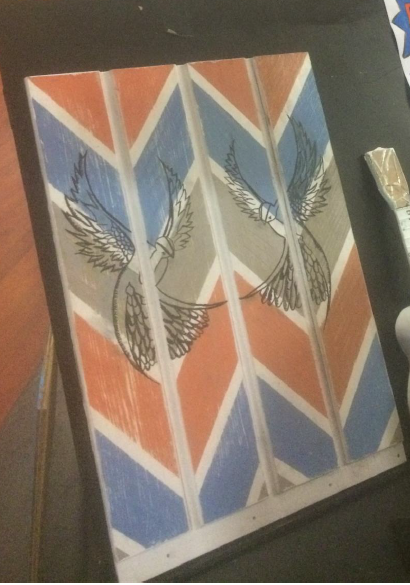
- Have students create an art-work that includes transformations and tessellation components in its design.
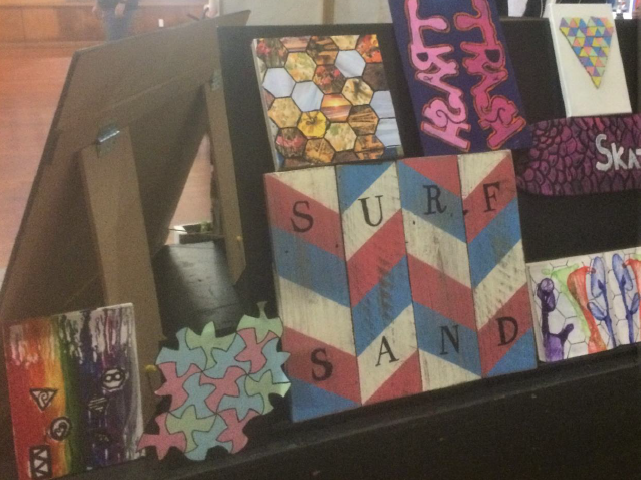
Examples of student created work:
Dear family and whānau,
This week in maths we have been looking at tessellations of the plane by different shapes. Your child will be able to tell you what ‘tessellation’ means. Ask them to show you how a basic shape can have 'nibbles' taken from it, and then be transformed (i.e. translated, rotated, or reflected), to create a tessellating pattern.
It would be appreciated if you could help your child look around your house and local neighbourhood to see if they can find any of the tessellations that we have been talking about. Your child should then make a sketch so that we can talk about them next week.