Trigonometric applications outside the classroom
This unit consolidates students' understandings of sine, cosine and tangent through practical experiences that apply trigonometry to a variety of outside-the-classroom situations.
- Describe and demonstrate how trigonometry can be used to find the height of a tall building or tree.
- Describe and demonstrate how trigonometry can be used to find the height of a high hill, or other high object where one cannot stand directly beneath the highest part.
- Describe in broad terms how trigonometry might be used to find the distance between the earth and the moon.
This unit is a ‘hands on’ unit, meaning the focus is not on students learning new mathematical concepts, but on applying familiar concepts in practical situations. The aim of these experiences is to both convince the students that trigonometry can be used for practical purposes, and to consolidate the understandings they already have.
The learning opportunities in this unit can be differentiated by providing or removing support to students, and by varying the task requirements. Ways to support students include:
- using symbols, words, numerals, and expressions alongside the use of diagrams to support students' thinking
- providing extended opportunities for students to practise using clinometers in contexts that are relevant to them
- providing opportunities for students to work in a range of flexible groupings to encourage peer learning, scaffolding, and extension
- constructing a class chart of key ideas, models, and expressions to be used by students as a point of reference
- modelling and providing explicit teaching around the construction of a clinometer and the mathematics explored in each session. Gradually releasing your level of responsibility allows you to scaffold students towards working independently
- allowing the use of calculators for making predictions and confirming calculations, and to ease the mental load associated with calculation.
To increase the relevance of the learning in this unit, support students to use their clinometers and measure the height of relevant tall objects (e.g. school buildings, the marae, their house).
Te reo Māori kupu such as pākoki (trigonometry), ine-rōnaki (clinometer), koki (angle), ine-koki (protractor), teitei (altitude, height, high, tall), pātapa (tangent), aho (sine), whenu (cosine), ahopae (latitude), and weheruatanga o te ao (equator) could be introduced in this unit and used throughout other mathematical learning.
- Clear plastic protractors (preferably with a small hole in the centre - large enough for a piece of the thread to be passed through)
- Clear plastic rulers
- Clear tape
- Cotton thread
- Materials for constructing one clinometer for each group of three students
- Small weights
- Drill and small bit
- Long tape measure
- World atlas
Session 1
In this session the students are grouped in threes. Each group constructs a clinometer, uses it to measure angles, and prepares for a practical application of trigonometry to be undertaken in Session 2. You might show students a video of a clinometer being used first, to engage them in the unit.
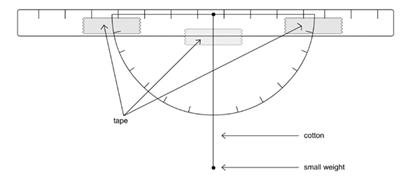
- Issue each group with a clear plastic ruler, a clear plastic protractor, clear tape, cotton and a small weight. If necessary, drill a small hole in the centre of the protractors large enough to pass the cotton through (prior to the session). Model the process of making a clinometer, and have each group make one. Tape the protractor to a clear plastic ruler, ensuring that the hole in the protractor is uncovered. Push the thread through the hole and tie a knot that is large enough to stop the string on one side of the protractor. Tie one small weight to the other end of the string.
- Use the next task to allow students to gain some facility in using their clinometer to measure angles. Use the diagram below to explain how this is done, and model the process for students.
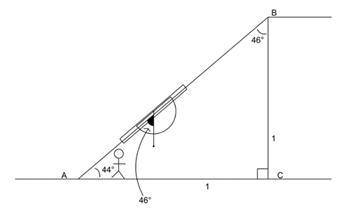
The clinometer allows the students to measure the angle ABC, and therefore calculate the angle BAC. Subsequently, students can visit different locations around your school and use their clinometer to measure different angles. Usually it is best for one person to hold the clinometer in such a way that his or her eye looks along the ruler to the top of the object concerned, and a team member to read off the angle. Students can take turns doing this. The aim is for students to become proficient at measuring angles so that this is not an issue during Session 2. For each measurement, the students should sketch a diagram like the one above and calculate the angle BAC.
Session 2
In this session students learn how to measure the height of one or more suitable objects, apply this knowledge to a practical task, and create a poster explaining how this procedure is carried out.
- Each student will need to measure the distance between his or her feet and eyes. Imagine the tall object to be measured is a tree. The diagram below indicates how this is done.
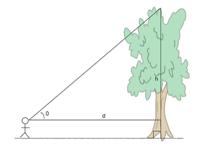
- Students measure the distance d from the base of the tree. They use the clinometer to find the angle θ. Using tan they can find h (because h = d x tan(θ)). At the end, they need to add on the distance between their feet and eyes. Model this process for students.
- Before you send the groups out, go through two practice examples using imaginary figures. Once you are sure the groups understand the process get each group to take the necessary measurements and calculate the heights concerned. Each group should make one tree measurement of the angle concerned (each at a different distance) for each member of the group.
- On their return to class, get each student to make a small poster that fully describes how a clinometer is made and how it was used for making the relevant measurements just completed.
Session 3
In this session we measure slightly more inaccessible objects, such as hills or trees surrounded by a lake.
- The method here is slightly more complicated, but trigonometry can still enable us to find such a height. See diagram below.
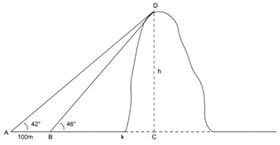
The method here involves taking a reading from the point A, then moving a fixed distance towards the hill to a new point B - in this case exactly 100m - and then taking another reading. Perhaps surprisingly, by using a combination of algebra and trigonometry, we can find the height of the hill.
- Go through the example in the diagram above. The algebra is a bit complicated. Work to 3 decimal places accuracy. Don’t pay attention to rounding errors because this will only confuse matters unnecessarily. The aim is for the students to understand the method. Greater accuracy can be used later once the method is understood.
- Let BC = k, and CD = h. Thus AC = 100 + k. Using triangle BCD, h = k x tan(46), ie h = 1.036k. Call this equation 1. Using triangle ACD, h = (100 + k) x tan(42), ie h = 0.900(100 + k), ie h = 90 + 0.900k. Call this equation 2.
Equations 1 and 2 each have unknowns h and k. Our aim is to find h. - At this point it will be helpful to the students to look at some simpler simultaneous equations of the same sort. For example: h = 2k and h = 10 + 0.5k. In this case h can be found as follows. If h = 2k then k = 0.5h. Substitute this in the second equation gives: h = 10 + 0.25h. Thus 0.75h = 10, and h = 40/3. Give the students more examples of this sort so that they become familiar with the algebra needed. Once they are comfortable, return to the main problem.
- We have equation 1: h = 1.036k. And equation 2: h = 90 + 0.900k. Rearranging equation 1 gives: k = 1/1.036 x h, ie k = 0.965h. Substitute this in equation 2. Thus h = 90 + 0.900 x 0.965h. Ie, h = 90 + 0.869h. Ie, h – 0.869h = 90. Ie, h(1 – 0.869) = 90. Ie, h = 90/0.132. Ie, h = 682m. Of course the student height needs to be added on at the end.
Session 4
In this session the students measure the height of a nearby hill in the way outlined in Session 3. Once this is done each student prepares a poster that details the method and the calculations done in the practicum.
Session 5
In this session students are given an insight into how trigonometry might be used, under the appropriate circumstances, to measure the height of the moon. But first the students need to be reminded what ‘latitude’ means, and what the moon rising or setting over the horizon means.
- Get the students to draw a circle representing the earth. Get them to mark a point P on the earth and imagine they are standing at this point. Now they draw a tangent through that point. See diagram below.
- The tangent is basically the horizon at P. When the moon is above this line it is above the horizon and visible from P. When it crosses the line it is either rising or setting. When it is below the line it is not visible from P.
- Next revise the meaning of latitude. See diagram below.
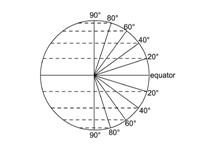
- Get the student to find, using an atlas, four countries at a latitude of 20 degrees, two in the southern hemisphere and two in the northern. If you are at a latitude 60 degrees, where might you be? What is the weather likely to be at a latitude 0 degrees? Why? If you are at a latitude of 90 degrees, where are you?
- Now for the problem. See diagram below.
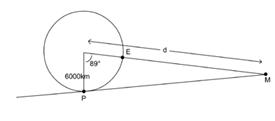
A friend of yours is at the equator, at E. You are at P, at latitude 89 degrees. Your friend and you are in phone contact. Accordingly you are able to establish that, just as the moon is directly overhead for your friend, it is just setting for you. You know that the radius of the earth is approximately 6000km. What is the distance, d, from the earth to the moon?
- Students make their own calculation.
(The answer is: d x cos(89) = 6000. Thus, d = 343, 792km.) - Here are some relevant facts: The earth radius is more correctly 6378km. The mean distance between the earth and the moon is 384,400km. The radius of the moon is 1738km. Its mass is 0.012 x mass of earth. The moon’s mean velocity in orbit is 1km/sec. Find other interesting relevant facts from the atlas.
- Complete this session by having students make a poster explaining what it means when the moon passes over the horizon, what latitude means with some examples, how the calculation was made, and some interesting facts associated with this problem.
Dear families and whānau,
Recently we have been investigating how trigonometry can be used to find the height of a tall building or tree. Ask your child to share this learning with you. Together, find the height of a tall building or tree in your local area.