This is a level 4 geometry strand activity from the Figure it Out series.
A PDF of the student activity is included.
Click on the image to enlarge it. Click again to close. Download PDF (263 KB)
construct shapes and patterns using a compass
FIO, Level 3-4, Geometry, Compass Shapes, page 12
compass
ruler
classmate
This activity initially helps students to recognise that the circumference is approximately six times the length of the radius. However, the objective of the activity is to give them practice in using the compass to make geometric designs beginning with a circle. This becomes a satisfying artistic activity, but you could also encourage them to use their design or logo to explore symmetry.
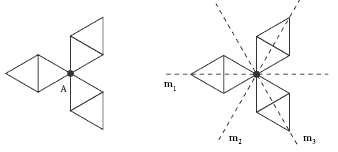
For example, the logo shown in the book has rotational symmetry of order 3 and three lines of reflective symmetry (m1, m2, m3). (Point A on the diagram below is the centre of rotation.)
Another design made from the original inscribed hexagon could be:
This design has rotational symmetry of order 6 and six lines of reflective symmetry. Examining designs for reflective or rotational symmetry follows on from the activity on page 21 of Geometry, Figure It Out, Level 3.
Answers to Activity
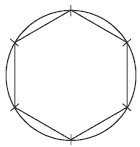
1. a. Six times
b. Your diagram should look like this:
2. Make six equally spaced marks on the circumference using the radius as the length of each space. Join every second point to draw an equilateral triangle.
3. Practical activity
4. Practical activity


