Maps
In this unit ākonga are introduced to using maps. They use maps to locate landmarks, identify views from different locations, and give directions using left and right turns, and distances.
- Use a map to identify views from a location
- Use compass directions to describe the direction of landmarks
- Describe pathways between map locations.
Maps provide a two dimensional representation of the real world. By looking at a map ākonga can anticipate the landmarks they will see from a given location and in which direction (N, S, E, W) those landmarks will be seen. By using maps of their kura or local area, ākonga will be able to check their thinking by matching the map with the real world.
Ākonga will begin to use maps to help them follow and give directions. They will start to use directions involving left and right turns and use landmarks to clarify pathways. Ākonga will begin to use distances in whole numbers of metres.
This unit can be differentiated by varying the scaffolding of the tasks or altering expectations to make the learning opportunities accessible to a range of learners. For example:
- increasing or reducing the amount of detail provided on maps
- specifically teaching compass directions and half and quarter turns, as required.
Some activities in this unit can be adapted to use contexts and materials that are familiar and engaging for ākonga. In particular, the choice of maps to use will depend on the interests of your class. Some ākonga may respond best to maps of familiar areas, (for example, marae, beach access or playground) while others may be more engaged by an imaginative context. You could work as a class (mahi tahi model) to create maps of a favourite story, or the location of a movie.
Te reo Māori vocabulary terms such as map (mahere), North (raki), South (tonga), East (rāwhiti), West (uru), left (mauī) and right (matau) could be introduced in this unit and used throughout other mathematical learning.
- Kura map
- Local map or fictional community map
- Copymaster 1
- Cardboard strips
- New Zealand Fire Service Escape Plan website
Session 1
In this session ākonga are introduced to using a map to locate landmarks and identify views from different locations.
- Give ākonga copies of a kura map with the outline of main buildings and features marked on it. Only label some of the buildings and features.
- Work with ākonga to label their classroom and to orientate the map.
- Ākonga are to label the buildings and features on the map.
- Ākonga then take their map and walk around their kura to check their labels and to add 2 or 3 new landmarks to the map.
- Back in the classroom, ākonga can use the map to answer questions that require them to describe different views from locations on the map. For example:
Which classroom has the best view of the marae?
What building can you see from the field?
What building can you see out the library windows?
Session 2
In this session ākonga use the kura map to describe pathways from locations.
- Show the ākonga which direction to put the compass points N, S, E, W on their kura map.
- Tell the ākonga that in today’s session they will be marking pathways on their map.
- Ask the ākonga to trace with their finger on their map a pathway you describe. For example, start in the kura hall and walk south past Ruma 1 and 2, then walk west towards the sandpit, from the sandpit you can see the library, so walk south over the lawn to the library.
- Ākonga work in pairs to give each other directions. Encourage the ākonga to use the compass directions, and to use the landmarks on the map to help give directions between locations.
- Kōrero with your class (mahi tahi model) what they found useful when giving or following the directions.
Session 3
In this session ākonga use a local or imaginative map to describe different views they can see from different locations. They use compass directions to give the direction of landmarks from given locations. The map below is available as Copymaster 1.
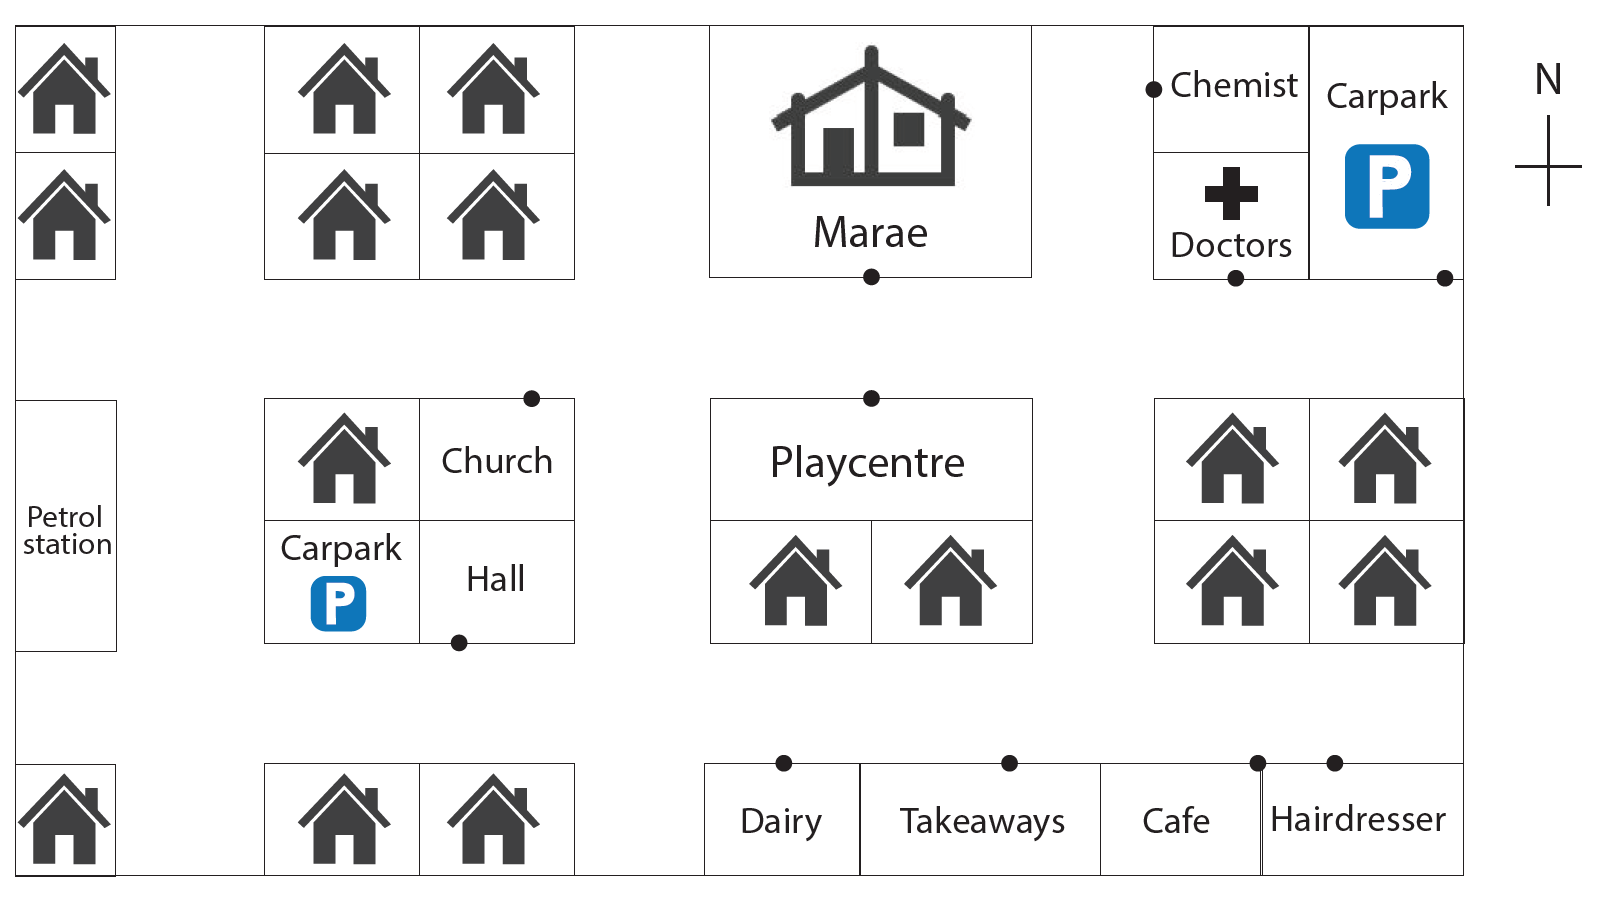
- Pose questions based on the map, which require ākonga to describe the views from different locations. For example:
How many whare have a direct view of the marae?
What can the children see from the playcentre?
What can the doctor see out the window?
If you sat in the doctor’s carpark what could you see?
Colour in a whare that has a view of the playcentre, the dairy, and the hall? - Pose questions based on the map which require ākonga to use the compass directions. For example:
What building is east of the café?
What building is north of the hall?
What building is south of the chemist?
What direction is the playcentre from the church?
What direction is the marae from the doctors?
How many whare are south of the hall?
From which building can you look west to see the church?
Session 4
In this session ākonga give a set of directions between two locations using distances and quarter turns to the left and right.
- Select a map to use for this session with your ākonga, it could be the kura map you used in Session 1, Copymaster 1 or a different map that ākonga are already familiar with. Work out an appropriate scale, for example 1cm is 50m, and help ākonga make scale rulers with strips of card. In Copymaster 1, the ruler graduations will be 0, 50, 100, 150 etc.
- On the Copymaster 1 map, the dots represent entry/exit points for buildings. Show ākonga how to turn the map around to orientate themselves as they follow directions and turn left and right.
- Give ākonga a set of directions to follow. Focus on left and right turns, and using landmarks to help provide the distances. For example, leave the playcentre and turn right, walk along and cross the road, turn right, walk past some whare and cross the road, where are you now?
- Ākonga can work in pairs to give each other instructions. These pairs could be a tuakana/teina model.
- Using their scale rulers, ākonga will be able to give directions that include distances. Give ākonga a set of directions to follow. For example, leave the café and turn left. Walk 40 metres, if you turn right what will you be able to see?
- Ākonga can work in pairs to give each other instructions that include distances and left and right turns. The tuakana/teina model could be appropriate for this learning also.
Session 5
In this session ākonga learn about pathways and apply this to creating a fire escape plan for their whare.
- Using the familiar map (for example, their kura map used in Session 1 or Copymaster 1) ask ākonga to draw the path from one location to another. Add conditions to the route they can take, for example draw how a class could walk from the library to the hall without walking past the office block.
- Ask ākonga to create a Fire Escape Plan. Before completing this activity they should draw a plan of their whare and then mark the escape route out of each room. https://fireandemergency.nz/at-home/creating-an-escape-plan/
- This activity is likely to take more than one session and can be completed as a home task.
Dear family and whānau,
This week your child has been using maps to describe views and pathways from locations. Your child has started to draw a plan of your whare and is finishing it by marking the escape routes out of each room in case of a fire. Please help them to complete the activity. You may wish to complete the Fire Escape Plan on the NZ Fire Service website - https://www.escapemyhouse.co.nz