Areas of Rectangles
In this unit students learn to use the multiplication formula to find the area of a rectangle. Using proportional reasoning students explore what happens to the area when the length and/or height of a rectangle is doubled.
- Use multiplication to calculate the area of a rectangle.
- Measure the length of a side using a ruler.
- Use proportional reasoning to find the area of a rectangle.
Area is the amount of flat surface enclosed within a shape. Commonly used standard units for area are cm2 (square centimetres), m2 (square metres), and km2 (square kilometres). Squares are used to introduce this context, because they are an example of a two-dimensional shape that iterates. This means the shape can be repeated over and over again, without any gaps or overlaps.
Rectangles are the easiest shapes to find the area of, because the array structure of repeating units (squares) is most obvious. Consider this rectangle filled with square units:
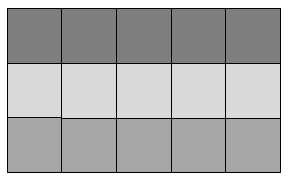
The units are arranged in three rows of five squares. The total number of units can be found by multiplication, 3 x 5 = 15. Similarly, the rectangle contains five columns of three squares, so 5 x 3 = 15 also gives the total area. This is an example of the commutative property - you can multiply numbers (e.g. 3 and 5) in any order and get the same result (15).
The learning opportunities in this unit can be differentiated by providing or removing support to students, or by varying the task requirements. Consider using these strategies to support students:
- Manipulate the side lengths of the rectangles you use. Consider the times tables that your students are familiar with and use these as a base of knowledge to build problems from. For example, constructing diagrams of rectangles that all have 3 rows could be an effective way to reinforce your students' knowledge of their 3 times tables, whilst teaching them about the concept of area.
- Use rectangles with smaller side lengths when introducing the concept of arrays and how the arrangement of rows and columns connects to multiplication equations. In general, rectangles with smaller side lengths make drawing and counting solutions more accessible. However, increasing side lengths promotes the need for more efficient ways to find the area. In that way, students see the efficiency of multiplicative methods.
- Use diagrams and physical models (e.g. square tiles) to support students in recognising arrays within the boundaries of rectangles. Gradually decrease the use of diagrams and physical supports to encourage imaging and thinking whilst drawing on previously established results. Refer to pages 11-13 of Teaching number through measurement, geometry, algebra and statistics for further ideas.
- Allow access to calculators where calculation is not the primary purpose of the lesson. For example, finding all rectangles with areas of 72cm2 offers opportunities to apply multiplicative thinking and systematic reasoning. Those opportunities may be lost if students are preoccupied with the mental calculations of multiplication.
The context for this unit can be adapted to suit the interests, cultural backgrounds, and experiences of your students. Students could be challenged to find the area of a room in their own home, a community or school garden, their classroom, a community sports ground, skate park, or marae. A diagram with measurements could be provided if the area is not readily accessible during school time.
Te reo Māori vocabulary terms such as mehua (measure), mitarau (centimetre), and tapawhā rite (square) could be introduced in this unit and used throughout other mathematical learning.
- 10cm by 10cm squares of paper or card, e.g. memo pads
- Large pieces of paper, e.g. butchers’ paper
- A variety of measuring devices, such as rulers, tape measures, trundle wheels, metre rulers (use whatever is available)
- Newspaper, recycled cardboard, scissors and tape
- 1cm square grid paper
- Copymaster 1
- Copymaster 2
Session 1
In this session students are introduced to the idea of using multiplication to find the area of a rectangle.
- Show the students a large rectangular piece of paper measuring 30cm by 60cm and a pile of smaller squares each measuring 10cm by 10cm (like memo squares). Tell the students you want to know how many of these small squares are needed to cover the large paper rectangle. You can set a context such as "this is the school garden and these are the concrete tiles we will be using to cover it".
How many square tiles will cover this area? - Let students briefly discuss how they might estimate an answer, then share the ideas. Look for students to explain two main processes:
- Iteration – repeated copying of the unit of measurement (memo square) along a side, with no gaps or overlaps.
- Equi-partitioning – equally splitting a side until the divisions are about the same length as the sides of the memo square.
Modelling these processes on a whiteboard, interactive whiteboard, or with the use of materials could support students to develop their thinking.
- Ask about how the square units will be arranged. Introduce the terms, rows (across), columns (down), and array (a structure of rows and columns) if students are not familiar with those words.
Do students recognise the array structure in the arrangement of square units? - Ask a volunteer to place the squares units side by side on the rectangle. Blu Tac can help to secure the units in place.
- Ask the students for ways to work out the total number of units. One by one counting, or skip counting/repeated addition (6, 12, 18 or 6 + 6 + 6 = 18) are legitimate strategies given the small number of units. Explain that the area of the rectangle is 18 squares.
Can we count the squares even more efficiently? - Record 3 x 6 = 18 and ask students where they can see representations of six and three in the model (i.e. in the number of rows and columns). Ask where the 18 is found (i.e. it is the total number of square units).
- Model the same process with different sized rectangles, e.g. 20cm x 80cm, 50cm x 40cm, 100cm x 100 cm (A square is a special rectangle with all sides the same length). The rectangles might be cut out of paper, created with play dough, drawn on the whiteboard, or drawn on the carpet/concrete with chalk.
Look for students to:- Recognise the array structure.
- Use multiplication as an efficient method to calculate the area.
- Provide the students with copies of Copymaster 1. Tell them to work with a partner to find out the area of each rectangle in small squares. As students work, look for their calculation strategies. Are they using additive or multiplicative methods?
Recognise that much will depend on their knowledge of multiplication facts and strategies. Smaller rectangles that utilise simpler times tables could be drawn and used by pairs of learners. - Gather the class and share solutions. It is interesting that Rectangle E, a square, has the greatest area, though other rectangles may look larger. To extend learners, you could ignite discussion around this.
Answers: A (3 x 7 = 21), B (6 x 6 = 36), C (4 x 11 = 44), D (11 x 3 = 33), E (7 x 7 = 49), F (8 x 6 = 48), G (10 x 2 = 20).
What do the answers tell us about these rectangles?
How big are the little squares? Students might measure with a ruler to check that the units are square centimetres.
Ask students to include the unit in their answers, e.g. 21cm2. Recording the notation for each rectangle is good practice.
Sessions 2 and 3
- Discuss the idea of a formula. You might find a funny video online about someone using a formula to make something. A recipe is a type of formula. Students may also make connections to playing sports (e.g. a team follows a formula to play well and win), tikanga (correct ways of doing things), or car racing (e.g. in Formula One racing, the “formula” entails a set of rules that all racers’ cars must meet).
What do we mean by a formula?
Do students explain that a formula is like an algorithm, or rule, that we can follow to get the same result each time?
Record W x L = A. This is a mathematical formula written as an equation.
I wonder what the letters W, L and A might represent? - Apply the formula to the examples students worked on in the previous lesson (Copymaster 1).
For example, Rectangle B had seven rows of five squares.
The row gives the length of the rectangle. In the case of B length equals 5. (rub off L in the formula and write 5 in its place)
The number of rows gives the width of the rectangle. In the case of B width equals 7. (rub off W in the formula and write 7 in its place).
The formula now reads 7 x 5 = A. I wonder what A equals. What value for area makes the equation true and matches the formula? - Ask students to use the examples from Copymaster 1. As a group, practise starting with the formula, and substituting the values of length, width, and area for each rectangle. Students may benefit from using materials to model the use of the formula.
- Provide students with a group worthy task to work on collaboratively (see Copymaster 2). This could be linked to school events (e.g. make a new sign for our classroom, design a school garden, design the size of a hāngi pit). Students might be given 1cm grid paper, 1cm squares, or work in their exercise books. There are several programmes online that allow students to model the construction of arrays using 1cm squares. Make sure to thoroughly investigate any programme you wish to use, to ensure its use will be appropriate and purposeful for your students.
- Look for students to apply the W x L = A formula to construct appropriate rectangles. For example, if they choose an area of 72cm2 they will need to consider all the factors of 72. Encourage students to find those factors systematically. Some students may benefit from the support of a multiplication basic facts poster or list.
A systematic approach involves starting with 1 as a factor then increasing the smallest factor by one and testing 72 for divisibility.
1 x 72, 2 x 36 (72 ÷ 2 = 36), 3 x 24 (72 ÷ 3 = 24), 4 x 18 (72 ÷ 4 = 18), 5 x (72 is not divisible by 5), 6 x 12 (72 ÷ 6 = 12), 7 x (72 is not divisible by 7), 8 x 9 (72 ÷ 8 = 9).
If the process continues the factors will appear in reverse order, e.g. 9 x 8 = 72. 8 x 9 and 9 x 8 are essentially the same rectangle though they may appear differently if the direction of the label is considered. - Gather the class to discuss solutions and look at real sized diagrams of the possible labels. Some options are mathematically correct but unworkable as a label option.
Discuss criteria for eliminating labels. For example, a label with a width of less than 5cm might be considered too ‘skinny.’
Discuss the best options, cut them out at real size, then use a real jam jar (or object that is relevant to the context of the learning) to consider how well each label/array design will work. - In the jam jar context, students might write a letter to Karly outlining how they investigated her problem and giving their recommendations. Their mathematical thinking could be used as the basis of a persuasive letter in other contexts.
- Another good investigation is to tile a large rectangular area with 1m2 carpet tiles. A hall or gymnasium is an ideal area though a classroom is also viable. Tiles of that size are commonly found at hardware stores. You will find an advertisement easily online.
- Get students to construct a unit square using newspaper or recycled boxes. They can use the unit to get a sense of the scale of 1m2 and make estimates of the area of the space before they calculate.
- Ask students to work in small teams to calculate the number of tiles that will be needed for the rectangular space. Look for them to measure the side lengths of the rectangular area using tape measures, trundle wheels, or metre rulers.
Do they apply the W x L = A formula? - Students can find the area of composite shapes by finding the area of the rectangles. For example:
- This shape can be seen to be made up of two 2cm by 4 cm rectangles, or a 2cm by 6cm rectangle and a 2 cm by 2 cm rectangle, or 4 cm by 6 cm rectangle with a 4 by 2 rectangle missing. Use 1cm square units (e.g. memo pads) to demonstrate the construction of this composite shape. There are different ways to solve composite shapes. However, one of the simplest methods starts with breaking a composite shape down into basic shapes (e.g. 2 rectangles). You could model this with memo pads or tiles. Next, find the area of the basic shapes you have constructed. Finally, add the areas of the basic shapes together. To support the development of this thinking, you could calculate the area of the shape shown above in two different ways. First, calculate the area from 2 rectangles, each with an area of 4cm x 2cm. The total area of each rectangle is 8cm2. Therefore, the total area of the composite shape is 16cm2. Next, calculate the area of the shape as one 2cm x 6cm rectangle (12cm2) added to one 2cm x 2cm (4cm2). Calculating the area of the same shape in different ways will allow for greater student collaboration, and will allow for students to learn from each other.
Session 4
In this session students explore using proportional reasoning to find areas of rectangles.
- Pose the problem: Sam’s family was shopping for a new table for the wharekai in the local marae. The first one they looked at measured 2m by 3m. Sam said if they wanted one with an area twice as big they should get the 4m by 6m size. Is Sam right?
- Ask the students to draw pictures of the table and to help them decide if Sam is correct.
- Work with students to establish that doubling the area only involves doubling one side of the rectangle. Doubling both sides of the rectangle increases the area by four times.
- Using this proportional reasoning students will be able to solve problems without recalculating from side lengths. Here are some example problems:
- The recipe made enough icing to cover the top of a 20cm by 20cm cake. What size cake can you ice if you double the amount of icing?
- The birthday card had a front cover measuring 15cm by 10cm, what is the area of the piece of cardboard used to make it?
- The marae had two areas that needed paving. Each area measured 5m by 8m. What is the total area to be paved?
- The gardener charged his customers by the area of their lawn. If the bill was $20 to mow a lawn that was 6m by 20m, what should the bill be for a 20m by 12m lawn?
Session 5
In the session students demonstrate their ability to apply measurement of area independently. Consider what culturally relevant contexts can be incorporated into this task, to increase the engagement of your learners.
The following links provide pages from Figure It Out books that are suitable:
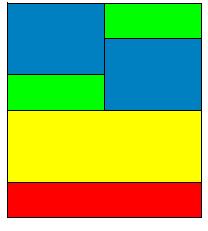
Students might also create a mat design and provide the dimensions and areas of the rectangular pieces that compose it. An example is given below:
Family and whānau,
This week at school we have been calculating the area of rectangles using the multiplication formula of length x width. We have been working out the areas of composite shapes by marking the shapes into rectangular shapes. For example,
At home this week your child is to draw 5 different composite shapes that each have a 20cm2 area. The lengths of the sides should be marked. Ask them to explain to you how they worked out the area for each one.
For extension, your child could measure the area of different rooms around the house, and then calculate the total area by treating the house as a composite shape.