Calibrating Clocks
In this unit students construct several simple clocks including water clocks and pendulums. They investigate time as measured by these clocks and make comparisons with standard units of time.
- Measure time in periods of up to 15 minutes.
- Compare non standard and standard measurements for time.
- Recognise the characteristics of a device that measures elapsed time.
Students' experiences with time throughout the learning sequence has two aspects:
duration and telling time.
Telling time must enable them to:
- develop an understanding of the size of standard the units of time, such as hours, minutes and seconds. This includes being able to estimate and measure using units of time;
- read and tell the time using both analogue and digital displays (clocks).
Standard units
When students can measure the duration of events using non-standard units, they are ready to move to the use of standard units. A non-standard unit is one that is personal, such as clapping or saying your name as a unit of time. A standard unit is accepted by a group of people. For example, the second is accepted all round the world as a unit of time. The motivation for moving to this stage often follows from experiences where the students have used different non-standard units for the same event. They can then appreciate that consistency in the units used would allow for the easier and more accurate communication of duration.
Measuring with standard units involves the introduction of minutes, hours and seconds in addition to reading time on analogue and digital clocks.
Duration
The minute is often introduced first because it is small enough to measure common events. The duration of a minute can be established by watching the second hand on a clock or by constructing a minute sand-timer. An appreciation for the size of a minute can be built up through lots of experience in measuring everyday events. For example, how many minutes does the song play for? How long is morning break? How long does it take to walk around the school building? How many times can you hop in a minute? How many linked cubes can you join in a minute?
As the students become familiar with the size of a minute they should be given opportunities to estimate before measuring. Minutes need to be linked to the movement of the minute hand on the analogue clock and the digits on digital displays.
An understanding of the size of a second can be developed by investigating the relationship between seconds and minutes. This can be done by watching the digital displays on some watches, on stopwatches and on digital downloads. The students should be encouraged to develop their own reference for a second, for example, a counting pattern "one – banana – two – banana – three etc".
Reading and telling time
The underlying number skills should be mastered before teaching students the skill of telling and reading time.
The learning opportunities in this unit can be differentiated by providing or removing support to students and by varying the task requirements. Ways to support students include:
- providing modelling and support on how to use the timing devices (stopwatches or clocks)
- pairing the students so that they can be supported at the station tasks
- reducing the number of tasks that need to be completed at the stations.
The context for this unit can be adapted to suit the interests and experiences of your students. While the focus is on creating “clocks” that measure time, the tasks can be made more engaging by providing a purpose for each clock that connects to the everyday experiences of your students. The clocks could then be used by your students for that purpose. For example:
- a clock that can be used to time whether an egg is soft or hard boiled
- a clock that measures an endurance challenge, like standing on one leg.
- a clock that could be used to measure the time allowed for a sash dance performance at Polyfest
- a clock that can be used to measure the time spent cleaning teeth or washing hands.
Giving students the opportunity to suggest their own purposes for the clocks and then adapting the stations so that they can tailor the clocks to those purposes is also likely to increase their engagement in the task. Students might be interested in the historical methods of measuring time used by different cultures. Water, candle and sand clocks date back thousands of years. Astronomical events were used by most cultures to measure long passages of time. Māori used phases of the moon to organise activities such as fishing or harvesting.
- Getting started: Candles (enough for one per group or pair), matches, large dish of sand for candles to stand in.
- Station One: Copymaster 1, plastic containers (e.g. milk bottles, yoghurt pottles), nails to make holes in plastic (variety of sizes), wooden sticks, water, trays or buckets for water collection, water, stopwatches or clocks with second hands.
- Station Two: Copymaster 2, pairs of plastic bottles with the same size openings (e.g. soft drink bottles, water bottles), small squares of cardboard, nails to make holes in cardboard, salt or dry sand (needs to be dry to run through hole), stopwatches or clocks with second hands.
- Station Three: Copymaster 3, string, a variety of weights (e.g. fishing sinkers or nuts and bolts) place to attach string to (e.g. edge of desk, overhanging shelf in classroom, empty chart holder), stopwatches or clocks with second hands.
- Reflecting: Variety of timing devices including stop watches, clocks, watches and devices made in the three stations.
Getting started
This session is taken as a whole class activity with students working in groups or pairs to experiment with the time taken for different candles to burn. The teacher retains control of the matches and the burning candles.
Brainstorm with students the different kinds of time keeping devices they know: watches, wall clocks, oven timers, phone timers, etc. Explain that this week they will be making and experimenting with a variety of different ways to measure time.
How did people tell the time before clocks were invented?
Online videos and picture books such as How Do You Know What Time It Is? by Robert Wells and About Time: A First Look at Time and Clocks by Bruce Koscielniak could be used to introduce this context. Students might talk about using the rising and setting of the sun, or the changes in length of day during the year.
- Show the students a candle.
How might a candle be used to tell time?
Some students may have heard of candle clocks. Search for videos online about “candle clocks”. You will find a short history about candle clocks that data back to 500 BC. - Ask students to estimate how long it would take for the whole candle to melt. How much would be melted in 5 minutes?
- Group or pair students and give each group a candle.
- Students record the length of their candle in centimetres. They also draw a mark on the candle to show how much they think will be melted in 5 minutes.
- Collect candles together (maybe in a dish of sand so they stand up easily) and burn all candles for five minutes. Students observe and watch to see the accuracy of their five minute marks. While they are waiting students might engage in a quick task, such as completing a time tables grid, or answering some maintenance questions.
- Blow out the candles after five minutes and return them to the students to check the accuracy of their mark. Students record how long the candle is now in centimetres.
Discuss how they might express their new knowledge. Students might use a rate to talk about the burn time, such as “1.5 centimetres burn in 5 minutes.” - Students put three more marks on their candles: showing the remaining length of the candle after 5, 10, 15 and 20 minutes of burn time.
- Collect all candles together and burn them for 20 minutes, observing the accuracy of the marks as they burn. While students are waiting for candles to burn they can attempt the measurement problems in this Figure It Out activity (Cooking Time).
- At the conclusion of the activity return candles to students and discuss
How accurate was your candle clock?
How could you make your candle clock more accurate?
What are the limitations of a candle clock?
What other devices for measuring time might have come after candle clocks.
Over the next three days have students work at the three stations, rotating groups so all students have a chance to try all three activities. Model all activities to ensure students can complete them successfully. Consider purposefully grouping different students together to encourage tuakana-teina.
Station One: Water Clocks
In this station students make and experiment with water clocks.
Student Instructions (Copymaster 1)
- Use the materials provided to make a water clock like the one in the diagram. The size of the hole you make and the size of the container you use will affect the way your clock measures time.
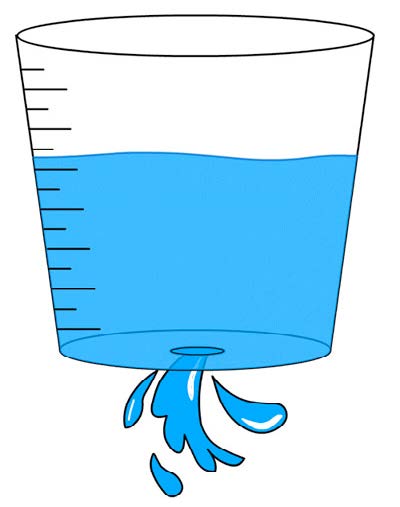
- Estimate the time it will take for the water level to drop from one mark to the next on your clock. Record your estimates in a table. Students may need to observe the water dripping out for a short time, to give them some information to estimate with.
water moves down | estimated time taken | measured time taken |
1 mark |
|
|
2 marks |
|
|
3 marks |
|
|
4 marks |
|
|
- Measure the time taken for the water level to drop from one mark to the next on your clock. Record your results in a table.
- Experiment with your clock and the way it measures time.
What happens if you make the marks further apart?
What happens if you make the marks closer together?
Can you make your clock measure 1 minute accurately?
Can you make your clock measure 5 minutes accurately? - Ask students to research water clocks online.
What are the advantages of water clocks?
What are the disadvantages?
Station Two: Sand Timers
In this station students make and experiment with sand clocks similar to egg timers.
Student Instructions (Copymaster 2)
- Use the materials provided to make a sand timer like the one in the diagram. The size of the hole you make will affect the way your clock measures time.

- Estimate the time it will take for the sand level to drop from one mark to the next on your clock. Record your estimates in a table.
sand moves down | estimated time taken | measured time taken |
1 mark |
|
|
2 marks |
|
|
3 marks |
|
|
4 marks |
|
|
- Measure the time taken for the sand level to drop from one mark to the next on your clock. Record your results in a table.
Were the times between the marks the same?
Why / Why not?
How could you make the time between each mark the same? - Experiment with your clock and the way it measures time.
What happens if you make the marks further apart?
What happens if you make the marks closer together?
Can you make each mark measure the same time period?
Can you make your clock measure 1 minute accurately?
Can you make your clock measure 5 minutes accurately?
Station Three: Pendulums
In this station students make and experiment with pendulums to tell the time.
Student Instructions (Copymaster 3)
- Use the materials provided to construct a pendulum like the one in the diagram.
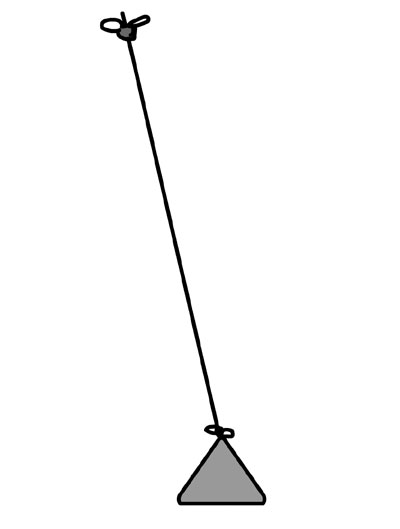
- Start your pendulum swinging to measure time. How long is the period (swing time) of your pendulum? Does the time change?
- To help your pendulum measure the same each time you use it, you will need to
- make sure you hold the pendulum in the same place each time you release it
- make sure you let the weight go rather than push it
- count the number of swings carefully from the highest place in the swing each time.
- Estimate the time it will take for the pendulum to swing 5, 10, 15 and 20 times. Record your estimates on a table.
number swings | estimated time taken | measured time taken |
5 |
|
|
10 |
|
|
15 |
|
|
20 |
|
|
- Measure the time taken for the pendulum to swing 5, 10 15 and 20 times. Record your measurements on a table.
- Experiment with your pendulum and the way it measures time.
What happens if you make the string longer?
What happens if you make the string shorter?
What happens if you use a heavier weight?
What happens if you use a lighter weight?
Can you make your pendulum measure 1 minute accurately?
Can you make your pendulum measure 5 minutes accurately? - Ask students to search online about pendulums. They may be surprised to learn that a 1 metre long pendulum has a swing time (period) of 1 second. Changing the weight makes no difference to the swing time.
What devices use pendulums to measure time? (Student may have seen a Grandfather clock or used a metronome)
Reflecting - Comparing Clocks
This session is taken as a whole class activity with students working with different timing devices to time the same event. Equivalent times are recorded and compared.
- Explain to students that today they will be using a variety of timing devices to measure the duration of set tasks. The purpose of the task is to contrast the accuracy and usability of the devices. If possible, bring along a mechanical wristwatch that uses a spring to store energy and drive the mechanism. Parents and grandparents might have old watches that they no longer use. Students might search “How a mechanical watch works” online and find a video. You might invite in a local watchmaker to talk to your class about how clocks are maintained and repaired.
- Distribute timing devices amongst pairs of students. Use a variety of timing devices including stop watches, clocks, watches and the devices made in the three previous stations.
- One student performs a task while all other students time the task.
- Record equivalent measures on a chart.
Task | Equivalent measures for time taken |
Recite the alphabet | 55 seconds 1/2 candle mark 2 water clock marks 3 sand clock marks 20 pendulum swings |
Count to 500 | 2 minutes, 33 seconds 3 1/4 candle marks 6 sand clock marks 52 pendulum swings |
- Continue for several tasks. When complete review and discuss results.
What are the advantages of the candle clock (and other devices)?
What are the disadvantages of the candle clock (and other devices)?
Which measure would be the most useful if you wanted to describe to someone in London how long a task took? Why? - Students might like to investigate how humans measured long periods of time such as the duration of a day, lunar month, season, or year. They will know that Matariki is significant as a marker of the middle of winter. Some students may have heard of the Māaori fishing calendar that uses phases of the moon to pick the best times to fish. Māaori people also used the rise and fall of tides to measure periods during the day.
How can we measure the duration of daytime? (sunrise to sunset)
Is the duration of daytime consistent throughout the year?
How is the length of a year measured? (365 ¼ days)
How did ancient cultures measure the passing of a year?
You might investigate structures across the world that marked important parts of the year, such as the summer and winter solstices, and equinoxes. Good examples might be Haʻamonga ʻa Maui in Tonga, Stonehenge in England and the sungate to Machu Picchu in Peru.
7. Students might be interested in creating a sundial to measure time during the day with the shadow of a vertical object. Sundials are common in public gardens. You could investigate the history of sundials and other significant time-keeping pieces in your community (e.g. Church bells at the cathedral, a clocktower at the railway station).
Dear family and whānau,
This week at school we are looking at different types of clocks and making clocks of our own using sand, water and pendulums. Ask your child to explain to you how these clocks work.
Your child has been asked to compile a list of all the devices at home that can be used to tell time. They need to bring this list back to school so we can create a class list.