How much room?
In this unit, as we explore the amount of room we have in our classrooms, and develop an understanding of a square metre and a square centimetre. We use this to decide on the "ideal" classroom size.
- Construct a square metre and use it to measure areas.
- Estimate and measure to the nearest square metre.
When students can measure areas effectively using non-standard units, they are ready to use standard units. The motivation for moving to this stage often follows from experiences where the students have used different non-standard units for measuring the same area and have realised that consistency in the units used would allow for the easier and more accurate area measurement.
Students’ measurement experiences must enable them to:
- develop an understanding of the size of a square metre and a square centimetre;
- estimate and measure using square metres and square centimetres.
The usual sequence used in primary school is to introduce the square centimetre and then the square metre.
The square centimetre is introduced first, because it is small enough to measure common objects. The size of the square centimetre can be established by constructing it, for example by cutting 1 centimetre pieces of paper. You may also have a supply of 1 cm cubes that can be used to measure the area of objects. An appreciation of the size of the unit can be built up through repeated experience in measuring everyday objects. Students should be encouraged to develop their own reference for a centimetre, for example, a fingernail or a small button.
As students become familiar with the size of the square centimetre they should be given multiple opportunities to estimate before being asked to use precise measurement. They can also be given the task of using centimetre-squared paper to create different shapes of the same area.
Understanding of a square metre can be established using a similar sequence of experiences - starting with constructing the unit before using it to measure appropriate objects. An important learning point is that one square metre of area can take many shapes whereas a one-metre square must be a square with an area of one square metre.
The learning opportunities in this unit can be differentiated by providing or removing support to students and by varying the task requirements. Ways to support students include:
- providing physical models of the square metre and square centimetre so students can manipulate the units
- ease the calculation demands by providing calculators
- helping students to record their working and ease demands on working memory
- providing more complex problems to extend students’ learning
- reducing the complexity of the numbers involved, e.g. smaller areas
- collaborative grouping so students can support others
- grouping students with mixed levels of mathematical confidence and knowledge to promote tuakana-teina (peer learning) and collaboration (mahi tahi)
- reducing the demands for a product, e.g. less calculations and words
The practical nature of the tasks in the unit requires access to physical and diagrammatic resources. Providing materials and putting varied demands on what tasks are carried out mentally, is a powerful tool in catering for diversity.
The context for this unit can be adapted to suit the interests and cultural backgrounds of your students. School classroom size is relevant to all students. However, students might be more interested in calculating the areas of sport playing surfaces, marae, gardens, etc. It may be that calculation of area is important to an immediate need, such as re-surfacing an astro-turf, or tiling a courtyard. The local church may be of cultural significance to students and be due for a repaint. Perhaps you could invite a local architect or builder to share how scale drawings are useful to their jobs. Be aware of opportunities to learn that connect to the everyday experiences of your students.
- Measuring tapes
- Metre rulers
- Chalk
- Recycled newspaper or cardboard
- Scissors and tape (duct tape is ideal)
Getting Started
Today we look at a metre square and use it to estimate and then measure the area of our classroom.
- Draw a metre square on the floor or an outdoor surface using chalk and a metre ruler.
What is this unit called?
How many students do you think would be able to sit in this space? - Discuss the idea of personal space and that students should be a distance from one another that they are comfortable with.
Is two people per square metre reasonable? Three? Four?
Can you estimate how many people would fit in this space with very few gaps?
How many square metres of mat space would we need to fit all the students in our class, if we fit 3 (use the students’ answer to the first question) in one square metre of mat space? - Model the division using an equation, e.g. 28 ÷3 = 8.666…
What do these numbers mean? (particularly 8.666…)
We divided the number of children in the class (28) by the number we thought would fit in one square metre of mat space (3). This tells us that we need 8.666 square metres of mat space to fit everyone in our classroom, if 3 people were to stand in each square of mat space. You might draw a diagram to explain this. - Ask students to estimate the size of an area that is 8 2/3 square metres.
- Get the students to make square metres using newspaper or recycled cardboard and tape.
- Mark out the required mat area within your classroom, by laying down square metres. You might highlight that many different arrangements of the squares are possible using a digital tool, or with your pre-created squares. Emphasize: These arrangements all have the same area.
Is the mat space in our classroom large enough? - Ask the students to estimate the area of the classroom in metre squares independently, or with a partner. You might tell students the measurement of a place they are familiar with (e.g. the library, the sports shed) to help them make more accurate estimates. Write estimates on the board.
Why do you think that is the area? What strategy did you use?
How did you work it out? Look for students to recognise the array (rows and columns) arrangement that the square metres will need to be in to measure the area. Explicitly map out some square metres on the floor. - There are not enough square metres to fully cover the floor. Plan out how we can find the total number of square metres needed. Draw a diagram to show what a fully covered floor will look like. Let students work in collaborative groups.
- Look at the diagrams that students create.
Do the diagrams indicate an array structure and the correct number of squares along each side?
How can we calculate the total number of tiles?
Expect that students will apply their preferred strategies, from counting in ones to skip counting/repeated addition to multiplication. Some students who think multiplicatively in other contexts may not see the applicability of multiplication to area. Explicitly ask students to justify their strategies, particularly where the numbers and operations they use come from. - For example, you calculated 8 x 5 = 40 square metres. Where did you get the 8 and 5 from? Why did you choose to multiply, rather than add, subtract or divide?
- Ask the students to plan in small groups how they could work out the number of metre squares in the classroom. Tell the students that they need to record their ideas to share with the rest of the class.
- Share ideas for working out the area. Ideas could include:
- Covering the floor area with metre squares drawn in chalk.
- Drawing metre squares across the width of the room and the length and then multiplying the number.
- Agree on the area of the classroom in metre squares in whole numbers of square metres using one of the approaches suggested. Discuss how to make the measurement of the room more accurate.
What do we do about the bits left over that we haven’t included in our measurement? Students might suggest using fractions of squares or centimetres to improve the precision of the measurement. You might pursue simple examples, such as halves of square metres (0.5 m2). Tell students that they will explore the idea of precision in more depth tomorrow
Exploring
Over the next 2-3 days we measure the area of other rooms available spaces in the school using square metres.Consider what spaces will be available for use by your students before beginning the session. We also record how many students are in each classroom, come up with a simple ratio of space required per student, and use this information to consider the adequacy of current space.
- Explore the issue of precision. Note that square metres did not fill the floor space completely. Propose that one method of making more precise measurements would be using smaller units. Ensure that students are familiar with centimetres as a unit of length. Ask them what a square that is 1cm x 1cm (1cm2) looks like. Show them a 1cm3 cube and a 1 cm2 piece of paper. Lead discussion around the difference (e.g. 2D/3D) and label the dimensions on the cube (i.e. height, width, depth) and on the square (i.e. height, width). Get students to cut a square centimetre out of waste paper. You, or students could also experiment with digital representations of these measurements.
How many square centimetres fill one square metre? - Let students use their square centimetres and square metres to work out an answer in small groups. Do they apply the array structure in this situation?
- Collect the class after an appropriate time and discuss their ideas. Since 100 centimetres fit along each metre length side, 100 x 100 = 10 000 cm2 equal 1m2. This is an excellent opportunity to apply place value knowledge. A calculator can be used if necessary. There are many videos and images online that could be used to demonstrate the relative size of 100cms, 100cm2, and 1m2. As an extension, students could be challenged to make a video, presentation, or poster demonstrating these relative sizes in the school or classroom environment.
We created a measure of 0.5 (one half) m2 yesterday. How many cm2 is that? (5 000) Where are those cm2 found in one half of a square metre? (100 x 50 = 5 000 cm2) - Get students to work with square centimetres by designing rectangles of various sizes, calculating the areas in cm2, and comparing the areas of different rectangles.
- Develop the connection between square metres and square centimetres by expressing the area of rectangles in both units.
For example, fold a square metre in quarters. What is the length of each side? What is the area of the quarter square in cm2 (50 x 50 = 2500 cm2) - Use a calculator to show how a measure in square centimetres can be converted to squares metres (2500 ÷10 000 = 0.25). Explain why division is used and confirm that 0.25 is the decimal for one quarter.
[Note that conversion between units of area is not required at this level but many students will be able to do so with support from technology. They will also learn more about decimals as a result.] - Tell the class that the principal wants to know if the classrooms are the right size for the numbers of students in them. To make this activity more real you could get ask the principal to write a letter to the class, or come and ask them to undertake this activity. [Schools actually audit their entitled space using this site https://property.education.govt.nz/spg. ]
- With the class list the rooms in the school that need to be measured. You may extend this to the library, hall, playing areas etc.
- Discuss ways of calculating areas when the rooms are not rectangular.
Usually compound shapes are divided up into smaller rectangles. The area of each rectangle is calculated and the total is found by addition. Note that finding the use of formula (e.g. area of a rectangle = base x height) is not explicitly taught in this unit. If your students are confident with the use of arrays, they may catch onto this concept, and could be supported through the use of this formula when measuring different rooms. - Allocate the spaces to be measured to small groups of students. If your school has a small number of rooms then groups can measure the same room and compare measurements. Tell them to draw a plan of the room and record the measurements they make. Remind them to ask how many students are normally in the room.
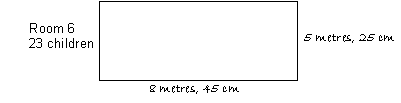
- Record the information on a class chart or on spreadsheet, with columns for room name, length, width, area, and number of students.
- Discuss the class chart:
Which classroom has the largest area?
Which room has the smallest area? - Discuss how you might create a way to decide if a classroom space is adequate for purpose.
How does your method allow for different areas and different numbers of students? Usually problems like this are solved using a ratio.
How many square metres of classroom is reasonable for each classroom? You might use your classroom as an indicator.
What is the floor area per student of our classroom? (For example, a 60m2 classroom with 30 students has a ratio of 2m2 per student)
Is our space adequate? Discuss time when the space feels crowded or empty. You might adjust the ratio if the space seems too small or too large.
Look at the other classrooms. Do you think that the classrooms have adequate area for the number of students? Why? Why not? You might discuss the requirements of different class levels, e.g. younger students are smaller and need less space, younger students move around more and need more space than older students. - If appropriate, develop a class letter to the principal or Board of Trustees that documents the findings, and makes justified recommendations. This could be used to develop a link to persuasive writing.
Reflecting
Over 1-2 days we use the information gathered to draw a scale map of the school with areas recorded.
- Discuss how to use the information gathered to draw a scale map of the school with areas recorded. Depending on the students’ prior experience with scale maps you could look at some building plans and the scales used. For the school map a scale of 1 cm = 1 metre is reasonable. Provide examples of scale maps for inspiration.
- Get each of the small groups of students to draw a scale drawing of the classroom they measured.
- Compile a scale map of the school.
- As a class, write statements to accompany the map.
- Share the map and statements with the principal as either an oral or written presentation.
Family and whānau,
This week at school we have been measuring the area of our classrooms using square metres. We have found out that we need to convert between metres and centimetres to metres to do this to be more precise. For example, 4 metres and 25 centimetres equals 4.25 metres. We have also learned to convert between square metres and square centimetres, though we need a calculator to support our work,
At home this week your child is asked to measure the area of their bedroom using square metres. If you don’t have a tape measure that is fine. Your student can estimate the length and width of their bedroom in metres. using a measuring tape we have made at school. They are to record the measurements on a scale drawing of their room using the scale 1 cm = 1 metre. Ask them to explain their drawing to you and how they worked out the area. They could also work out how much it would cost to carpet their room. That will require finding out the cost of carpet online.