Outlining area
This unit of work explores the measurement of area. Ākonga estimate and measure area using square centimetres.
- Recognise the need for a standard unit of area
- Measure objects using square centimetres
- Estimate the measure of objects using square centimetres.
When ākonga can measure areas effectively using non-standard units, they are ready to move to the use of standard units. The motivation for moving to this stage often follows from experiences where the ākonga have used different non-standard units for the same area and have realised that consistency in the units used would allow for the easier and more accurate communication of area measures.
The measurement experiences of ākonga must enable them to:
- Develop an understanding of the size of a square centimetre
- Estimate and measure using square centimetres.
The usual sequence used in primary school is to introduce the square centimetre and then the square metre.
The square centimetre is introduced first, because it is small enough to measure common objects. The size of the square centimetre can be established by constructing it, for example by cutting 1-centimetre pieces of paper. centimetre cubes can be used to measure the area of objects. An appreciation of the size of the unit can be built up through lots of experience in measuring everyday objects. Ākonga should be encouraged to develop their own reference for a centimetre, for example, a fingernail or a pebble.
As ākonga become familiar with the size of the square centimetre they should be given many opportunities to estimate before using precise measurement. This could include using centimetre-squared paper to create different shapes of the same area.
Consider integrating real-world and cross-curricular examples, such as the area of grass seed or bark needed for a school garden, or the area of space available on a tapa cloth, or the area of new rakau sticks. You might also draw on the books you have been reading as a class to frame the learning in a new context (e.g. estimating and measuring the height of different characters or items from the story).
Te reo Māori vocabulary terms such as mehua (measure), horahunga (area) and mitarau pūrua (square centimetre) could be introduced in this unit and used throughout other mathematical learning.
This unit can be differentiated by varying the scaffolding provided or altering the difficulty of the tasks to make the learning opportunities accessible to a range of learners. For example:
- providing smaller shapes for ākonga to work with that have an area of a whole number of square centimetres
- modeling how to estimate the area of a shape by visualising the first row and column of a grid
- introducing the use of the recording symbol cm2
The context in this unit can be adapted to recognise diversity and student interests to encourage engagement. For example, the activities could focus on measuring familiar objects such as leaves in autumn, shells following a trip to the beach, or pebbles found at your local awa. For the activities to work there needs to be a collection of objects, all with a range of areas around 120cm.
- Centimetre cubes
- Large sheets of paper
- A hat
- Strips of paper
Session 1
We start this unit with a guessing game which introduces the idea of estimation. Consider how the mystery object you choose might reflect the learning interests and cultural make-up of your class.
- Show ākonga the outline of an object, for example; a small book, a shell or a rākau stick.
What do you think that this could be the outline of?
How many cubes do you think I would need to cover this shape? Give each student a 1cm cube and ask them to write their guess on a piece of paper. Introduce the idea that an estimate is a thoughtful guess.
I think the area of the mystery object is ........... cubes
Lillie-Moana
Show the class a shape made with 5cm cubes, for example a rākau stick
Ask ākonga to record the shape on cm squared paper.
What is the area of this shape?- If ākonga say 5 squares tell them that the unit square is called a square centimetre.
Why do you think it is called a square centimetre? - Ask a volunteer to make a different shape with the 5 cubes. Tell them that the shape must be flat and the whole sides of the squares must touch.
What is the area of this shape? (5 square centimetres or 5 square cm) - Give each student 5 cm cubes and challenge them to find other shapes that can be made with the cubes. Ask them to record the shapes on the cm grid paper.
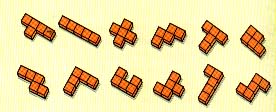
(These shapes are called pentominoes and there are 12 distinct shapes that can be made. Some ākonga may wish to explore this concept further). - Share shapes. Check again that the ākonga understand that each has an area of 5 square cm. You may wish to introduce the recording device of 5cm2, although this is not the purpose of this unit.
- As an extension, ākonga could make larger shapes in response to a prompt (e.g. remember when we looked at tukutuku panels yesterday, can you make a new pattern that would fit on a tukutuku panel?) and could estimate and measure the area of these larger shapes. Encourage ākonga to use effective counting methods (e.g. skip counting in fives, repeated adding). This could be further adapted by changing the size of the shapes ākonga make (e.g. 2cm2, 3cm2.)
Session 2
- Look at the outline of the mystery object from yesterday. How can we work out whose guess was closest to the area of the object?
- Give each pair of ākonga an outline of the mystery object and ask them to work out its area in square centimetres. These pairs could be based on the tuakana/teina model to encourage shared learning. Have centimetre cubes and squared paper available and support ākonga to make decisions about how they will measure the area. Share areas and approaches used.
- Talk about how to handle part squares. Within this, draw on the understandings of halves and quarters that is demonstrated by your ākonga.
- Ask ākonga to write what they think the object is, and their measurement for its area, on the object’s outline. Display the outlines on a Mystery Object chart.
Session 3
- Pose the question: What objects do you think have about the same area as our Mystery Object? Note that ākonga will need to use their estimation skills to accurately identify objects of a similar area and discuss possible estimation strategies.
- Brainstorm ideas for objects that have about the same area as the Mystery Object. Write the names of these objects on strips of paper and put them into a hat.
- Working with a partner, ākonga take a strip, and find the object it names. They then make an outline of the object, calculate its area, and write the name of the object and its area on the outline. Ākonga could use cm2 to record their area.
- At the end of the session work together (mahi tahi) to order the objects measured from smallest area to largest area, and identify objects with a similar area to the Mystery Object.
Session 4
- Establish a challenge: Today we’re going to challenge ourselves to identify objects with a specific area. We’ll need to use our estimation skills.
- Before the session, fill the hat with strips of paper. Each strip needs to have the measurement of an area written on it. Include several strips of the same measurement.
- Ākonga work in pairs to take a strip with the measurement of an area, and draw or find five objects with that area. Encourage tuakana/teina by pairing more knowledgeable and less knowledgeable ākonga together. You might provide a poster or digital presentation of objects that match the given measurements, to prompt ākonga in their thinking. Consider how these objects could support links to the cultural make-up and learning interests of your class (e.g. if learning about traditional Māori games and activities, objects could include poi, manu tukutuku (kites), and ruru (knucklebones).
- As a class, review the task together (mahi tahi) and find out how successful ākonga were at estimating the area. Discuss useful estimation strategies.
- Ākonga who have been working with the same measurement compare results and discuss any differences, checking each other’s measurements.
Session 5
Today we use the measurement skills we've been working on to find out who has the smallest and largest footprint in our class.
How could we find out?
About how many square centimetres do you think it would be? Why do you think that?
- Ask small groups of ākonga to think about a way of measuring footprints to find out who has the smallest and who has the largest.
- Support ākonga to draw outlines of their feet. If a variety of measuring ideas have emerged, you could model a few (or all) of the ideas and choose one idea to follow as a class.
- When the outline is made the ākonga need to work out the area of their footprint.
- Share outlines and measurements. Display from smallest to largest.
Dear family and whānau,
This week at school we have been measuring the area of objects using square centimetres.
At home this week your child is asked to figure out the area of largest and smallest footprints in your family using the attached square centimetre paper. They can draw and outline and then figure out the area. Encourage your child to estimate the area in square centimetres before working it out. We will use these to make a classroom display of big and little footprints.