All about angles
This unit supports students to understand angles as a turn relationship between two rays, and to apply their understanding in sport and design settings.
- Identify angles in the environment.
- Measure an angle using a protractor.
- Use angles to travel at a bearing.
- Anticipate the path of a ball as it bounces off a wall.
- Use rotational symmetry to create a logo.
In this unit the students will discover how to measure angles. All measurement is the assigning of quantity to an attribute (a feature or characteristic). An angle is created by rotation or turn. Most angles that students encounter are presented in static form. For example, angles in a room, or in household furniture, are already constructed. An angle in those situations is the intersection of two or more planes (flat surfaces). Two dimensional diagrams of angles are also presented in static form, illustrating that two rays intersect at a common point.
However, it is the relationship between the connecting rays that constitutes the angle. That relationship is the turning of one ray onto the other, at about the point where they meet.
We owe our system of measuring angles to the ancient Babylonian civilisations (c. 3000-539 BC). The Babylonian number system was based on 60, and the measure of 360° as a full turn was based on a calendar of 360 days. Therefore, the creation of a measure of angle was a result of wanting to quantify the dynamic passage of time. 360 is a good base as it is easily partitioned into many fractions, e.g. ¼ of 360° equals 90°.
The learning opportunities in this unit can be differentiated to cater for the current achievement levels and learning preferences of your students by providing or removing support to students, and by varying the task requirements. Ways to support students include:
- modelling turns physically, and relating body movements to angle diagrams
- Acting out the games used in this unit
- choosing angles that are easy equal partitions of a full turn. Half and quarter turns (180⁰ and 90⁰) are easiest but sixths of a turn (60⁰), eighths (45⁰), and thirds (120⁰) are also relatively easy and common in everyday contexts
- explicitly modelling skills, such as measuring an angle with a protractor.
- providing small group teaching opportunities for students who find the measuring skills difficult. Scales are often difficult for students, and a protractor has the scale arranged around the perimeter of a circle, or half circle
- using calculators to ease the demands for some students, especially where division of a full turn is required.
- encouraging sharing and discussion of students’ thinking
- using collaborative grouping so students can support each other and experience both tuakana and teina roles
- encouraging mahi tahi (collaboration) among students.
Adapt the contexts for working with angles if needed, to meet the needs, interests, and cultural backgrounds of your students. Sport is a motivating context for many students, and logos are a familiar context. However, students might be more motivated by the context of physical journeys, such as hiking or yachting, especially in America’s Cup time. Angles in culturally significant buildings or maps of the local area might be used. Navigation systems used by Polynesian mariners is likely to inspire some students.
Te reo Māori vocabulary terms such as koki (angle), koki hāngai (right angle), hihi (ray), hurihanga (rotation), and ine-koki (protractor) could be introduced in this unit and used throughout other mathematical learning.
- Scissors, rulers, protractors, calculators
- Blackboard protractor
- Builder’s rope, and marker cones
- Copymaster 1
- Copymaster 2
- Copymaster 3
- Copymaster 4
- Copymaster 5
- Copymaster 6
- PowerPoint 1
- PowerPoint 2
- PowerPoint 3
Session One
In this exploration students attend to situations where angles are present. In doing so, they recognise that these situations can be dynamic, e.g.an ice skater turning, or static, e.g. a playground slide.
- Begin by showing students Slides One through Five of PowerPoint 1.
In each of these pictures there is an angle. Tell me where you can see angles. Have a korero with a partner and share your ideas. - Through examples, try to develop a working definition of an angle. Pictures present a static view of angle. That view is useful in construction but it neglects the important relationship that connects all angles, the turn or rotation.
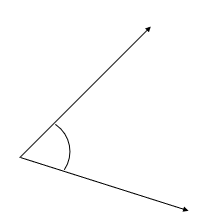
- Show the students Slide Six which rotates a ray (one-directional arrow) in relation to another.
Where is the angle in this picture? - Students may attend to the point where the rays intersect. That is an important feature of an angle. They may attend to the space between the rays which is a distractor. On clicks of the mouse the ray rotates further.
Is the angle staying the same, getting smaller, or getting bigger?
What is causing the angle to get bigger?
Students usually agree that the angle is increasing in size though they may be attending to area, and not to rotation. It is also important that students realise that an angle can be greater than a right angle. You might mention the right angle when the rotation reaches 90⁰.
What are the important features of an angle?
Students should mention the intersection (important), the rays (rather than lines), and the turn, which is the relationship between the two rays. - Slide Seven contains pictures of scissors of various sizes. Ask the students to discuss in pairs or threes:
Which pair of scissors is the most open? - After a suitable time, bring the class together to discuss the pairs of scissors. Use Slides Eight and Nine to highlight that it is the rotation, rather than the area, between the rays that defines the size of the angle. Slide Ten shows the two most open pairs of scissors. The two angles can be compared using the right angle as a benchmark. The black handled pair is open at more than 90⁰ and the green handled pair at slightly less than a right angle.
Some students might suggest measuring the angles with a protractor. The animation shows how to do that (use mouse clicks to navigate).
You are now going to learn a bit about how people learned to measure angles based on the Babylonian method from many years ago. - Provide students with Copymaster 1 and ask them to work through the problems. Encourage sharing of their thinking and collaboration (mahi tahi) with others. Look for students to make connections between the base of 360 degrees (as in days of the year) and the fractions they need to create. Some students may need a calculator for division but encourage the use of mental strategies, where possible.
- After students have completed the tasks work through the remaining slides of PowerPoint One. Look to see that they can estimate benchmark angles such as 90⁰, 45⁰, and 60⁰. Are they able to adjust their noticing to accommodate the changes in orientation?
Session Two
- Begin the lesson with Copymaster 2. In this activity students estimate the size of given angles first then check their estimates with a protractor. The difference between estimate and actual angle is calculated. At the end students can sum their differences and compare their performance with those of classmates.
- Next, show the students a video of a goal kicker from rugby, rugby league, AFL (Australian rules), or football (soccer). All the sports have female professional leagues so be gender inclusive.
If the commentator said that a player scored from an acute angle, what would that mean?
Are there kicking positions that are harder to score from than others? Why? - You might ask students to draw diagrams to explain their thinking. The difficulty of a kick can be due to several variables including distance, wind direction, preferred foot of the kicker, nature of the ball, and angle. Focus on angle, assuming distance and other factors are controlled.
Let’s imagine the kick is only 20 metres from goal.
Which position gives you the best chance of kicking the goal? Why? - Students might create a scale drawing of the situation using 1cm grid paper. A scale of 1cm=5m or 1cm=2.5m works well. Alternatively draw the situation like this.
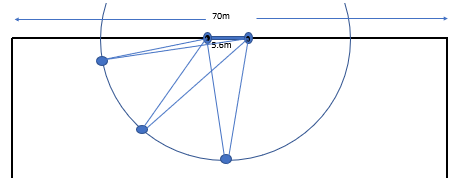
As the kicker moves further away from the central point the angle gets smaller, making the shot more difficult. In real games, a kicker taking a kick from a non-central position, moves further back to increase their angle. - Take the class outside. You will need to take clipboards and paper, a large blackboard protractor, PE cones or markers, and a long builders’ rope (cheap at hardware stores). Place the markers at different angles to the posts at a distance such as 10 metres which is easily kickable. Measure the angles using the rope and the protractor.
- Station a record keeper at each marker and several balls (rugby, soccer, tennis balls can be thrown if necessary). Station half the class as ball receivers on the other side.
- Let each student have two or three kicks from each station (Kickers and receivers will need to change places). Record keepers keep tallies of the successful and unsuccessful shots.
- After the kicking is complete bring the class inside to look at the data.
Create a table like this:
Angle Successful Unsuccessful 15⁰ 13 45 24⁰ 21 37 36⁰ 36 22 55⁰ 45 13 - Ask the students to use calculators to change the numbers to percentages. For example, 36/58 = 36÷58 = 62.1%.
What do you notice about the success rate as the angle changes?
Naturally the success rate declines as the angle declines. Likewise, success rate increases as angle increases. - Use Copymaster 3 as practice of applying angles to goal kicking.
- Students could investigate angles in sports or games they are familiar with. For example, running between pou in kī-o-rahi, making a pass across the field in hockey, or shooting from a certain position in basketball.
Session Three
In this lesson students play two games related to angles, snooker and golf. Look up short videos of both sports online, and briefly discuss how angles are involved in each game.
- Use PowerPoint 2 to discuss two things:
- The path of a ball after it hits the cushion (side of the table).
- The path of a ball when it is hit by another ball.
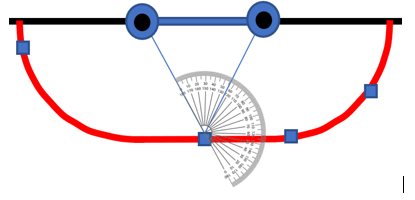
- Slides One to Three show billiard balls bouncing off cushions. Ask students to look at the first path of the ball and anticipate the direction the ball will bounce off the cushion. Protractors appear to show how the angle of entry and departure are related.
- Slides Four to Six show situations where the cue ball hits a target ball. In general, a line from the pocket through the centre of the target ball tells where to aim the cue ball (assuming no spin). After impact the cue ball travels at a normal (right angle) to the line. The slides also include bounces off the cushion which students should be encouraged to anticipate.
- Ask students to estimate the angles for all three slides then reveal the protractors to check. You may need to discuss obtuse angles that measure between 90° and 180°.
- Copymaster 4 has some scenarios for students to explore. They will need a pencil, ruler and protractor. As your students work look for:
- Do they recognise that the entry angle must equal the departure angle?
- Do they orient the protractor, and read the angles properly, to mark the departure path?
- Do they recognise that alternative paths off the cushion are parallel?
- Do they notice that the angle of the cue ball after impact is normal (at right angles) to the line for the pocket to the target ball?
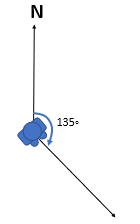
- The golf game is designed to practise angles from 0° to 360° as bearings. To find a bearing measure the angle clockwise from due North. For example, a bearing of 135° is shown below. Note that a bearing is used to face a particular direction, and is used in navigation and orienteering.
Students need to combine their estimates of a bearing and distance to play each shot. Slide Seven shows an example of a hole being played. Provide the students with Copymaster 5, a protractor and ruler. Let them play a round of golf!
Session Four
In this final lesson students apply their knowledge of angles to create a logo with rotational symmetry.
- Slides One to Three of PowerPoint 3 show how an element can be rotated to form a logo. The number of rotations of the element before it returns to starting position is called the order of rotational symmetry. The angle of rotation is the result of equally partitioning 360⁰ by the order. For example, to create a logo with rotational symmetry of order four, the element is rotated four times through an angle of 360⁰ ÷ 4 = 90⁰.
- After viewing the first three slides, move to complete logos on Slides Four to Six. Discuss how to work out the order of rotational symmetry for each logo, and how the angle through which the logo maps onto itself.
- Students can then work on Copymaster 6 which requires them to identify the rotational symmetry of complete logos.
- After students have completed the task ask them to design their own logo using rotational symmetry. The completed logos can be given to other students for analysis. Students may wish to use digital technologies, such as PowerPoint, Scratch, or Geogebra to create their logos.
Family and whānau,
This week we have been exploring angles. We found that an angle is a turn relationship between two rays. Then we investigated the best place for a goal kicker to shoot from, played games of pool and golf, and created our own logo. Ask us to tell you all about how angles are involved in these activities.