Starting from Scratch
In this unit students use a digital programming platform, Scratch, to learn about polygons, and use the language of direction and distance.
- Create a programme in Scratch for a Sprite to walk out a shape or figure, including:
- Correct numbers of steps
- Correct angles
- Use of repetition
- Use of blocks
- Use of variables and operators
- Read a programme in Scratch and work out the path that the Sprite will take
The mathematics in this unit is primarily about geometry though aspects of measurement and number are applied.
Specific Teaching Points
- Polygons are planar shapes which means they are two-dimensional. ‘Poly’ is the prefix for many and ‘gon’ means corners or angles. Polygons are bounded (enclosed) by line segments so the sides are straight. The name of a polygon comes from the number of corners (or sides) it has. For example, a pentagon has five corners and five sides since ‘penta’ is the prefix for five.
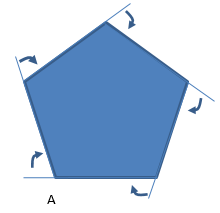
- In this unit students need to navigate the boundary of polygons. This requires knowledge of the exterior angles. Imagine beginning at corner A and walking around the outside of the regular pentagon. Regular means that the sides and angles are all equal. Five turns would occur during the journey that has you starting and ending at A and facing the same direction as you started at the end. Since you are facing the way you started you must have completed a full 360° turn. That full turn was divided into five equal small turns which must be 360 ÷ 5 = 72° each.
- If the polygon was a regular hexagon it would have six corners. The 360° would be equally shared six ways so each exterior angle would be 360 ÷ 6 = 60°. Therefore, in general, the exterior angles of a regular n-gon are (360 ÷ n)°.
To have their Sprite facing the correct direction students can use this command: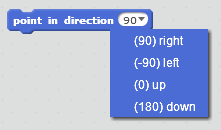
To make sense of this command students need to understand bearings, in a simple way. Bearings are measured in a clockwise or anti-clockwise direction from due North (vertical). Here are some examples.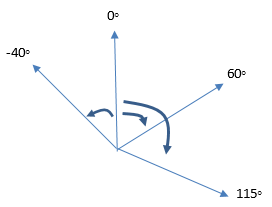
Note that in Scratch the bearing that is an anti-clockwise turn from the vertical of 40° is written as -40°.
- Students also need to attend to length, as measured in steps with Scratch. Therefore, some ideas of measurement and proportion are involved. Take the simple situation of navigating from A to B. The first attempt in red was a length of 200 steps.
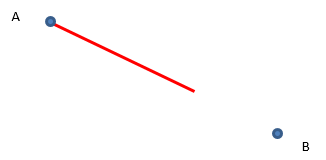
To work on the length required students need to apply iterative use of a unit or equal partitioning. One way to solve the problem is to realise that 200 is about two-thirds of the distance. Each third must be 100 steps so the whole distance must be three thirds, 3 x 100 = 300 steps. In working with Scratch students may encounter more difficult proportions. They may need to rely on iteration. In the red line example, they might realise that the line can be equally cut into four parts. One part is 50 steps and can be used as a unit to measure the whole length that is needed. That measurement process of placing units end on end without gaps or overlaps is called iteration.
Students' experiences with digital technology are likely to vary considerably. The learning opportunities in this unit can be differentiated by providing or removing support to students and by varying the task requirements. Ways to support students include:
- physically modelling the movement of a Sprite or robot by students to develop a sense of decisions they make to complete a path
- developing and interpreting code in small pieces before putting together the complete code. This approach is like modular programming
- writing and enacting code in a risk-free environment. Simply trial code and accept that sometimes what you get is not what you expect
- taking a gradual improvement approach by looking at what works and what does not. Refine the existing code then review it again
- letting students work in pairs to share ideas and expertise.
Task can be varied in many ways including:
- letting students self-select a level of challenge that they feel comfortable with. The activities have several options that vary in difficulty.
The context for this unit is engaging. Capture students' interest in robotics by exploring non-fiction examples, and science fiction stories. There are many videos of films and television shows online. Students will enjoy personalising the movements of a Sprite to create a figure that is of significance to them. Can they train the Sprite to draw a koru, or nutukaka (kakabeak) flower, or write their signature? Can they create a shape or emblem that is important in their culture? Use collaborative partnerships (tuakana/teina relationship) to motivate your students. Most coding is completed in teams (mahi tahi model) which reflects the collaborative nature of work in digital technologies.
Te reo Māori vocabulary terms such as taparau (polygon), taha (side), koki (angle) and ahu (direction) could be introduced in this unit and used throughout other mathematical learning.
- Access to Scratch software, available for online use or free download at https://scratch.mit.edu/download
- Copymaster 1
- Copymaster 1 solutions
- Copymaster 2
- Video 1
- Video 2
- PowerPoint 1
- PowerPoint 2
Prior Experience
Students should have a concept of an angle as a measure of turn and be able to use a protractor to measure angles. Some experience with co-ordinate planes would be an advantage but is not strictly needed. Students will also need to know the properties of simple polygons like triangles, squares and hexagons. Support the development of these understandings as necessary.
Session One
In this lesson students investigate giving directions with sufficient clarity that a robot or sprite can carry them out. You may like to play a short video from YouTube showing the portrayal of robots in science fiction, e.g. Star Wars or Lost in Space. Begin by discussing this question:
- Ask: How do robots know what to do?
Students need to understand that robots are really computers that are programmed by humans to carry out tasks. This avoids the thorny issue of whether robots will become self-thinking in the future. - Discuss: What is a programme?
A programme is composed of a set of instructions that the robot can interpret. It only makes sense to tell a robot to “Go forward three steps” if it understands the meanings of “Go forward” and “Steps”. Computers are very good at counting if they understand what “three” means. - Ask the students to work in pairs. One student is the programmer and the other student is the robot. The challenge is:
- Give the robot clear instructions to walk the perimeter (outside boundary) of a square.
You may need to clarify the meaning of perimeter. Let the students work for a few minutes to work through their instructions. Some recording will be necessary. When you gather the class ask a few pairs to model the instructions. These issues should surface.- What actions can we assume the robot can do? (Walk forwards/backwards/ etc., turn, count steps, …)
- Why is precise language important?
- How important is it to get the sequence of steps correct? What happens if the steps are out of order?
- Are some actions repeated? This can be thought of as a ‘block’. If the robot knows a block how can this make a programme easier to write?
- Tell the students that they are going to use software called Scratch which is a programming language. Play Video 1 which shows the creation of a set of commands to draw a square. You might stop the video at certain points to allow students to set up the programme themselves. Video 2 shows how to set up a block that can be altered to draw any regular polygon.
- Once the students have a workable block for a square introduce the challenge:
How can the commands be altered to create other regular polygons?
You may need to discuss the meaning of ‘regular’ as having equal sides and angles. The prefixes of the polygons (many angles) indicate the number of angles, e.g. octa refers to eight, hexa- refers to six. Let the students explore how to create other polygons. - At some point gather the class to see if they have generalised how to create a n-gon (polygon with any number of sides). Their suggestions can be tried out using the ‘polygon’ block. In general, it is the combination of number of sides and angle that determines whether the path closes a space.
You may need to draw a diagram of what the angle is referring to:
"Angle as a turn" is one of the most fundamental concepts in Geometry and Measurement. To support students to understand that the sum of exterior angles of a polygon is always a full turn (360°) get a student (robot) to act out walking various polygons. - Notice how our robot ends up facing the direction she/he started with. So, how much has it turned to make a triangle, square, pentagon..?
In general, to create a regular polygon of n sides the angle needs to be 360° ÷ n. For example, to create a hexagon the angle of turn is 360° ÷ n = 60°. - The final challenge for the class is:
What values for the variables side length, angle and number of sides do you enter so the beetle draws a circle? Is that possible?
Maximising the repetitions to 360, and minimising the distance and angle to one, creates a polygon that looks like a circle. In fact, the shape is a 360-gon. Some students might wonder how many sides and angles a circle has.
Session Two
In this session students apply their knowledge of programming in Scratch to create paths. There are seven challenges which vary in difficulty as indicated by the number of stars on the cards (See Copymaster 1).
- Let students choose a level of difficulty that they think is appropriate for them. Students may wish to work in pairs to work on the challenges.
The solution codes for the challenges are provided in Copymaster 1 solutions PDF. Note that there are often many different programmes that produce the same outcome. Also, remind the students that they are trying to get as close as they can to the target paths. It is difficult to get the coding identical to the original. - Gather the class after a suitable time of exploration (this may be a whole maths lesson). Discuss how they went about answering the challenges. Points to bring out are:
What did you first look for when you saw a path?
How did you figure out which lengths to put in? (Relative length is important in some paths)
How did you figure out which angles to put in? (Discuss turns greater than 90°)
What features of some paths told you that a repeat loop was possible? (This involves partitioning the path into several identical parts) - Students might enjoy the opportunity to create path challenges for others. You might create your own set of challenge cards with solution coding on the back.
Session Three
So far students have worked from a shape to create code. In this lesson they are given the code and expected to anticipate the shape that will be drawn. After anticipating they can always recreate the code on Scratch to see what happens but that is not the aim. Pre-made codes for use in sessions three and four are available in the Scratch Codes zip file.
- Show your students PowerPoint 1. The first slide gives a piece of code that will draw a letter ‘a’. Several question bubbles appear as you click the mouse.
The key idea is that students attend to the code in ‘chunks’ and anticipate the effect of each chunk. Recording the information in pieces before assembling the whole figure is very useful. You can find the code saved as ScratchCode-LetterA.sb2. - Mouse clicks to reveal highlighted parts of the code that can be discussed before making a collective prediction.
- After you have worked through Slide One ask the students to attempt Slide Two in pairs or threes. The code draws a sand timer figure. Allow the students sufficient time to anticipate the figure that will be drawn. Then gather the class together. You can find the code as ScratchCode-Hourglass.sb2.
- Copymaster 2 consists of 12 cards with codes. Students are required to anticipate the final figure that will be drawn by the code. Recording the expected figure before testing it is important. There are varying degrees of difficulty, so students can work at a level that is appropriate for them. The number of stars indicates the complexity of the code. Let your students work for at least 30 minutes on the tasks. Allow access to Scratch so students can try out their ideas, including their anticipations for parts of the code. All the codes used are available as files for use with Scratch (See Code Card ###).
- Discuss with the students how they worked out what the code did when enacted. You might address:
How did you separate the whole code into parts?
What features did you look for first? What did repeats suggest to you?
How did you deal with blocks and variables?
What effect did random variables have on the design a code created?
Session Four
In this session students explore the use of Scratch to create directions for movement on a map. Training a robot to move is more complex than the instructions that you might give to another human being. Robots cannot interpret instructions like “Follow Smith Street down to the corner.” They can use their GPS system to travel in a compass direction like North or East but rely on simpler instructions like distance to move and angle to turn.
- PowerPoint 2 contains a map that is the backdrop to the following activities. Identify the location of four people Zane, Awhina, Ajay and Fatu. Ask the students to imagine telling a robot how to move from Zane’s place to where Fatu lives.
- Write down a set of instructions that students give you for the journey. Have a student act out each instruction, one after the other. Ask where the robot’s location, and the direction they face, after the instruction is given.
- Open the file ScratchCode-TownRedMove.sb2. Before clicking the flag, ask your students to look at the code. Ask what moves they expect the robot to make. Test their predictions by clicking the flag. Tell the students that their task is to complete the set of instructions so the red robot travels to where Fatu lives. The robot must walk along roads or pathways.
- After a suitable period, bring the class together to discuss their strategies.
How did you know how many steps to take on each section of the journey?
How did you know which direction to face?
Did you use any repetition? Where? How did you know that would work? - A further challenge is to give students access to ScratchCode-Town.sb2. They can choose the person they want to move and their destination. By choosing the Sprite for that person and deleting the others they can code the journey.
Alternatively pose an even harder challenge by using ScratchCode-City.sb2. The layout is more regular which may enable use of repetition and block, but the journeys are longer.
Dear family and whānau,
This week we are working with a programming language called Scratch. We will use Scratch to tell a robot how to travel along paths. Some of the paths will be shapes like triangles and squares but other paths will be more complicated.
While we are solving problems, we will learn about sequencing steps to create programmes that work. Some programmes will need us to repeat actions over and over, to build blocks of commands, and to use variables to control what the robot does. Ask your children to explain some of the activities they have been working on.