Transformations
This unit explores important ideas about reflective and rotational symmetry.
- Recognise when one figure is a reflection of another using invariant properties such as perpendicular distance from the mirror line, equalities of lengths, areas and angles, and opposite orientation in relation to the mirror line.
- Recognise the rotational symmetry of a figure, including identifying the centre of rotation and the order and angle of rotation.
- Create symmetrical patterns using the properties of translation, reflection, and rotation.
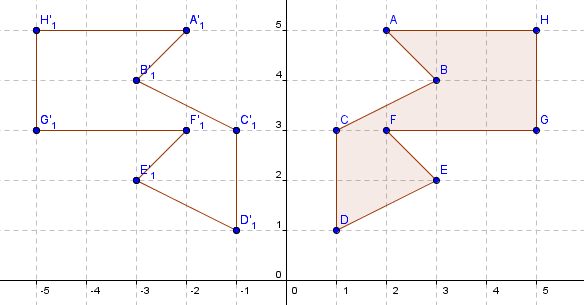
Both reflection and rotation are isometries. This means that a shape can be transformed (i.e. reflected or rotated) without altering the measures or metrics (e.g. the arrangement of points with relation to each other). Within this, the lengths, angles and areas of 2-dimensional shapes and their images under reflection and rotation remain the same. For example, in the image below a polygon is reflected on the y-axis. The lengths AB and A’B’ are the same, as are <CDE and <C’D’E’ and the areas of the polygon and its image (8½ square units).

The only changes from shape to image in reflection and rotation are to do with orientation. In reflection the shape and image face opposite directions relative to the line of reflective symmetry (mirror line). In rotations orientation depends on the angle of rotation.
Invariance of length, angle and area are insufficient to locate the image of a shape under reflection and rotation. In reflection, the location of points and their image are the same perpendicular (90°) distance to the mirror line. B and B’ are both 3 units of length away from the y-axis at right angles.
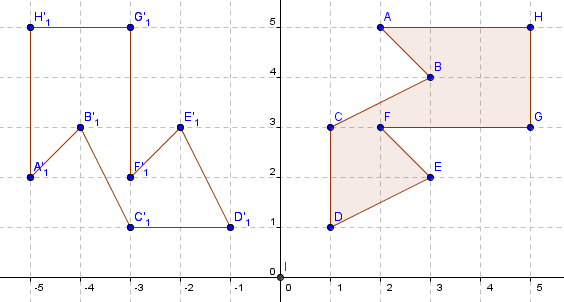
In rotation, points on the shape and on the image are the same distance to the centre of rotation, meaning the point through which the shape was rotated. In this example, the distances of both A and A’ to the centre of rotation (0,0) are equal. Note that the angle formed by the distance rays is 90° the angle of rotation anti-clockwise.
Specific Teaching Points
Research by Ramful and Lowrie (2015) shows that students tend to rely on their spatial thinking rather than analytically considering whether or not a shape is the image of another under reflection or rotation. Spatial thinking involves capturing an image of a shape and transforming it mentally. Spatial imagery is important and is extremely useful in a wide variety of fields, such as engineering, design, architecture, building and surgery.
However, advancing spatial reasoning requires students to connect their spatial imagery and analytic thinking. Analytic thinking involves considering the properties of shapes under transformation. Knowing and applying the invariant properties of reflection and rotation allows students to solve more complex problems than those accessible by visualisation alone.
The learning opportunities in this unit can be differentiated by providing or removing support to students, or by varying the task requirements. Ways to support students include:
- pairing students so that they can support each other through tuakana-teina. This is particularly important as they work on computer applications
- providing pre-made cardboard shapes so students can physically act out reflections and rotations
- restricting the complexity of the shapes students are asked to reflect or rotate
- using computer technology to encourage risk taking and experimentation, and to model the reflection and rotation of patterns and designs.
This unit is focused on reflection and rotations. These symmetries are common in everyday figures. Use examples from real life that are appropriate to the interests and cultural identities of your students. Traditional Māori and Pasifika designs and art forms such as whakairo (carving) and tapa cloth, use reflection and rotation. Logos of well-known brands, tiles, wallpaper patterns, and natural shapes in the environment, such as reflections in lakes, provide other possible contexts.
- Attached files as listed at bottom of unit
- Paper, card (waste), pens
- Access to computers
- Copymaster 1
- Copymaster 2
- Copymaster 3
- Copymaster 4
- Copymaster 5
- Copymaster 6
- Video 1A
- Video 1B
- Video 2A
- Video 3A
- Video 3B
- Video 4A
Prior Experience
It is anticipated that students will have prior experience of reflecting and rotating shapes without necessarily attending to invariant properties. They may have experience of creating patterns such as tessellations and kowhaiwhai by use of reflection and rotation. Games such as Simon Says could be used to engage students in the context of "reflecting" and "rotating" actions.
Session One
In this session students explore the invariant properties of reflection.
- Search for the YouTube clip of “Harry Worth Window”. You will find a short introduction to a comedy show where Harry, an English comedian, uses a reflection to create an illusion that he is split jumping in the air.
- Ask, “How does the trick work?”
The camera only sees one real half of Harry. The other half is the image of his real half after reflection. A student might physically model how the effect works. - Use Copymaster 1 for students to draw stages of Harry’s ‘jump’ as follows.
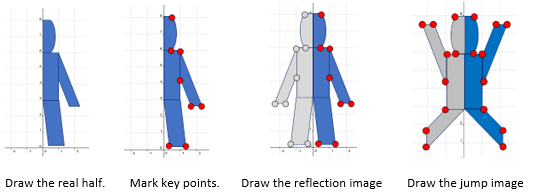
- If your students have access to appropriate software they can use that software to create an interactive ‘jumping Harry’. Video 1A gives instructions of how to create an interactive model on Geogebra.
- Ask the students to work in small groups to discuss what features of the real and image halves of Harry for the effect to work. Invariant properties such as conservation of length, angle, area should arise. It is also important that students realise that the image has opposite orientation to the real half. The image holds up its right hand while the real half holds up its left hand.
Pay particular attention to what becomes of the key points (label them) when they are reflected to form the image. This may need to be done systematically. For example:
Real Point A (2,1) B (1,6) C (0.5, 8) Image Point A’ (-2, 1) B’ (-1, 6) C’ (-0.5, 8) - Expect students to notice that reflection in the y-axis maps a coordinate (x, y) onto (-x, y). Software makes this more obvious as the coordinates of key points are usually available visually. Note that the distance from a point on the real half to the mirror line is the same as the matching distance of the image to the mirror line. That distance is measured at right angles to the mirror line. This property explains why any point, for example (1, 6), will have an image (-1,6) since 1 and -1 are the same distance from the y-axis.
- Use Video 1B to introduce the game of Symmetry Tennis. The example shown is a more challenging form of the game since the mirror line is at an angle, rather than being horizontal or vertical. Provide students with Copymaster 2 so they can play the game in pairs.
Look for the following:- Do students attend to the invariant properties, particularly the perpendicular distance of a point to the mirror line?
- Do they pay attention to the orientation?
- Do they play strategically by creating shapes that are difficult to locate and position?
Session Two
In this session the theme of symmetry is continued with focus on the internal symmetry of a shape. Students will need a digital picture of their face looking straight onto the camera with their eyes level.
- Start with Video 2A. The first frame shows the face of a young man. Ask, “How could we check how symmetrical this person’s face is?” Pause the video and Invite ideas from the students. Encourage them to apply the invariant properties of reflection that they discovered in the previous lesson. For example, the pupils of his eyes should be the same distance from his mid-line and at the same height. The angle formed by his cheeks should be the same on both sides. The areas of his ears should be the same. You may choose to let students investigate further with their own idea or continue with the video.
- Watch the video further to see how overlaying a coordinate plane can support closer analysis using key points. Once the students understand how the key points can be located, discuss how points can be used to get some idea of how symmetric the face is. Ideas that might arise are:
- Coordinates will need to take on decimal values to be accurate enough.
- Points should match with the x value of the ordered pair changing signs, e.g. (2.7, 3.3) should map to (-2.7, 3.3).
- Some way of measuring variation will need to be developed.
- Put the students into small groups to establish some idea of how symmetric the young man’s face is. Provide the students with a copy of Copymaster 3 for their group to work on. Let the students work collaboratively for a suitable time before bringing the class together to discuss their thoughts. Students might invent some measure of symmetry. The measure might be absolute, such as the difference in the numbers in the ordered pairs, e.g. eyebrows – (2.2, 5.9) is only 0.2 different to (-2.3, 5.8). Others might create a proportional measure, e.g. -2.2/-2.3 = 0.96 = 96%. Useful questions to ask are “Should we expect that the ordered pairs will match exactly? How do we allow for error in our measurement? What will be an appropriate variation?
- There are several possible options for extending the activity:
- Let students investigate the extent to which their own face is symmetric. It is worth reminding them that even people perceived as glamorous are non-symmetric. You can easily find examples on the internet.
- Let the students investigate what they would look like if two halves of the right side of their face were merged. Do the same thing with their left side. This can be done by inserting an image into a PowerPoint document, cropping it down the middle, making a copy and reflecting it.
- Develop a collective symmetry measure, and apply it to their own face or that of a well-known celebrity or sports star.
Session Three
In this session students extend their concept of symmetry to include rotational symmetry, looking for invariant properties and testing to see if a shape has internal rotational symmetry.
- Look at Video 3A which shows a design from traditional Celtic knot design. Pause the video after the introduction to ask the students what symmetry the shape has. It is likely that students will initially focus on reflection. Remind them how the shape might be tested for reflection using invariant properties. The knot does not have reflective symmetry. This is particularly obvious at points where one thread goes over or under another.
- Play the video to illustrate how the figure maps onto itself by rotation about the centre. The order of rotational symmetry for the knot is four, meaning it maps onto itself four times in a full 360° rotation. The angle of rotation is 90°.
- Copymaster 4 has other Celtic knots and a collection of Māori and Polynesian designs. Ask the students to establish the symmetry of each knot or design. Can they:
- recognise when a shape has or has not got reflective symmetry?
- recognise when a shape has or has not got rotational symmetry?
- establish the angle and order for shapes with rotational symmetry?
- You may like to look at this interactive worksheet about the rotational symmetry of a snowflake and regular octagon. Before dragging the sliders ask your students to anticipate which angle will map the shape onto itself.
https://www.geogebra.org/m/PhvUvyqz (symmetry of a snowflake and octagon) - Next play Video 3B which gives instructions for creating a slider interaction in GeoGebra. Be aware that some drop down menus do not show in the video but you are ‘talked through’ how to use them. You may decide to show the video in small sections, so students can create their own interactions as they view. Alternatively, if technology is not accessible, use Copymaster 5 so students can do the same activity by manually drawing a polygon with integral key points.
- After students have created their own interactions pose the following investigation:
Suppose you have a polygon that has some key points. These key points have coordinates such as A = (1,2), B = (3,5), C = (6,6) etc.
Rotate the polygon 180°. What is the connection between the coordinates of each key point and the coordinates of the image of those points, A’, B’, C’, etc.
Can you generalise what happens to any key point under a 180° rotation about the origin?
Try rotations of 90° and 270°.
Can you generalise about the image of any key points under these rotations? - Discuss students' answers to the questions. In general, any key point (x,y) becomes (-x,-y) under a 180° rotation, (x, y) becomes (-y, x) under a 90 rotation anti-clockwise, and (x, y) becomes (y, -x) under a 90 rotation clockwise.
- Finalise the lesson with the questions on Copymaster 6. Check to see if your students can identify the invariant properties of a shape under rotation.
Session Four
In this session students engage in an investigation that applies reflective and rotational symmetry. Students will work in small groups. Each group will need a set of paper squares which are readily available at stationery and dollar shops. They will also need a compass.
- Show the students how to create a set of Quarcibits as follows. This investigation was originally created by Dr Jill Brown (Deakin University).
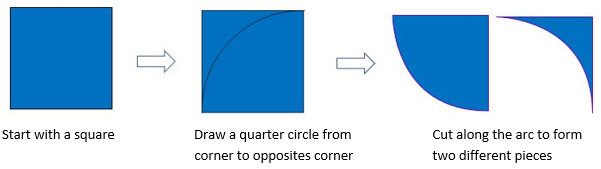
- The two different Quarcibits can be joined by joining matching edges. So…
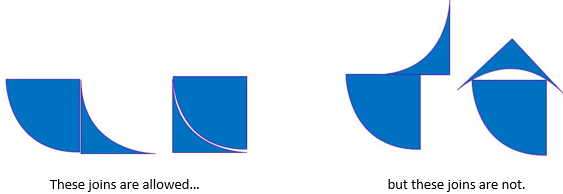
- The first part of the investigation is to find out how many different shapes can be made by joining two Quarcibits. Remind the students that two quarter circles and two left over pieces could be joined.
- Give your students time to find all the possible shapes. A shape is the filled silhouette so the location of the join is not important. Ask students to come up with a convincing argument that they have found all the possibilities. Expect a systematic strategy such as:
- Classify the shapes by combinations, i.e. two quarter circles, quarter circle and left over, two left overs.
- For each ‘family’ anchor one Quarcibit then systematically consider the possible positions of the other Quarcibit.
- Test the shapes that are created for uniqueness. If shape maps onto another by reflection or rotation it is not unique.
- There are seven di-Quarcibits possible as shown below, organised by family of meeting Quarcibits:

Giving the shapes names is helpful in identifying them, especially if the names relate to real world shapes, such as ‘hedgehog’ and ‘lightning bolt’. - Next play Video 4A to show your students how the di-Quarcibit shapes might be organised in a Carroll Diagram by symmetry. Ask your students to create the two-way table and classify their di-Quarcibits. Look for:
- Do students work with both classifications simultaneously to locate the shape in the correct cell?
- Can they identify if a shape has symmetry and the nature of that symmetry (lines, order, angle of rotation)
- To extend the investigation further, challenge your students to find all the tri-quarcibits. There are 21 possible shapes and most lack symmetry – Why?
Kia ora parents and whānau,
This week we are studying transformations of shapes. In particular, we are looking at the features of a shape that change or stay constant as we reflect or rotate the shape. Encourage your child to look around the house and gardens for symmetrical shapes. Good examples might be dinner plates, plants and flowers, logos on products (cars and sporting apparel are good examples), and toys. Ask your child to explain the types of symmetry each shape has.