The purpose of this activity is to engage students in making a map to show the relative position and direction of features of a particular location.
This activity assumes the students have experience in the following areas:
- Reading simple maps to locate and move.
- Interpreting grid references on maps.
- Drawing simple maps of familiar places.
- Using scale to estimate distances on maps.
The problem is sufficiently open ended to allow the students freedom of choice in their approach. It may be scaffolded with guidance that leads to a solution, and/or the students might be given the opportunity to solve the problem independently.
The example responses at the end of the resource give an indication of the kind of response to expect from students who approach the problem in particular ways.
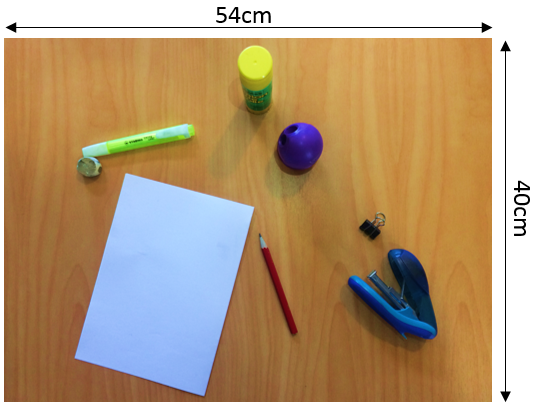
- Make a map of Jayden’s desk and write a precise location for three of the items on his desk.
- Make a map of your own desk showing the relative position and location of at least 6 items on it.
The following prompts illustrate how this activity can be structured around the phases of the Mathematics Investigation Cycle.
Make sense
Introduce the problem. Allow students time to read it and discuss in pairs or small groups.
- Do I understand what the problem asks me to do?
- Do I know what the words mean? (The meaning of scale and compass points (N,E,S,W) is important.)
- What will a correct answer look like? (The answer will be map of all the objects located and sized relative to one another.)
Plan approach
Discuss ideas about how to solve the problem. Emphasise that, in the planning phase, you want students to say how they would solve the problem, not to actually solve it.
- What maths ideas are involved in the problem? (Discuss the features of maps such as compass directions, scale, and legend.)
- What do I already know about maps?
- How do people create maps? Where do they start? What do they do next?
- How might I use grid lines to accurately locate and size the objects?
- What tools might be useful? (A digital platform might ease the drawing load for some students.)
- How will I know when I solve the problem?
Take action
Allow students time to work through their strategy and find a solution to the problem.
- Where might I begin? What information is the most useful?
- How will I record the information on my map in a systematic way, so I do not lose anything?
- How will I turn the compass, so it matches the information about Jayden’s desk?
- Have I created and used gridlines?
- Will my drawing on the map make sense to someone else?
- Can I learn from what others are doing? How?
Convince yourself and others
Allow students time to check their answers and then either have them pair share with other groups or ask for volunteers to share their solution with the class.
- What is my answer? Does my answer meet the requirements?
- How might I convince someone else that my map is correct?
- Could I have solved the problem in a more efficient way? How?
- What did I learn about creating maps?
- How might what I learned help me to draw a map about a different scene?
- What advice would I give others about how to solve this problem?
Examples of work
Work sample 1
The student uses reorientates the compass and gets the objects in their correct position relative to each other. They size the objects by sight rather than scale.
Click on the image to enlarge it. Click again to close. 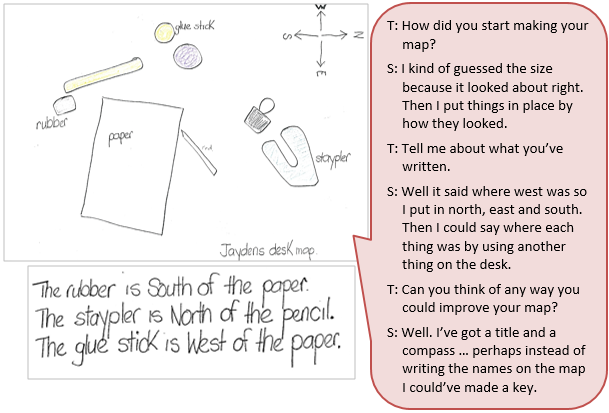
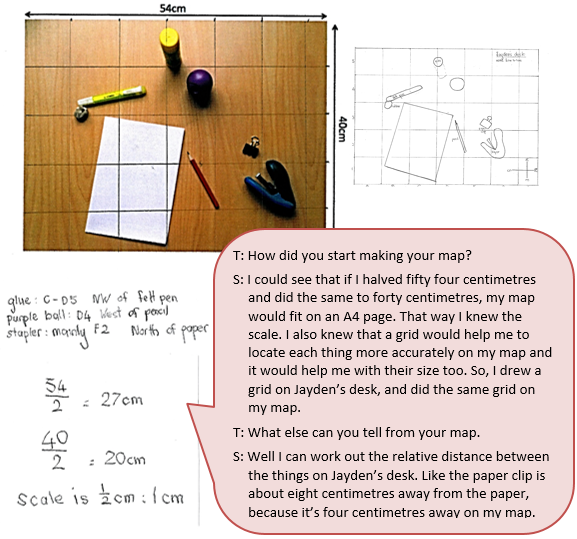
Work sample 2
The student makes use of the scale and compass to correctly size and locate the objects.
Click on the image to enlarge it. Click again to close.