This unit consists of mathematical learning, at Level 2 of the New Zealand Curriculum, focused around celebrations of Matariki, the Māori New Year. The sessions provide meaningful contexts that highlight Māori culture and provide powerful learning opportunities that connect different strands of mathematics.
Session One
- Use place value based strategies to subtract single and two digit numbers.
Session Two
- Interpret a calendar to make decisions about dates.
- Add two digit numbers.
Session Three
- Gather and sort data to make decisions about quantities of food to order.
- Calculate with measures, including money.
Session Four
- Recognise shapes in a figure.
- Follow a set of instructions for movement.
Session Five
- Use symmetry to recognise when winning positions are the same.
Specific Teaching Points
Session one involves subtracting single digit and two digit numbers starting at 200. As students take handfuls or counters from their "waka" they should anticipate how many counters remain. Students should use place value to calculate, as opposed to counting back. The use of a linear model for representing the calculations is recommended. A bead string is ideal and can be mounted along the edge of a whiteboard. Jumps can then be recorded on the whiteboard.

The session notes recommend linking two strings end on end to form a line of 200 beads. An important strategy in this activity is ‘back through ten’. For example, a student has 93 counters left and removes a handful of 17 counters. How many do they have left?
On the bead string, this calculation can be modelled like this:
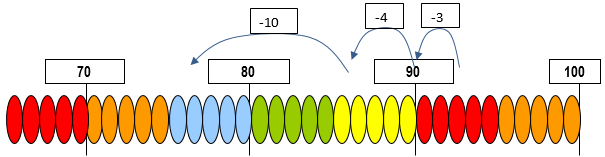
In this diagram, 93 – 7 is calculated in two steps. First, the seven in 17 is imaged as 10 and 7. Three is subtracted from 93 to get to 90 and then four is taken away to get 86. Thus, the seven from 17 has been subtracted, leaving only the 10 to be taken away next. This is a ‘back through ten’ strategy, meaning it uses a decade number (i.e. 90) as a benchmark. Alternatively, a student might take away the ten in 17 first, and then the 7.
Session three involves dealing with "like" measures, e.g. dividing or multiplying weights. Measuring objects with devices like kitchen scales is important to the development of students’ understanding of the measurement system. For example, students will need to find out how many kilograms of kūmara need to be ordered for the hāngī. If possible, bring a few kūmara along so students can experiment and find out how many kūmara make up one kilogram in weight. They will then need to use division or multiplication to calculate how many kūmara they need in total for the hāngi. If 24 kūmara are needed and four kūmara weigh one kilogram then 26 (24 ÷ 4) kilograms of kūmara will need to be purchased.
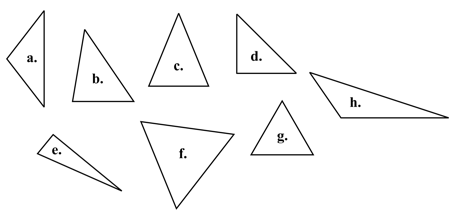
Session four develops important geometry ideas out of whai (string figures). A common issue with the learning of geometry is that students form prototypical views of shapes. For example, they might consider an equilateral triangle to be the only shape that is a triangle. All of the shapes below are triangles:
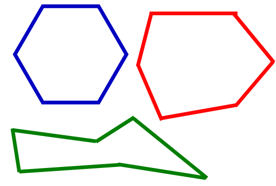
The issue of prototypical ideas will also apply to other polygons such as hexagons and octagons.
These three shapes are all hexagons. Note that the bottom hexagon is concave as it has two internal angles greater than 180°. It is important to discuss the defining characteristics of a class of shapes like hexagons. The only required property is that the shape is closed by six sides.
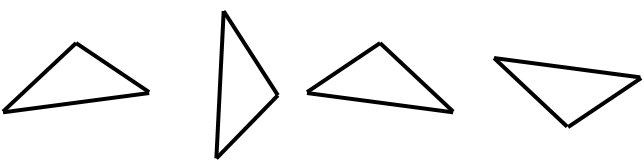
Session five also involves an important mathematical idea, distinctness. Rotating or reflecting a shape does not change its properties, except orientation (direction it is facing). The idea is fundamental to determining if given shapes are similar or different. For example, all of the shapes below are similar even though they look different. They can all be mapped onto each other using translation (shifting), reflection (flipping), and rotation (turning).
Similarity is applied in Session Five by looking for different winning positions. If the positions are reflections or rotations of one another then they are not considered to be distinct.
The learning opportunities in this unit can be differentiated by providing or removing support to students, or by varying the task requirements. Ways to support students include:
Tasks can be varied in many ways including:
- explicitly modelling the key mathematical processes that students are required to apply in each session (e.g. measuring, subtracting, dividing)
- supporting the use of specific counting and addition and subtraction strategies in reflection of your students’ strengths and strategy knowledge
- modifying the numbers utilised in each session to suit the needs of your students
- grouping students to encourage tuakana-teina (peer learning) and mahi-tahi (collaboration).
Although the context of Matariki should be engaging, and relevant, for the majority of your learners, it may be appropriate to frame the learning in these sessions around another significant time of year (e.g. Chinese New Year, Samoan language week). This context offers opportunities to make links between home and school. Consider asking family and community members to help with the different lessons. For example, members of your local marae may be able to share local stories and traditions of matariki with your class.
Te reo Māori language is embedded throughout this unit. Relevant mathematical vocabulary that could be introduced in this unit and used throughout other learning include āhua (shape), shape names (e.g. whetū - star), tātai (calculate, calculation), tāpiri (add, addition), ine (measure), taumaha (weight), huri (rotate, rotation), whakaata (reflect, reflection), and neke (translate, translation, move)
- Copymaster 1
- Copymaster 2
- Copymaster 3
- Copymaster 4
- Copymaster 5
- PowerPoint
- Counters, sticks, string, magnets and paperclips
Prior Experience
The activities are mostly open ended so they cater for a range of achievement levels. It is expected that students have some experience with naming and classifying basic geometric shapes, with measuring weight in kilograms, and with translating, reflecting and rotating shapes. They should also have place value knowledge to at least 200.
Session One
- The Māori New Year is celebrated at a different time each year. That is because the date depends on two events, the rising of the star cluster Matariki and the arrival of a new moon. In June, Matariki and the other six or eight stars of the cluster become visible in the Eastern Sky about 30 minutes before dawn. This is known as the rising of Matariki as, for the month prior to Matariki, it is below the horizon. After the rising of Matariki, Māori look for the next new moon to signal the New Year. The week prior to the new moon, excluding the night of no moon, is when Matariki is celebrated. Slide 1 of the PowerPoint shows the best known seven stars of Matariki. Slide 2 shows how to find Matariki should you want to organise a pre-dawn star spotting expedition.
- The Tūwharetoa legend of Tamarereti has connections to Matariki. Versions of the story vary but all name him as responsible for creating the stars in the night sky. Slides 3-8 tell the legend in abbreviated form. You may like to show an animated version of the story.
- Tamarereti cast the shining stones into the heavens on his journey across Lake Taupō. The stones stuck in the dark night sky to become the stars. Ranganui, the sky father, put Tamarereti’s waka into the sky in honour of his deeds, and the waka appears today as the Milky Way. The Southern Cross and Pointers make up the anchor and rope of this great canoe (see slide eight).
- Show the students slide 9 which shows a satellite picture of Lake Taupō. Click to discuss where Tamarereti drifted to while asleep, cooked his fish, then set off from to return to his village.
- Select a student to act out the next part of the lesson.
What the legend does not tell you is that Tamarereti collected 200 bright shiny stones and put them at the bottom of the waka.
Have a ‘waka’ with 200 counters ready for the student to act out the story. Any narrow container will make a good waka. - Tell the student to start rowing, then grab a small handful of stones to throw into the sky. Remember that the stones have to last the whole journey so Tamarereti cannot use them up all at once. Ask the student to cast the counters onto a sheet of art paper so the whole class can see.
- Ask: Is there a way to group these stones to count them easily?
Look for students to suggest ways to group the counters. Combinations that add to ten are especially useful. - Tell students: Tamarereti is being careful not to use all of his stones up because the Taniwha will eat him if he is unable to see. He wants to know how many stones he has left. How could he work that out?
- Let the students work out the remaining number in pairs. Then share the different ways the answer could be achieved. Look for part-whole strategies rather than counting back. For example if 15 stones are thrown into the sky subtracting ten then five is a good strategy. If 19 stones are thrown then subtracting 20 and adding one is effective.
- Ask: What might Tamarereti scratch into the side of his waka to keep track of his number of stones?
- Invite suggestions from the students about how to record the number of stones. Write on a map of Tamarereti’s journey the first stone toss or use the animation on Slide 5 to show how the journey might be recorded. Let the students work in pairs to act out and record Tamarereti’s journey across Lake Taupō. Each pair will need a container, 200 counters and a copy of Copymaster 1. The number of counters can be lessened or increased to vary the challenge. Expect students to manage the distance to go on the map and the number of stones left. They should record the results of their calculations as each handful of stones is cast into the heavens. The grid system on Copymaster 1 could be used to create coordinates so students can indicate the position of Tamarereti’s waka each time he casts out shining stones.
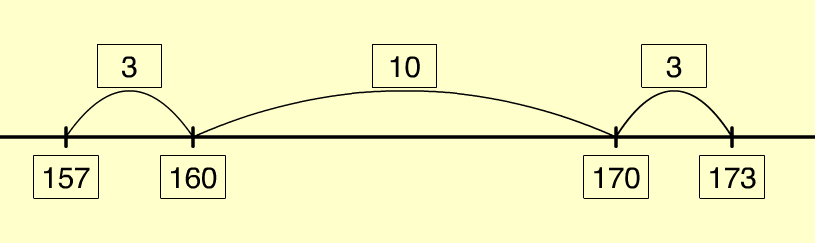
- After a suitable period, bring the class back together to discuss the strategies they used to calculate the remaining stones. Use an empty number line or two connected hundred bead strings to illustrate strategies as students suggest them.
- Back through ten (173 – 16 = 157)
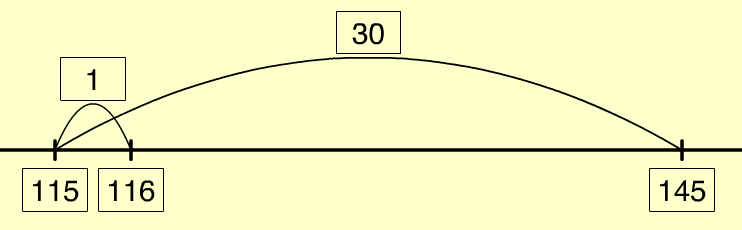
- Tidy numbers and compensation (145 – 29 = 116)
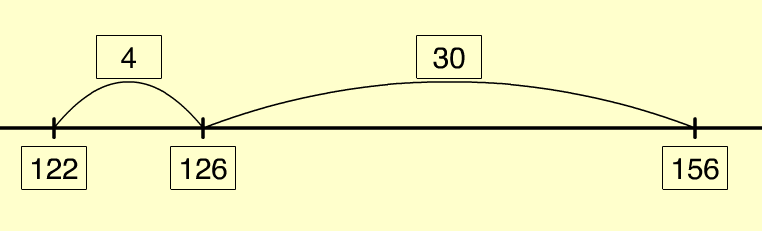
- Standard place value (156 – 34 = 122)
- Back through ten (173 – 16 = 157)
- You might use the work samples students produce as evidence of their additive thinking.
Session Two
- Slide 11 of the PowerPoint shows the phases of the moon. Ask the students why the moon (marama) changes appearance. Some may know that the change is caused by the moon’s orbit around the Earth and the extent to which the half of the moon lightened by the sun’s rays is visible. You can demonstrate this with a ball and a lamp.
- The phases of the moon are important to Māori as they indicate which days are best for traditional food gathering, particularly fishing. Slide 12 shows a page from Mathematics Across Cultures (1992). Ask the students to interpret the calendar.
- Why does the month only have 30 days? That is the length of one moon orbit of the Earth (actually 29.5 days).
- When are the best days to fish in the lunar month? (The red days which are days 18, 24, and 25)
- When are the worst days of the month to fish? (The first 2 days of the new moon, days 6-7, 10, 16, 20-22, and the last two days of the old moon).
- So what are the best days to fish during Matariki? Matariki is celebrated in the last quarter of the lunar cycle but not on the day of the new moon.
- Use the timeanddate.com website to capture the lunar calendar for the current month. Give each student a copy of the calendar and ask them to make a puzzle for a classmate. They do that by cutting the calendar up into jigsaw pieces. Set the maximum number of pieces to eight and tell the students to use the straight lines of the calendar to cut along. They can cut vertically or horizontally so shapes like an L or a Z are encouraged.
- Once they have cut up their calendar, students give their pieces to a partner to reassemble. Look to students to attend to the progression of days at the top of the calendar, the maximum of seven days in each row, and the sequence of whole numbers to put the puzzle back together. Have the students glue their completed calendar into their mathematics book.
- With their calendar intact students can answer these questions:
How do we find out the date of the full moon from this calendar?
So when will the last quarter start?
When are the good days for fishing?
When will the new moon appear?
So when does the New Year start? - Tell the students that, in honour of Matariki, they are going fishing. If the day is not a good fishing day, wish them luck. If it is a good day for fishing, say you are expecting a lot of success. The fishing game can be played in two ways:
- Cut the fish out (see Copymaster 2) and attach a paper clip to each fish. Make a fishing rod using a stick, a piece of string and a magnet (magnetic strip is a relatively cheap way to do this). Students capture a fish by getting it to stick to the magnet.
- Cut out the fish cards and turn them upside down. Players take turns to choose a fish.
- The game can be played in pairs or threes. The object of the game is for each player to gather fish that add to 100. They do that as often as they can. At any time players can trade fish with each other to make 100.
- Once the students have played the game on Copymaster 2, gather the class to share another legend. Māui was known as a trickster. It was Matariki, the New Year, and it was very cold outside. Māui’s brothers were getting bored (again) so he decided to play a trick on them. He made up the second set of fishing cards (see page 2 of Copymaster 2). The brothers tried for a long time to make 100 with the fish. They could not. Can you?
- Let the students try the second fishing game to see if they can do better than Māui’s brothers. It is actually impossible to make 100 with the cards but see if your students can figure out why. They may need to take the game home to their whānau to see if anyone can explain how Māui’s clever trick works. All of the numbers on the fish are answers to the nine times table so the totals must always be in the nine times table (multiples of nine). 100 is not a multiple of nine.
Session Three
Matariki is a time of cultural pursuits and feasting to celebrate the New Year ahead. The hāngī or earth oven has particular significance at the time of the new moon after the rise of Matariki in the eastern pre-dawn sky. Matariki is the star at the bow of Te Waka o Rangi and her travels around the sky for eleven months of the year are exhausting. It is said the steam of the first hāngī in the New Year rises into the sky and replenishes the strength of Matariki. From the offerings she gathers strength to lead the giant canoe for another year. Without Matariki at the bow the canoe cannot travel and Taramainuku cannot cast his net to gather the souls of the departed. At the New Year the names of the dead are called out so the souls of the departed may be cast into the heavens as stars.
There are many resources already available about hāngī.
“Preparing for the hāngī” is a Level 3 activity from the Figure It Out series.
“Hanging out for hāngī” is a unit at Level 3 that develops a statistical investigation around deciding which foods to cook.
The notes below are an adaptation more suitable for Level 2 students.
- Tell your students about the types of food that are usually cooked in a hāngī. Chicken, pork and lamb are the most common meats used and the vegetables tend to be root crops like kūmara, potato and pumpkin. Stuffing is also popular. Before your class can plan the hāngī you will need to find out what people like to eat.
- Your investigation question is “What hāngī foods do people in our class like to eat?”
- Copymaster 3 has a photocopy sheet of ‘choice squares’. Put a container such as a shoebox or 2L plastic ice-cream container in the centre of the room. That is where the data will be placed. Show the students the first page of the Copymaster.
- Ask: If you want to eat any of these foods at our hāngī you need to cut out that square and put it into the box. Should there be some restrictions on what you can eat?
Students might mention that people should not eat every meat and every vegetable. Agree on some restrictions like one or two meats and up to three vegetables. Point out that stuffing is a yes or no choice. - Explain that the data will be used to order the food. “If someone chooses two meats while another person chooses only one meat, how will we deal with that?” Students might suggest that a person choosing two meats can put in one half of each square while a person choosing one meat might put in the whole square.
- Give the students time to make their choices and put the squares of the food they choose into the container. It is important that they cut out squares rather than the food within the squares as scale is important for possible data displays. Once you have brought the class together in a circle on the mat, empty the container of squares.
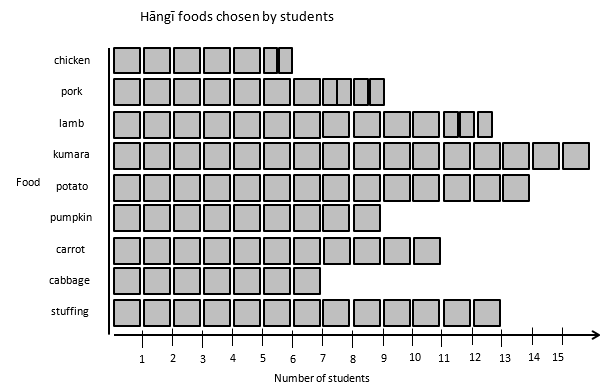
- Ask: How might we organise these data so we can order food for the hāngī?
- Students should suggest putting the squares into categories so get a few students to sort the data into piles. Ask, “How might we show the data so the number of squares for each food is easier to see?” After some discussion you should end up with a picture graph made with the squares. Managing the half squares should provoke a discussion about how large fractions such as five halves are. You might glue the squares in place on a large sheet of paper and add labels and scale to the axes. The graph might also be given a title. If relevant, you could use a digital graphing tool (e.g. Microsoft Excel, Google Sheets) to create a spreadsheet and bar graph.
- Once the data display is complete, put the students into small groups to discuss “How might we use this data to order food for the hāngī?” After a suitable time, gather the class to share ideas. Expect students to consider the idea of a portion, that is how much of a food is reasonable as part of a meal. For example, one pumpkin is too much for a single portion so a fraction such as one eighth or one tenth is more sensible.
- Share the information about meat (see PowerPoint slide 13) for a poster about this information). The poster has some questions for the children to consider. Have a set of kitchen scales available to identify objects around the room that weigh the same as a lamb chop or a size 14 chicken. You might use the scales to count in lots of 100 grams to find out how many portions are in one kilogram of meat.
- Ask the students to work with a partner to decide how much of each food to buy. Look for them to consider the data on preferences you have collected, the information about portions of meat and their estimates of how much of each vegetable is required for each portion. You may decide to pool the data across several classes to make the task more challenging and avoid having a lot of pork left over! The students should produce a shopping list with clear working about how they decided on each amount.
- Share the shopping lists and agree on suitable amounts of each food. The amounts of vegetables are likely to be expressed as numbers of whole vegetables, e.g. two pumpkins, which will add interest to the next part of the lesson – working out the cost per person. Copymaster 3 has a fictitious flyer from the local butcher and fruit and vegetable shop so that the students can create a budget for the hāngī food (see also Slide 13 of the PowerPoint). Allow students to use a calculator if they need to. Some may like to use a spreadsheet to keep track of their budget. Students will need to convert from numbers of vegetables into kilograms by estimating. For example, four or five good sized potatoes weigh 1 kilogram. Students may realise that they need a recipe for stuffing so they can calculate how much bread to order. Let them search for a stuffing recipe. Onions are an important ingredient in stuffing.
- The final part of the budget is to work out a cost per person. This is a sharing context. The total cost, say $75, is divided equally among all the people in the class. Look for students to realise that the operation needed is division. You may need to link to simpler sharing problems so they connect the equal sharing to division and can write an equation for the solution, e.g. 75 ÷ 25 = 3. Talk about the meaning of the numbers in the equation, e.g. 3 represents $3 per person.
Session Four
Matariki was a time when food was already stored, and it was cold outside. So whānau (families) spent time together engaging in cultural pursuits such as storytelling, arts and games. Whai (string games) were popular with tamariki (children) and adults alike, especially when they involved co-operation. Whai has a long history and is common to many indigenous cultures around the world, including the indigenous tribes of North America. Traditionally whai was played with twine made from flax. The best man-made fibre to use for whai is nylon since it slides and flexes, and is soft on your hands. It is commonly used to form lines for brickwork so is available at most hardware stores in a variety of colours. Nylon string is usually available in craft shops.
- Ask your students to make a tau waru (number 8) loop by wrapping the string loosely around their palms eight times, cutting the string, knotting it with minimal wastage, and trimming any loose ends.
- Whai relies on algorithms that are standard procedures. Algorithms are an important part of mathematics. Processes that initially take some time to master become standardised routines. The more complicated whai rely on the some basic moves being well known by the maker. That is where you should start with your students.
- Dasha Emery has created an excellent series of videos that give clear instructions about making well known whai. A good first move for students to learn is called “Opening A” which is a standard algorithm. This opening is the start of many whai, particularly those that end in diamond shapes. Play the video at the link below which talks students through Opening A. Dasha refers to this pattern as kotahi taimana (one diamond). Let students practise the opening until they have it mastered:
- Kotahi taimana - One diamond (YouTube)
- Next follow the instructions in this video to create te kapu me te hoeha (cup and saucer):
- Cup and saucer (YouTube)
At 1:08 it is easier to think of going over two strings and ‘picking up the third string’ in that move. Note that the move where you use your mouth to shift the bottom of two strings over your thumbs (2:00 - ) is called ‘Navajoing your thumbs’ and is another algorithm common in whai.
- Cup and saucer (YouTube)
- The next whai your students might make is ngā taimana e rua (two diamonds) which builds on Opening A. Tell your students to make the standard opening before the video starts. Alert them that somewhere in the video they will need to Navajo their thumbs. Work through the video, with students supporting each other to create the ngā taimana e rua pattern. Alternatively give the students copies of Copymaster 4 that has the instructions in graphic form. The written form will be much harder to interpret.
- Put the students into small groups of about three or four. Provide them with opportunity to become class experts in a particular whai pattern. Their job will be to teach the rest of the class how to make that pattern. Another YouTube chanel with many examples of string patterns is available at the link below:
- Once your students have practised their whai in small groups invite them to teach others how to make their pattern. You could do this as a whole class or create expert-novice pairs.
- For an interesting geometry challenge consider looking for different shapes within a whai pattern. For example the gate pattern looks like this
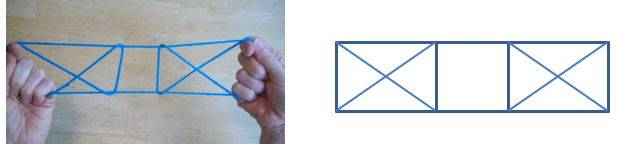
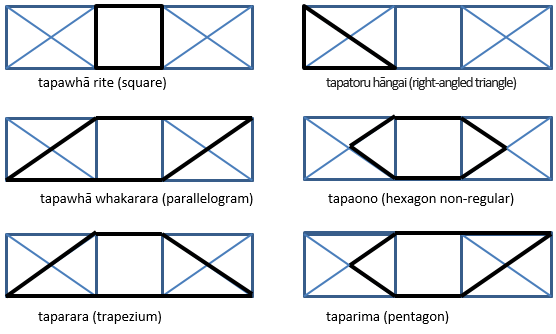
- Ask your students what shapes they can see in the figure. Here are a few possibilities:
- Some interesting points might arise such as:
- A three sided polygon is called a triangle, irrespective of the length of the sides, size of angles or orientation. The same is true of all five sided polygons being called pentagons and all six sided polygons being called hexagons.
- Non-regular means that all the sides and angles are not equal so a regular polygon, such as a square, must have equal sides and angles.
- The prefix ‘tapa’ means sides and the number name tells how many of those sides are in the shape, e.g. tapatoru means three sides (very helpful).
Session Five
In this session students learn to play the traditional Māori game Mū Tōrere which is like a form of draughts. The original game is sometimes referred to as the wheke (octopus) game or the whetū (star) game due to the shape of the board. It is appropriate that students learn to play the game at the time of Matariki, since the Māori New Year is a time of engaging in cultural pastimes. The board (see Copymaster 5) has been altered to include the nine or seven stars of Matariki, depending on the version of the game that is played. A digital version of this game is available online - search for “Mū Tōrere - HEIHEI Games”.
- Introduce the Mū Tōrere Ngāwari (easy) version first. The game is played in pairs with each player needing three counters for the easy game and four counters for the original game. Their counters should be of one colour. The rules are included on the game boards.
- Let the students explore the easy game in pairs. Tell them that they need to record the winning position if one of them wins. Using black and grey for the counter colours can help to identify the arrangements that create wins. After they have played awhile bring the students together to share the winning positions. Create a set of diagrams. In these examples grey wins.
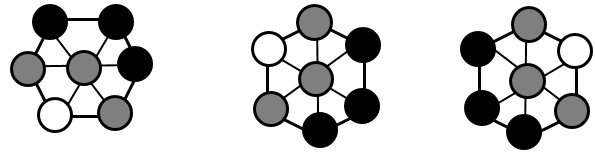
- While they may look different the winning arrangements are actually the same, and are just rotations or reflections of one another. That can be demonstrated by putting the patterns on cards and turning them.
- Ask: What must be true for a player to win in the easy game?
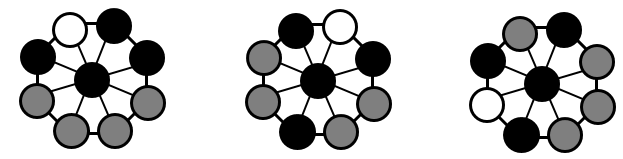
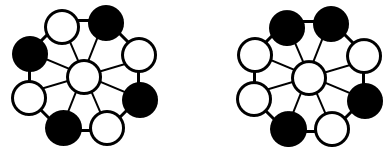
The winner must occupy the centre circle, the opponent’s stones must be clustered together around the hexagon and the winner must have the ends of the cluster blocked off. You might try to find a winning arrangement by separating the loser’s stones into a group of two and one but there is no way for the other player to stop them moving. - Transfer to the original game that has the same set of moves but more winning arrangements. Ask the students to create winning arrangements on their board prior to playing the game. Create a gallery so the students can look for similarities and differences. Here are winning positions for black. Notice how all four, three and one, and two and two configurations of grey can all result in a victory to black but the winner must always occupy the centre. Discuss the similarity of winning arrangements created by students as the diagrams are reflected or rotated.
- Is it possible to trap a player that has four ones, or a two and two ones (as shown below)? Try colouring in four circles grey to achieve a trap. It is not possible.
- Once winning positions have been analysed let the students play the game. Competitive games go for over thirty moves so tell your students to be patient and think ahead. An interesting idea is that players can always create a draw if they know what they are doing. Is that true?
Dear parents and whānau,
This week we are exploring some mathematical ideas with activities to celebrate Matariki, the Māori New Year. We will be learning the legend of Tamarereti and using that story to learn about numbers of bright stones. We will look at the phases of marama (the moon) to find the best days to go fishing in the New Year period, plan and cost a hāngī, and discover geometry in whai (string patterns). Lastly we will learn to play Mū Tōrere, a traditional Māori game that takes a lot of strategy to win.
These activities involve number, algebra, geometry, measurement and statistics so we will be very busy and doing a lot of mathematical thinking.