The purpose of this activity is to engage students in relating two dimensional projections to a three dimensional perspective in the context of a scale and unit conversion measurement problem.
This activity assumes the students have experience in the following areas:
- Multiply and divide numbers by 10, 100 and 1000.
- Convert between metric units of length, especially between metres and centimetres.
- Create 2-dimensional drawings of 3-dimensional objects.
- Create scale models from drawings.
The problem is sufficiently open ended to allow the students freedom of choice in their approach. It may be scaffolded with guidance that leads to a solution, and/or the students might be given the opportunity to solve the problem independently.
The example responses at the end of the resource give an indication of the kind of response to expect from students who approach the problem in particular ways.
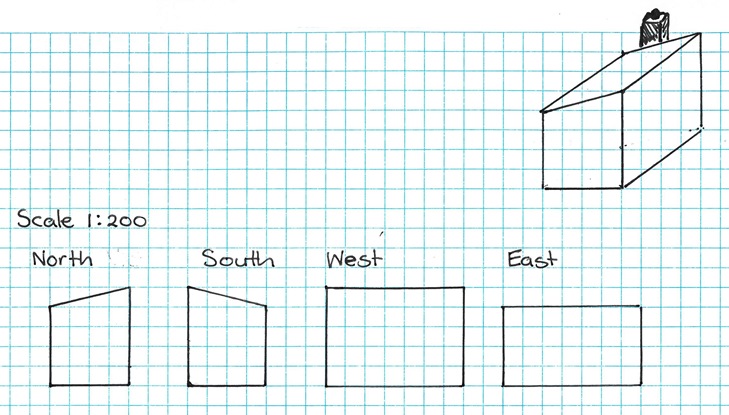
A hut is to be built with a single pitch roof. The plans below show the main structure of the hut, but needs a chimney to be added with the following specifications.
- The top of the chimney must be 500 mm above the top of the roof.
- The chimney will be attached to the centre of the outside of the South wall.
- The base of the chimney is to be 1m wide by 50 cm deep.
Draw the chimney on the plans.
Note: Each of the squares on the paper are 5 mm x 5 mm.
The following prompts illustrate how this activity can be structured around the phases of the Mathematics Investigation Cycle.
Make sense
Introduce the problem. Allow students time to read it and discuss in pairs or small groups.
- Do I understand the situation and the words? (Students may need support to understand the meaning of the scale 1:200, and how the various 2-dimensional drawings relate to one another.)
- What are the important conditions for location of the chimney? Where will the chimney be in each drawing? Which part of the chimney will be visible?
- Does this look/sound like a problem I have worked on before? (Students should relate the task to drawings of other objects, such as cube structures.)
- What information has been given?
- Is there anything missing? (Location of the chimney on each view requires inference from the conditions provided and the view diagrams.)
- What will the solution look like? (The chimney will be visible in each view, including the perspective drawing.)
Plan approach
Discuss ideas about how to solve the problem. Emphasise that, in the planning phase, you want students to say how they would solve the problem, not to actually solve it.
- What do I need to know to get started?
- Can I build a 3-dimensional model of the hut to help me? What materials would be helpful? (Modelling clay or plasticine.)
- What strategies can I use to get started? (Starting with one view first then progressing to the others is a useful strategy.)
- Which view should I try to get right first? Why choose that view?
Take action
Allow students time to work through their strategy and find a solution to the problem.
- Have I worked in a systematic step-by-step way? Have I got the scale correct and used the 5mm squares to make the chimney the correct size?
- How can I check that the drawings I have made are correct? Should I compare my drawings to those of other students? How can I check my drawings using the model I made?
- How could I make sure that I haven’t missed anything?
- Does my solution make sense? Does it match my visual image of the hut?
- Does my solution answer the question? Is the chimney visible in all drawings? Should it be?
Convince yourself and others
Allow students time to check their answers and then either have them pair share with other groups or ask for volunteers to share their solution with the class.
- What is the solution?
- Is my drawing clear for someone else to follow?
- How would I convince someone else I am correct? (The model might be useful.)
- What have I learned about solving problems like this?
- What could I try differently next time?
- Is there some mathematics that I need to learn from this task?
Examples of work
Work sample 1
The student makes the specified changes to two dimensional plans, consistent with the three dimensional perspective and the measurements given in a range of units.
Click on the image to enlarge it. Click again to close. 
Work sample 2
The student makes the specified changes to two dimensional plans, consistent with the three dimensional perspective and the measurements given in a range of units.
Click on the image to enlarge it. Click again to close. 