This is a level 2 link geometry activity from the Figure It Out series.
Click on the image to enlarge it. Click again to close. Download PDF (637 KB)
give instructions using distance and direction
classmate
something that can be used as unit of length (not ruler or tape measure
cardboard for tokens
In this activity, students create an orienteering course using their own units of length and quarter and half turns in the place of compass directions. They don’t need much equipment and don’t have to make any fancy measurements or calculations, but they do need to understand how the activity works and rigorously standardise their turns and lengths.
Play a quick game of “Simon Says” to practise turns, make sure that everyone knows their right from their left, and sort out clockwise and anticlockwise. Then give the group a series of oral instructions to follow, either by stepping them out or by moving a small plastic animal on the carpet. Get the students to give instructions to a classmate to step out the shape of the letter H or E. (Write the letter and show the callers secretly so their classmate has to guess the letter from the instructions.)
Make sure that the students are not too ambitious with the courses they set out. If the activity goes very well and they want to do it again, they can be more ambitious the second time.
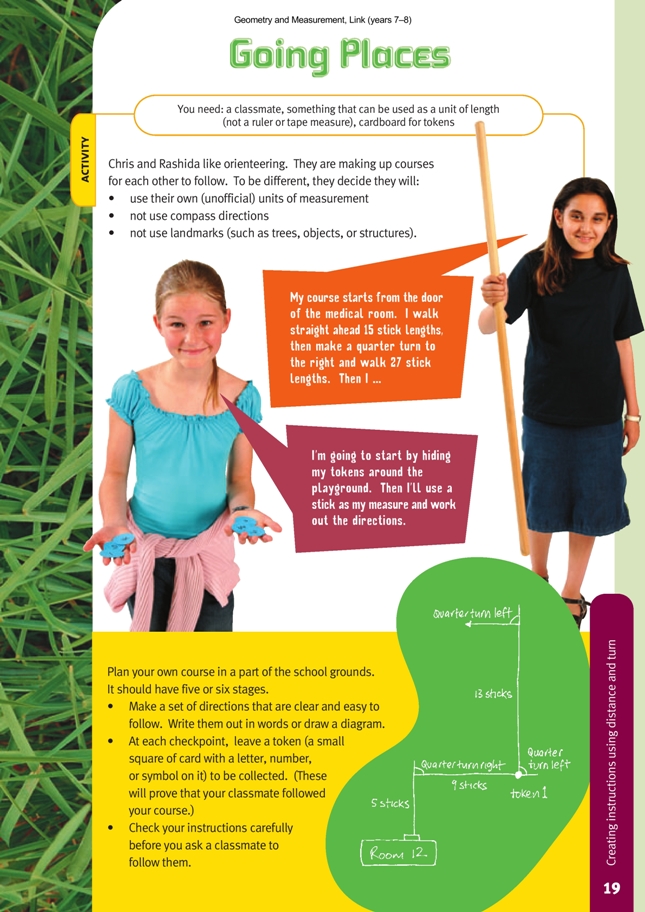
A course is divided into stages. A stage is a set of moves that lead to a token. It is suggested that a course have about 5 or 6 stages. Instructions can be in the form of a simple (not-to-scale) diagram like the one in the student book or written, for example:
1. Start on the steps of the medical room. Go forward 5 sticks, make a right turn, go forward 9 sticks. Find token 1.
2. Make a left turn. Go forward 13 sticks. Make a left turn. Go forward 20 sticks. Find token 2.
The tokens are an important part of the activity. They give the student doing the course confirmation that they are on the right track and ready to begin the next stage, and they prove to the person who set the course that their classmate successfully navigated it.
If you are working with a whole class, the logistics of this activity will be simplified if you pair the students up and then send one person from each pair off to lay their course. When the courses are laid, the others take their instructions and go off to navigate them while the setters remain in the classroom. As the courses are navigated, students return to the classroom with their tokens and report to the classmate who set their course. When everyone has returned, discuss what the difficulties were, talk about how they were overcome, and collect advice for next time. Next time, reverse the roles for each pair of students.
Before the students set out to navigate their course, emphasise that in this activity, direction is always defined by comparing it to the previous direction. (North, south, east, and west play no part.) When they stop to locate a token, they must take care to remember exactly which direction they were facing before they stopped.
A variation on this activity is to turn the tokens into clues. When a student sets out on a course, they are only given instructions for the first stage. When they locate the token, it will have the instructions for the next stage written on it.
Extension
Logo is a computer program designed for students. Using instructions exactly like those in this activity, they can guide the “turtle” (cursor) around, tracing a path as it goes. Logo instructions look like this: REPEAT 4[FORWARD 120 RIGHT 90]. Acting on these instructions, the turtle will take 120 steps forward, follow this by a right turn, and repeat both the actions that are inside the square brackets a further 3 times. The result is a square with sides 120 turtle steps long. Using Logo, students learn to be precise about their instructions at the same time as they create complex figures and designs on the screen.
Answers to Activity
Practical activity